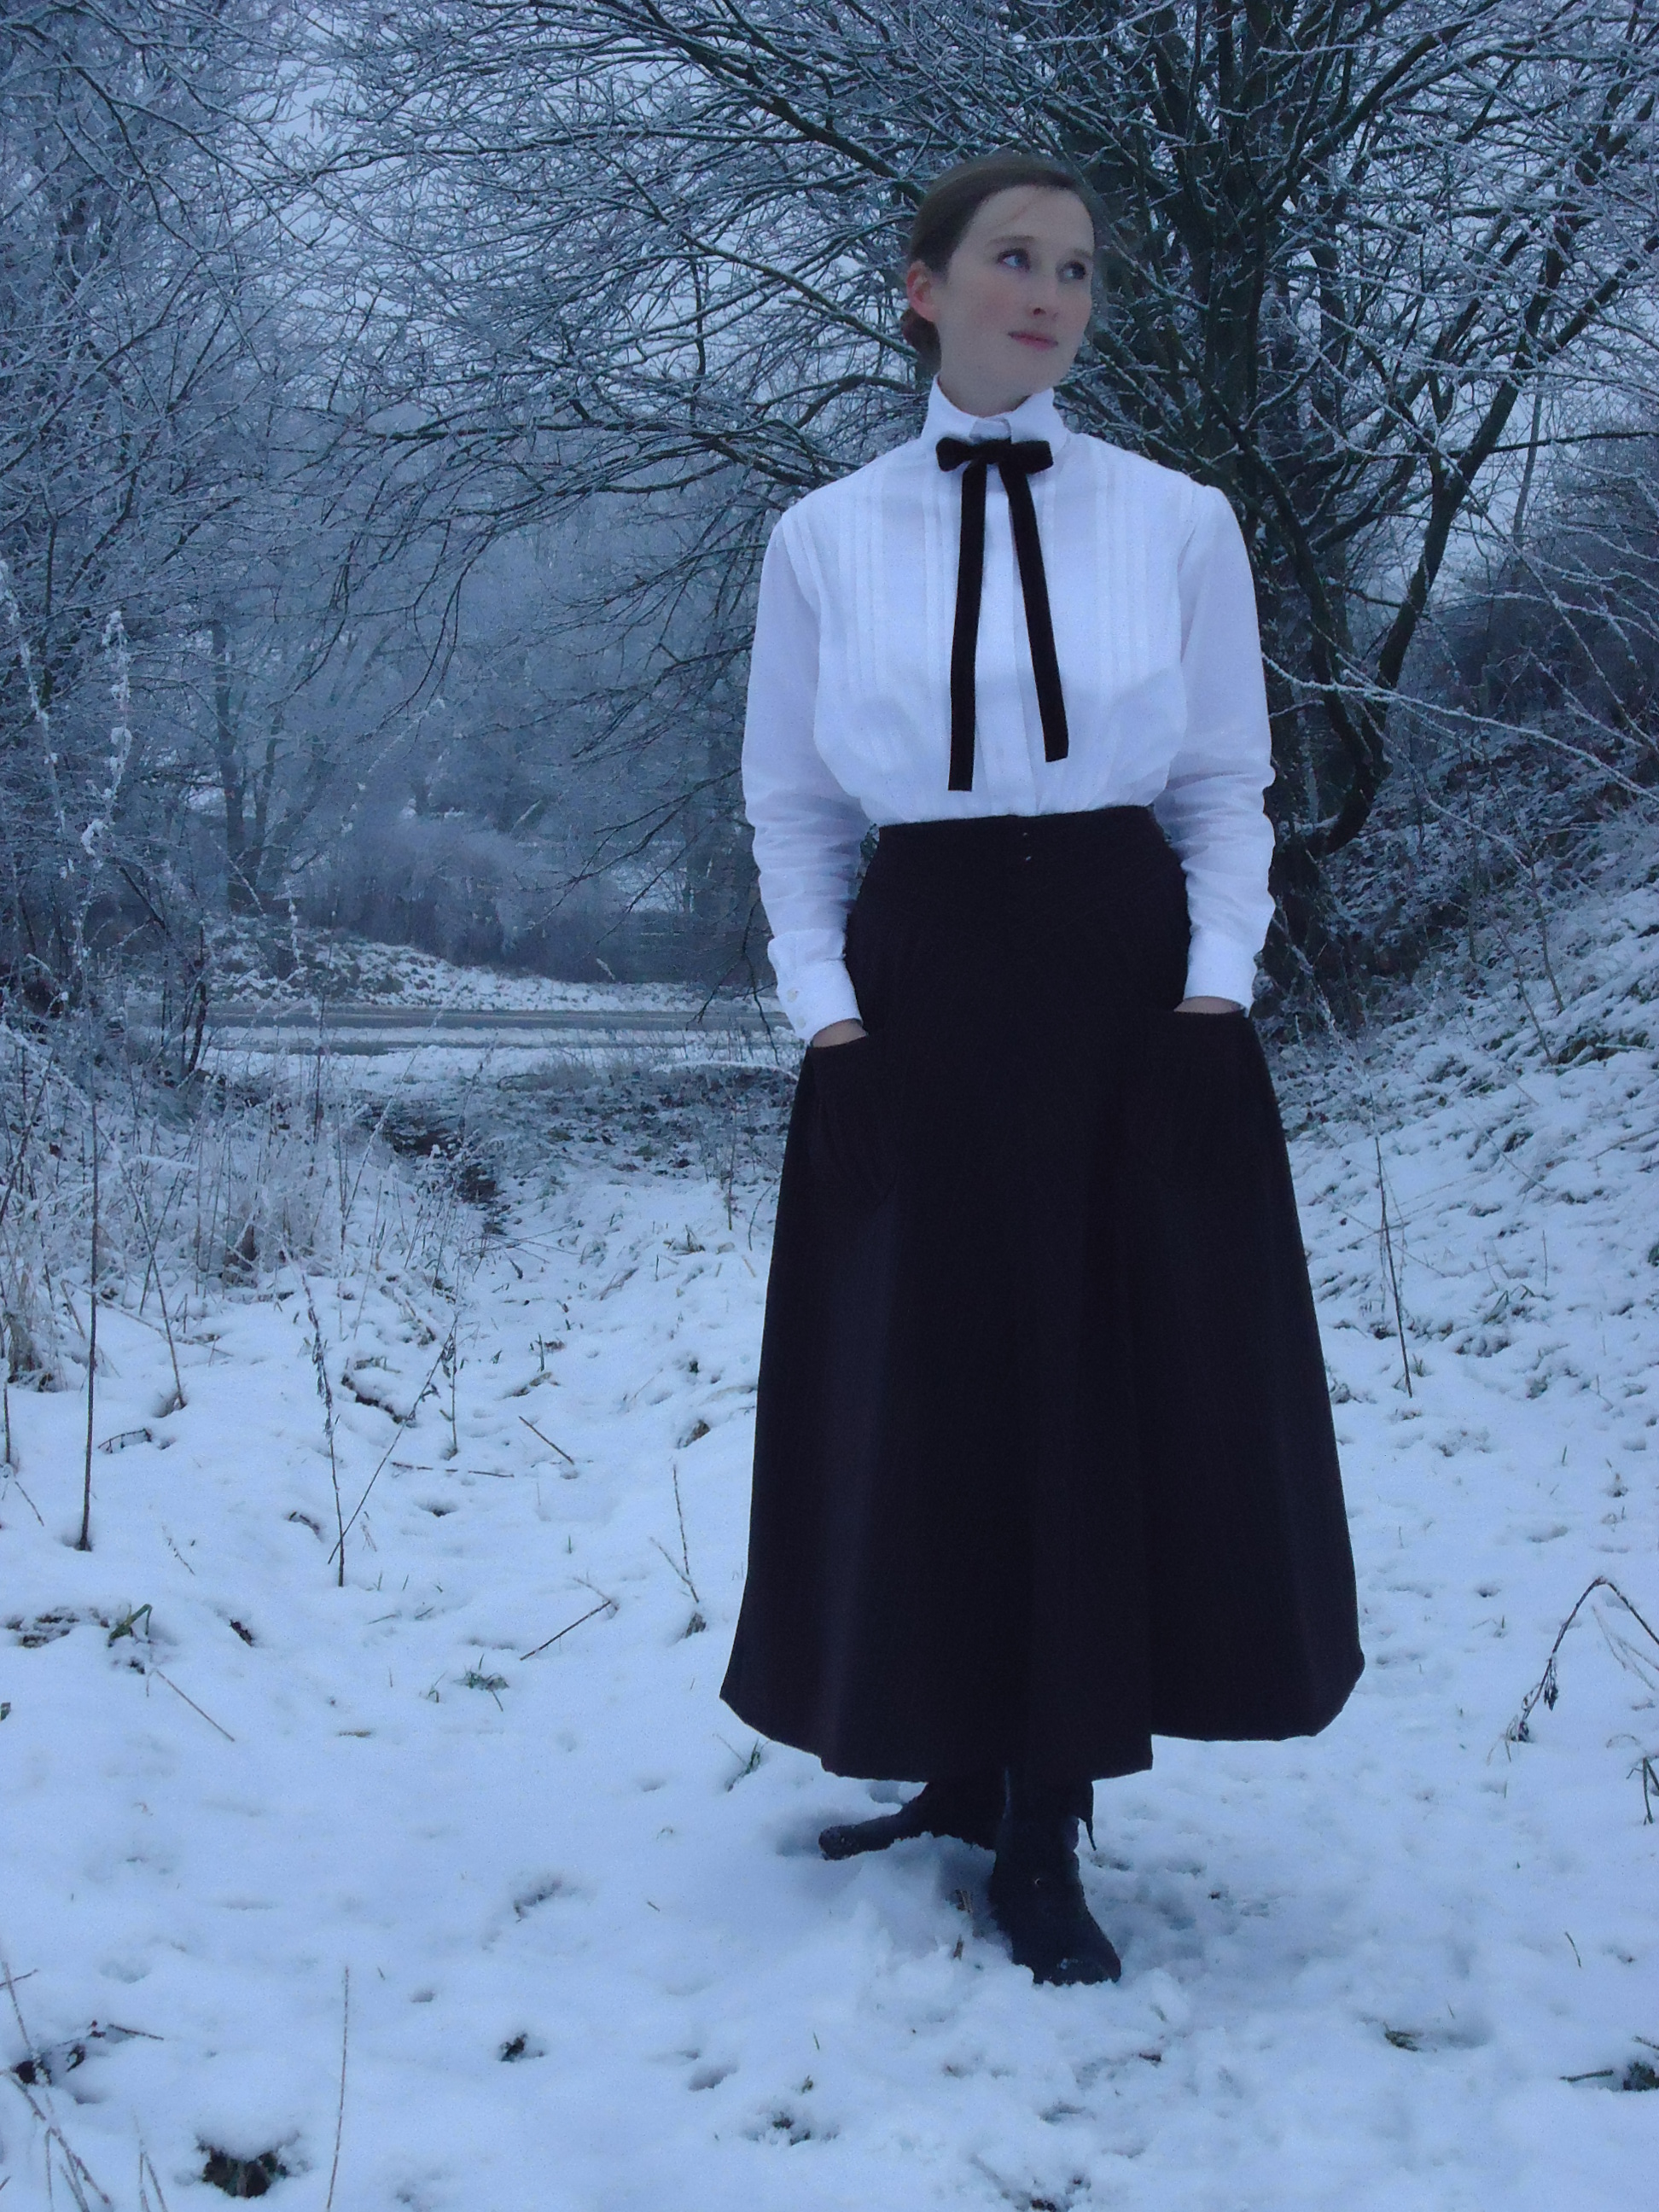
My father does not care about clothes. This high quality shirt, made of fine Egyptian cotton, was damaged while carrying wood. It felt wrong to just throw it away. I thought about just using the unstained parts, but then only the back and the collar remained, so the shirt has been lying in my stash for one year now, awaiting the serendipity.
Pappa bryr sig inte om kläder. Denna fina skjorta, i fin egyptisk bomull, blev sönderriven och nerfläckad när han bar ved. Det kändes fel att slänga så fint tyg. Jag hade tänkt behålla de oskadda delarna, men vid närmare granskning visade sig endast ryggen och kragen ha klarat sig. Därför har skjortan legat undangömd i väntan på en uppenbarelse.
I often wore my historical clothing at home before becoming a mother. Now I have hardly worn anything historical for two years for fear of having it stained or torn and because of the impracticality (it is quite hard to crawl around on the floor and under furniture, wearing floor length skirts). One week ago the need for wearing something historical grew too great and I decided to wear Edwardian clothing for the Christmas dinner at work. Since I ended up sharing table with people who did not know about my interests, nobody understood that my strange hair and clothing was historical and I just felt awkward. I decided that it was time to make something historical that I could wear at home – practical for the sake of my son and nice looking for my sake. This was the perfect purpose for the damaged shirt!
Innan jag blev mamma hade jag ofta historiska kläder till vardags. Nu har jag nästan inte använt något historiskt på två år, dels i fruktan att kläderna ska förstöras och dels för att det är så opraktiskt (det är ganska krångligt att krypa runt på golvet i hellång kjol). Förra veckan blev abstinensen efter att ha historiska kläder för svår, så jag bestämde mig för att ha min edwardianska dräkt till julbordet på jobbet. Jag hamnade vid ett bord med folk som inte känner till detta udda intresse, så ingen fattade att kläderna och frisyren var historiska och jag kände mig bara dum och missanpassad. Jag bestämde mig för att sy något slitstarkt historiskt plagg som jag skulle kunna ha hemma istället. Detta var ju det perfekta användningsområdet för den redan förstörda skjortan!
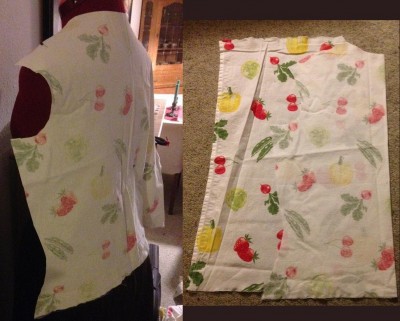
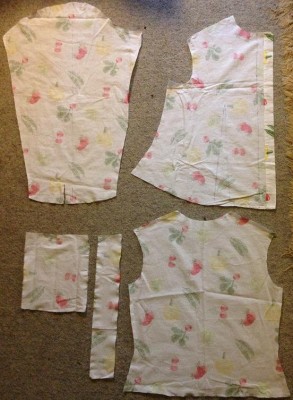
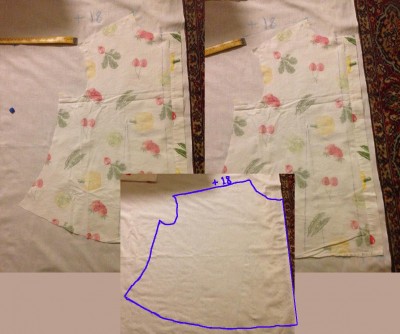
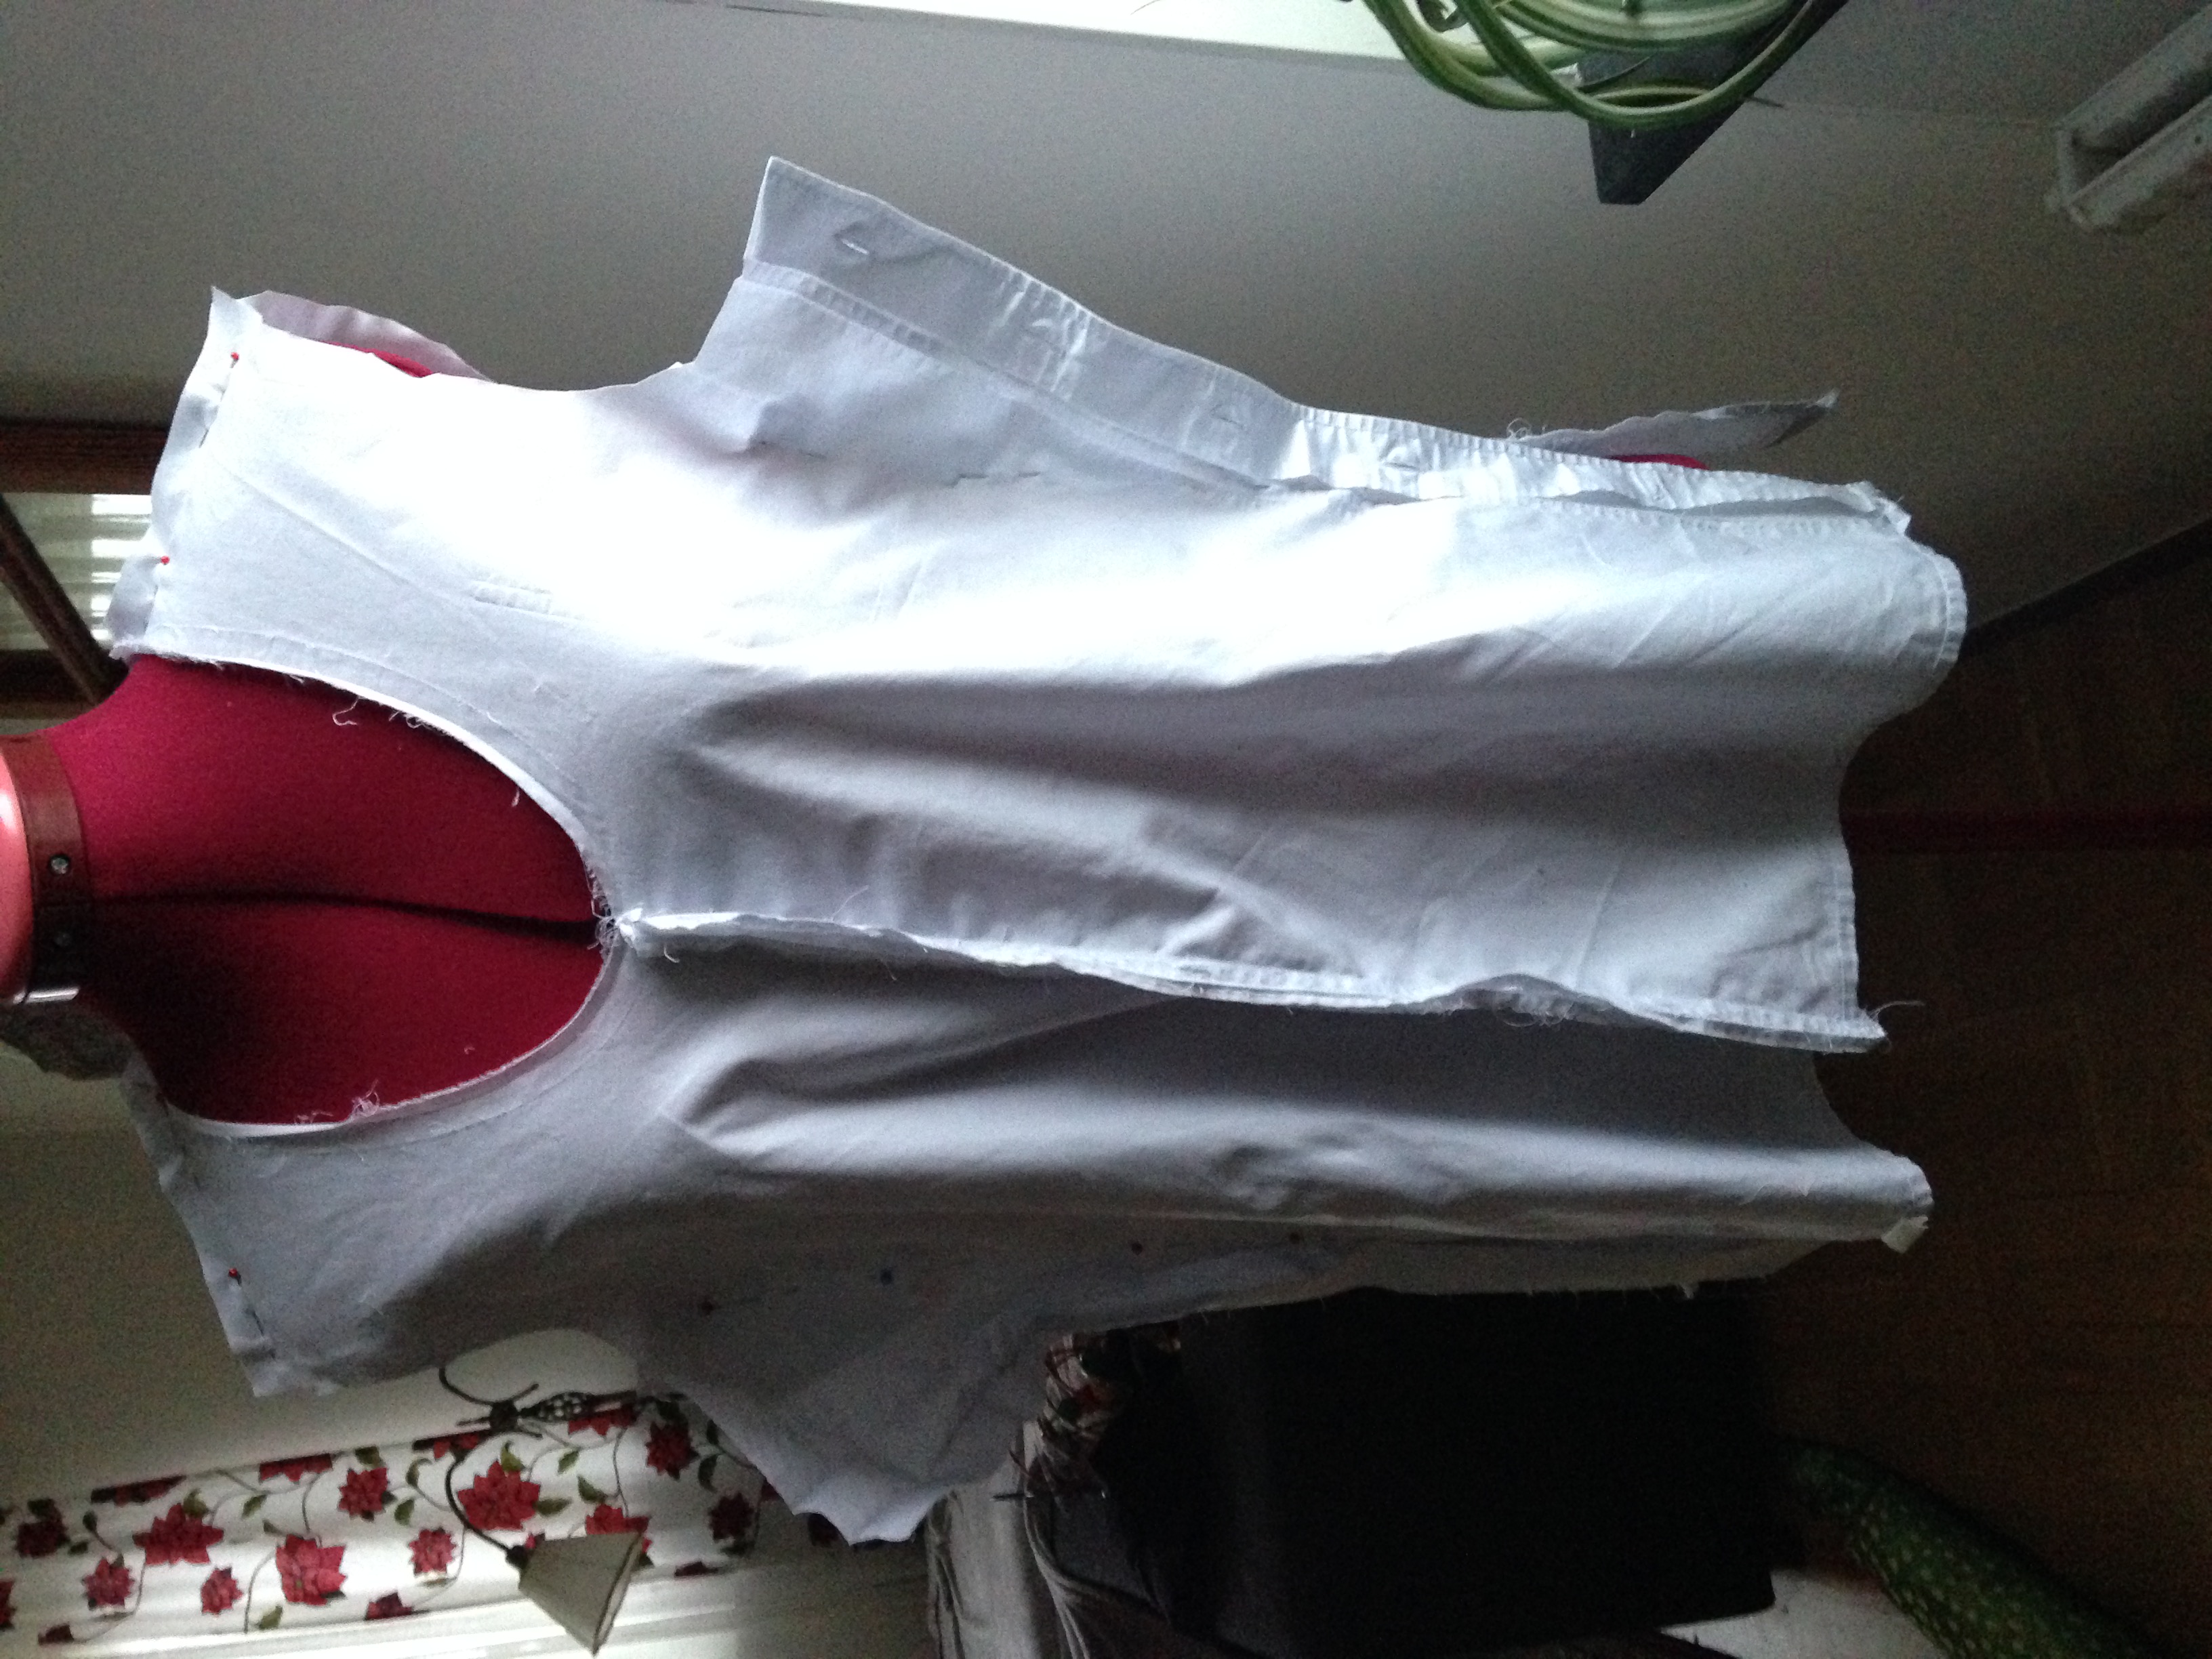
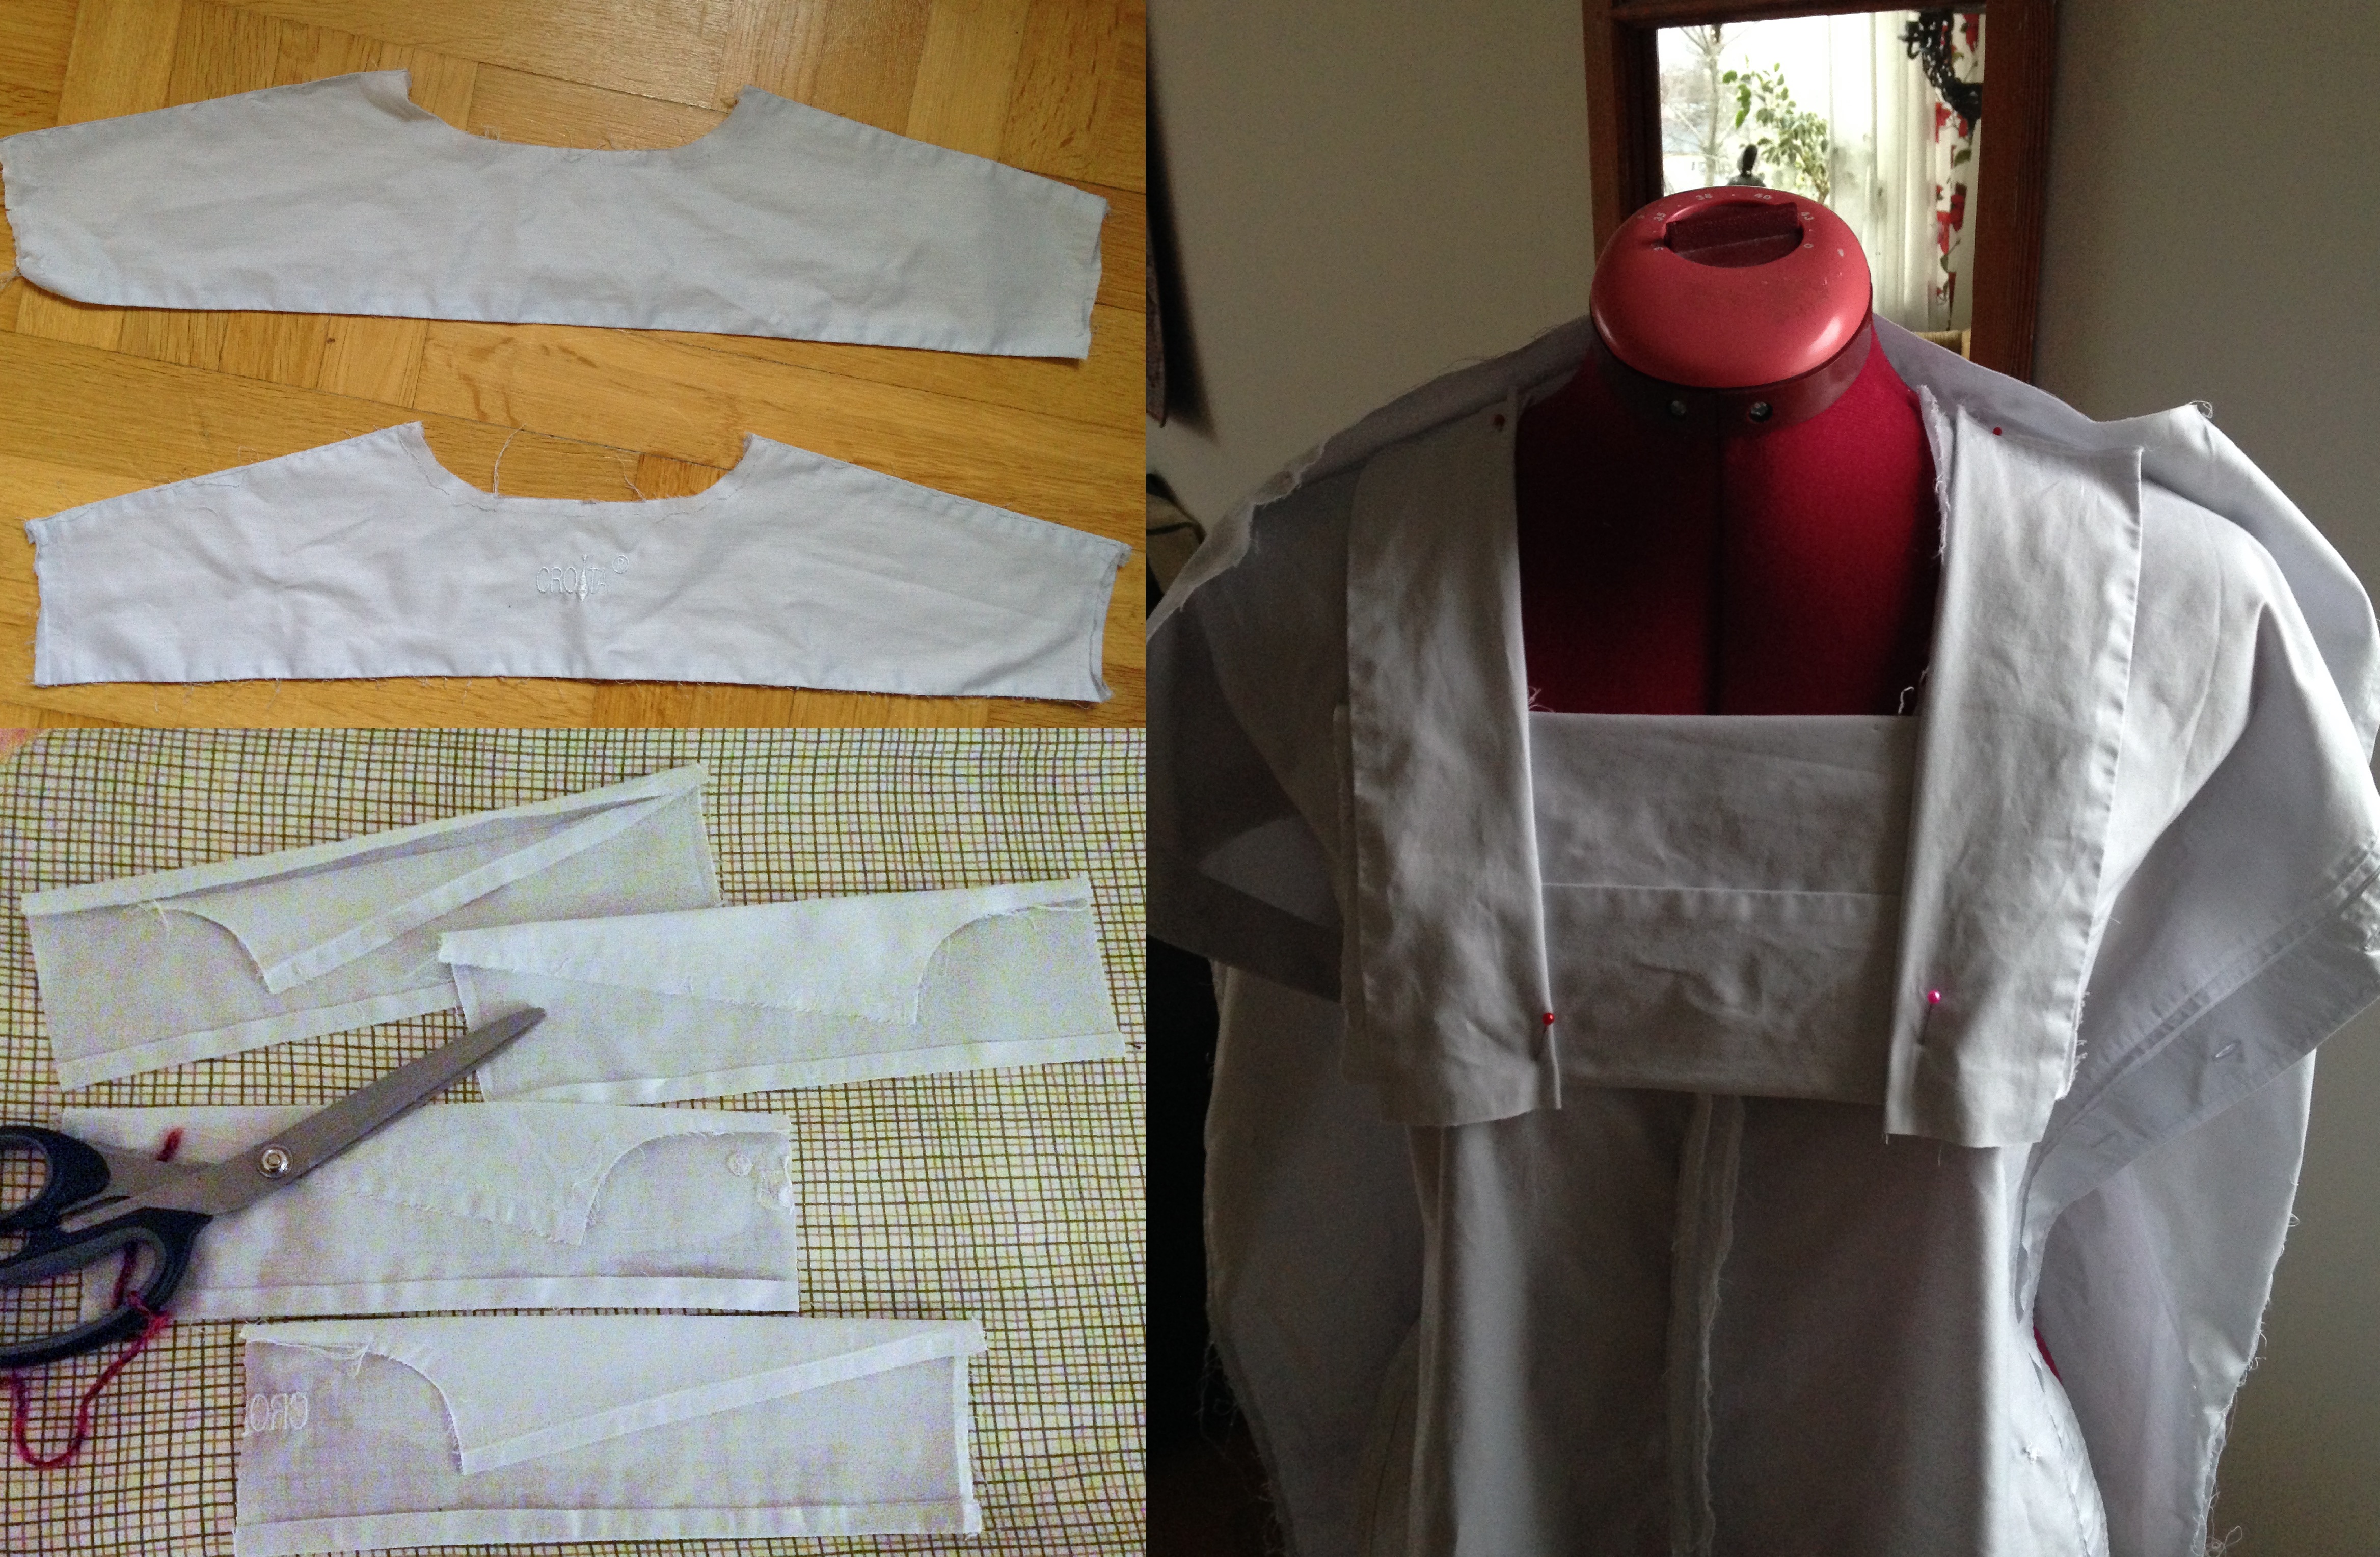
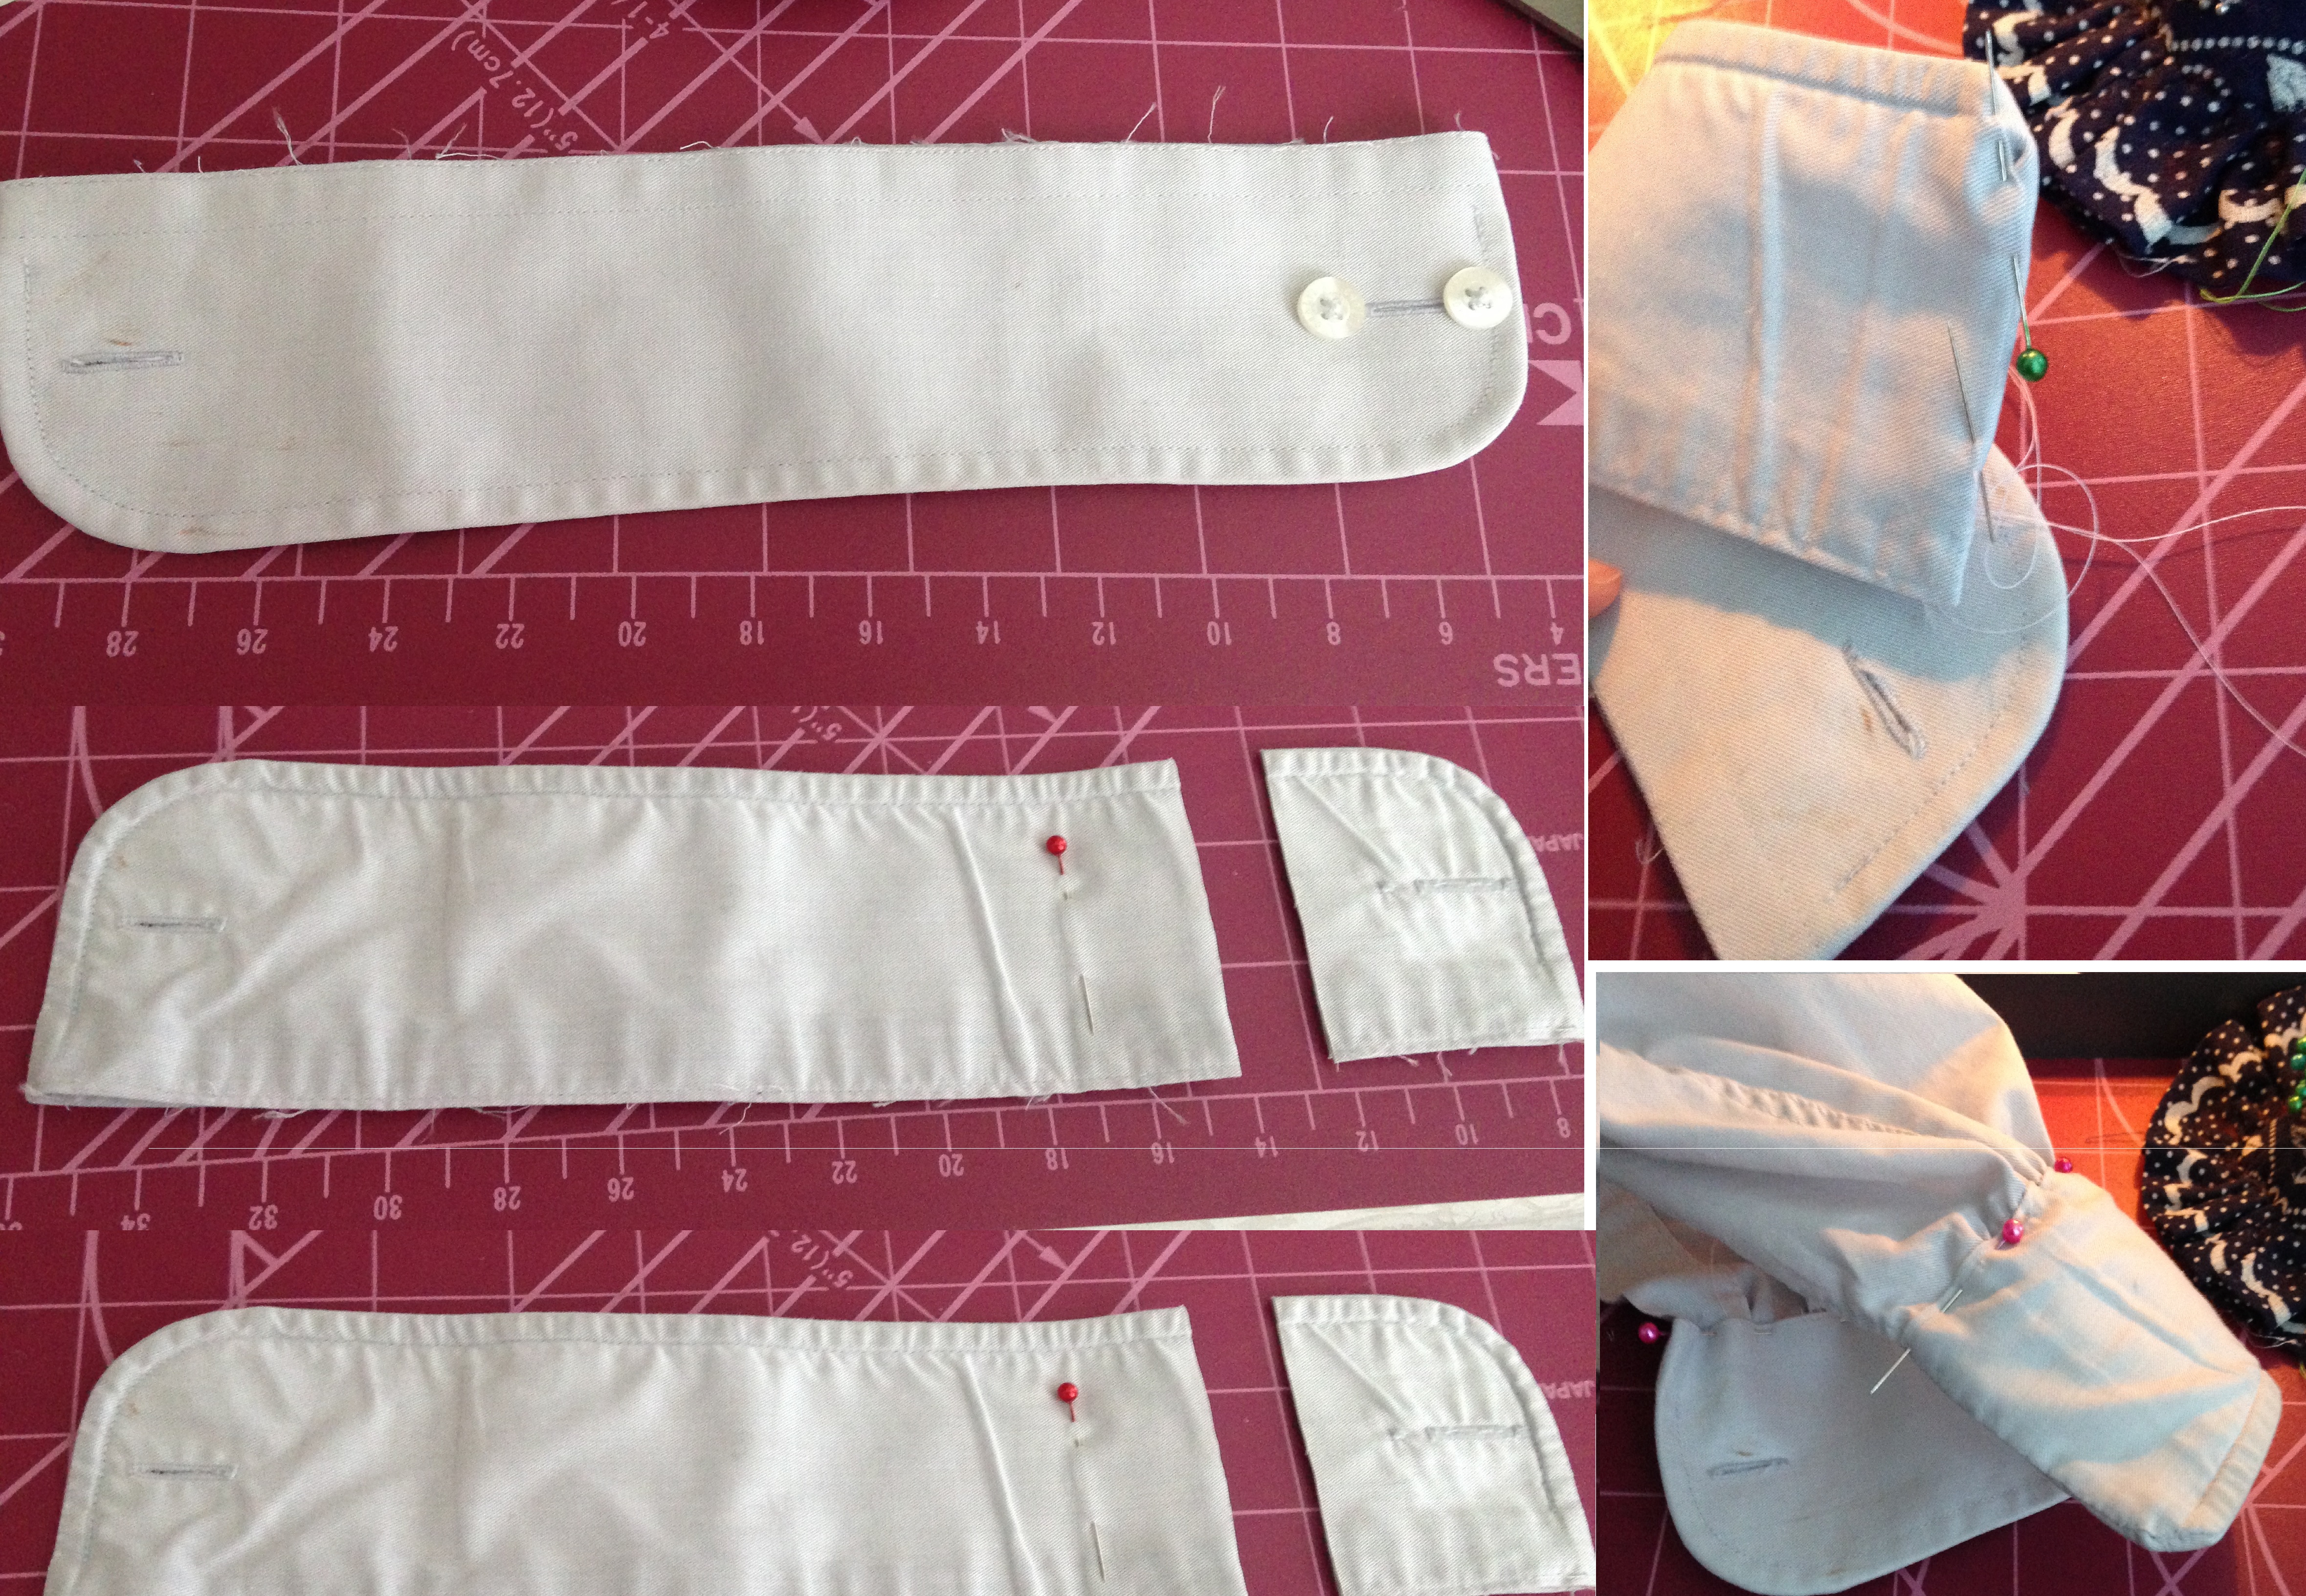
I decided to refurnish it – I took everything apart and switched sides for the front parts, so that the worst parts were placed at the sides, about the hight of the waistline. The front parts were sewn together and then the armholes made a deep neckline, that I needed to hide.
Jag sprättade isär alla delar och bytte plats på framstyckena, så att de värsta fläckarna hamnade i sidorna, nära midjan. Framstyckena syddes samman framtill. Ärmhålen bildade en djup urringning som behövde fyllas.
I used the pieces from the top of the back, to fill the neckline.
Jag använde delar från ryggens ovandel för att fylla igen urringningen.
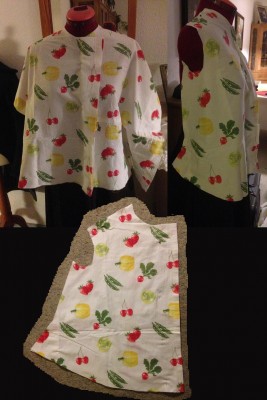
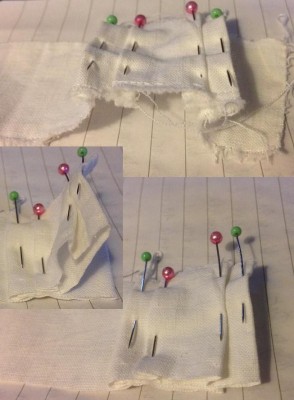
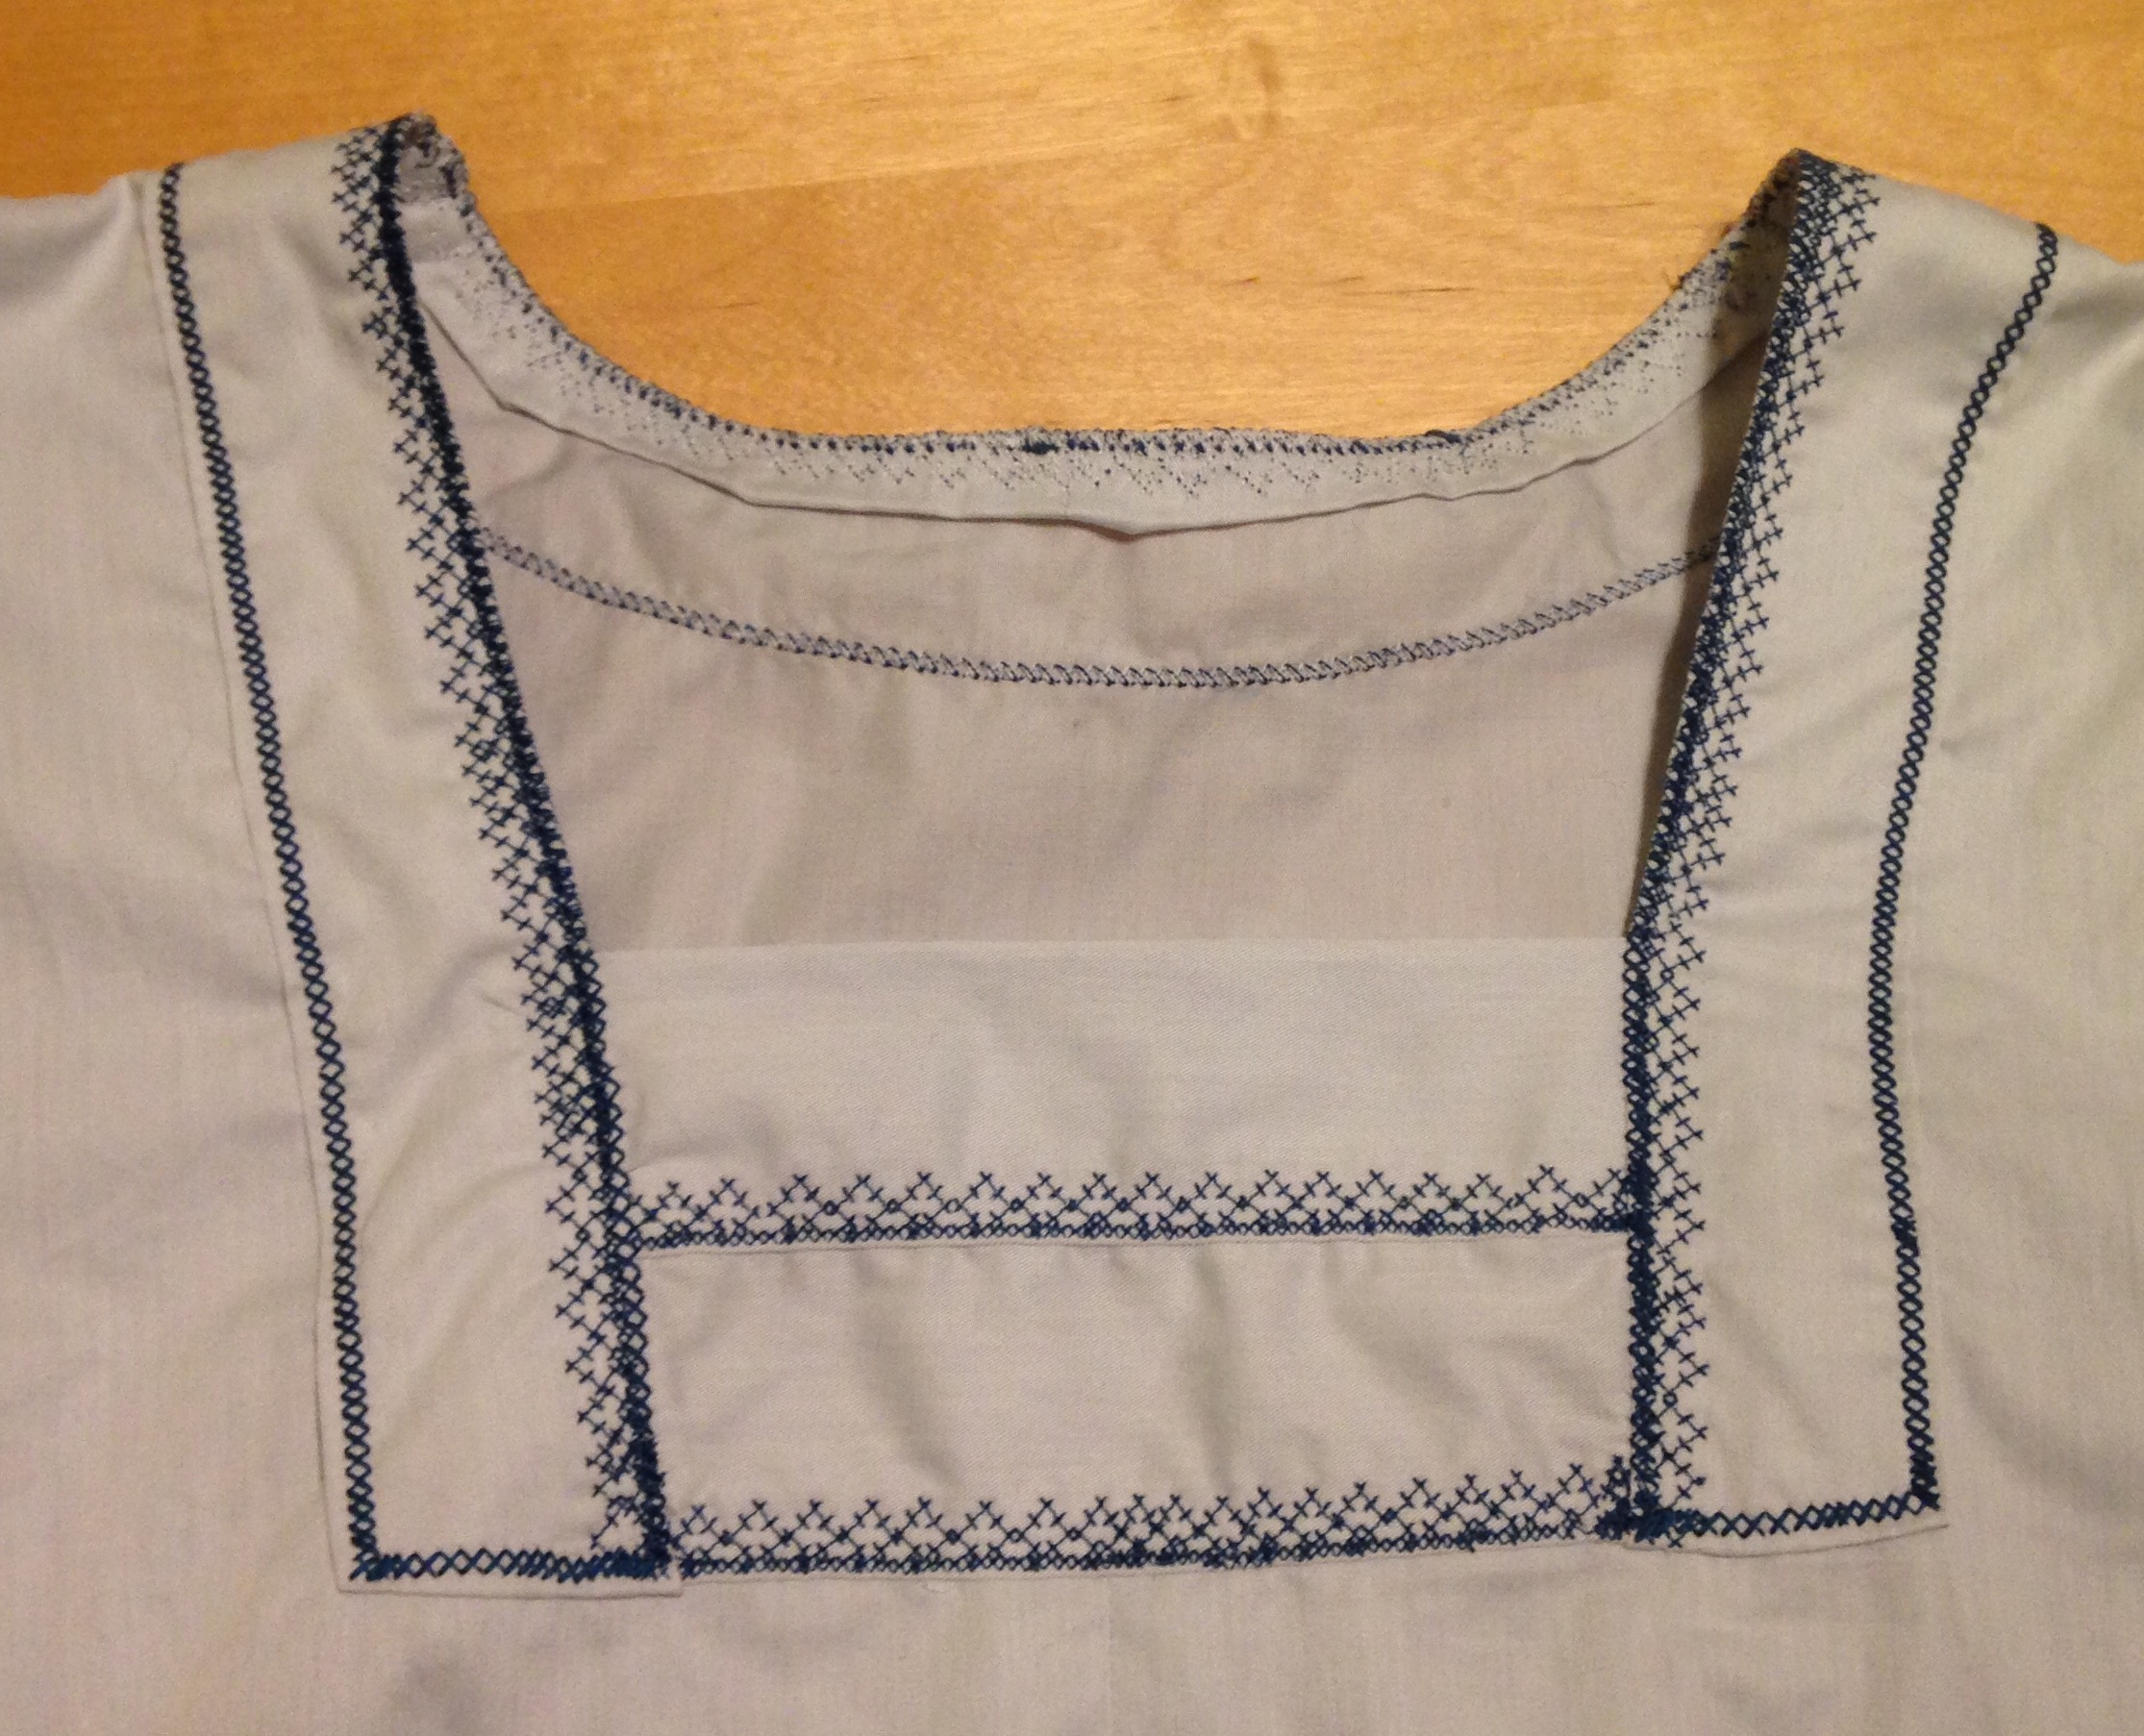
Since this blouse should not fit closely, I made straight seams in the sides and cut armholes. Then i started decorating the neckline with the help of my sewing machine. Because of the different layering along the neckline, the seams ended up very uneven, and I found myself masking my mistakes by adding more and more decorating seams.
Eftersom blusen inte ska smita åt runt kroppen, sydde jag bara raka sömmar i sidorna och klippte ärmhål. Sedan började jag dekorera runt urringningen med maskinsöm. På grund av alla olika lager blev sömmarna ojämna och jag la till fler och fler sömmar för att maskera tidigare fel.
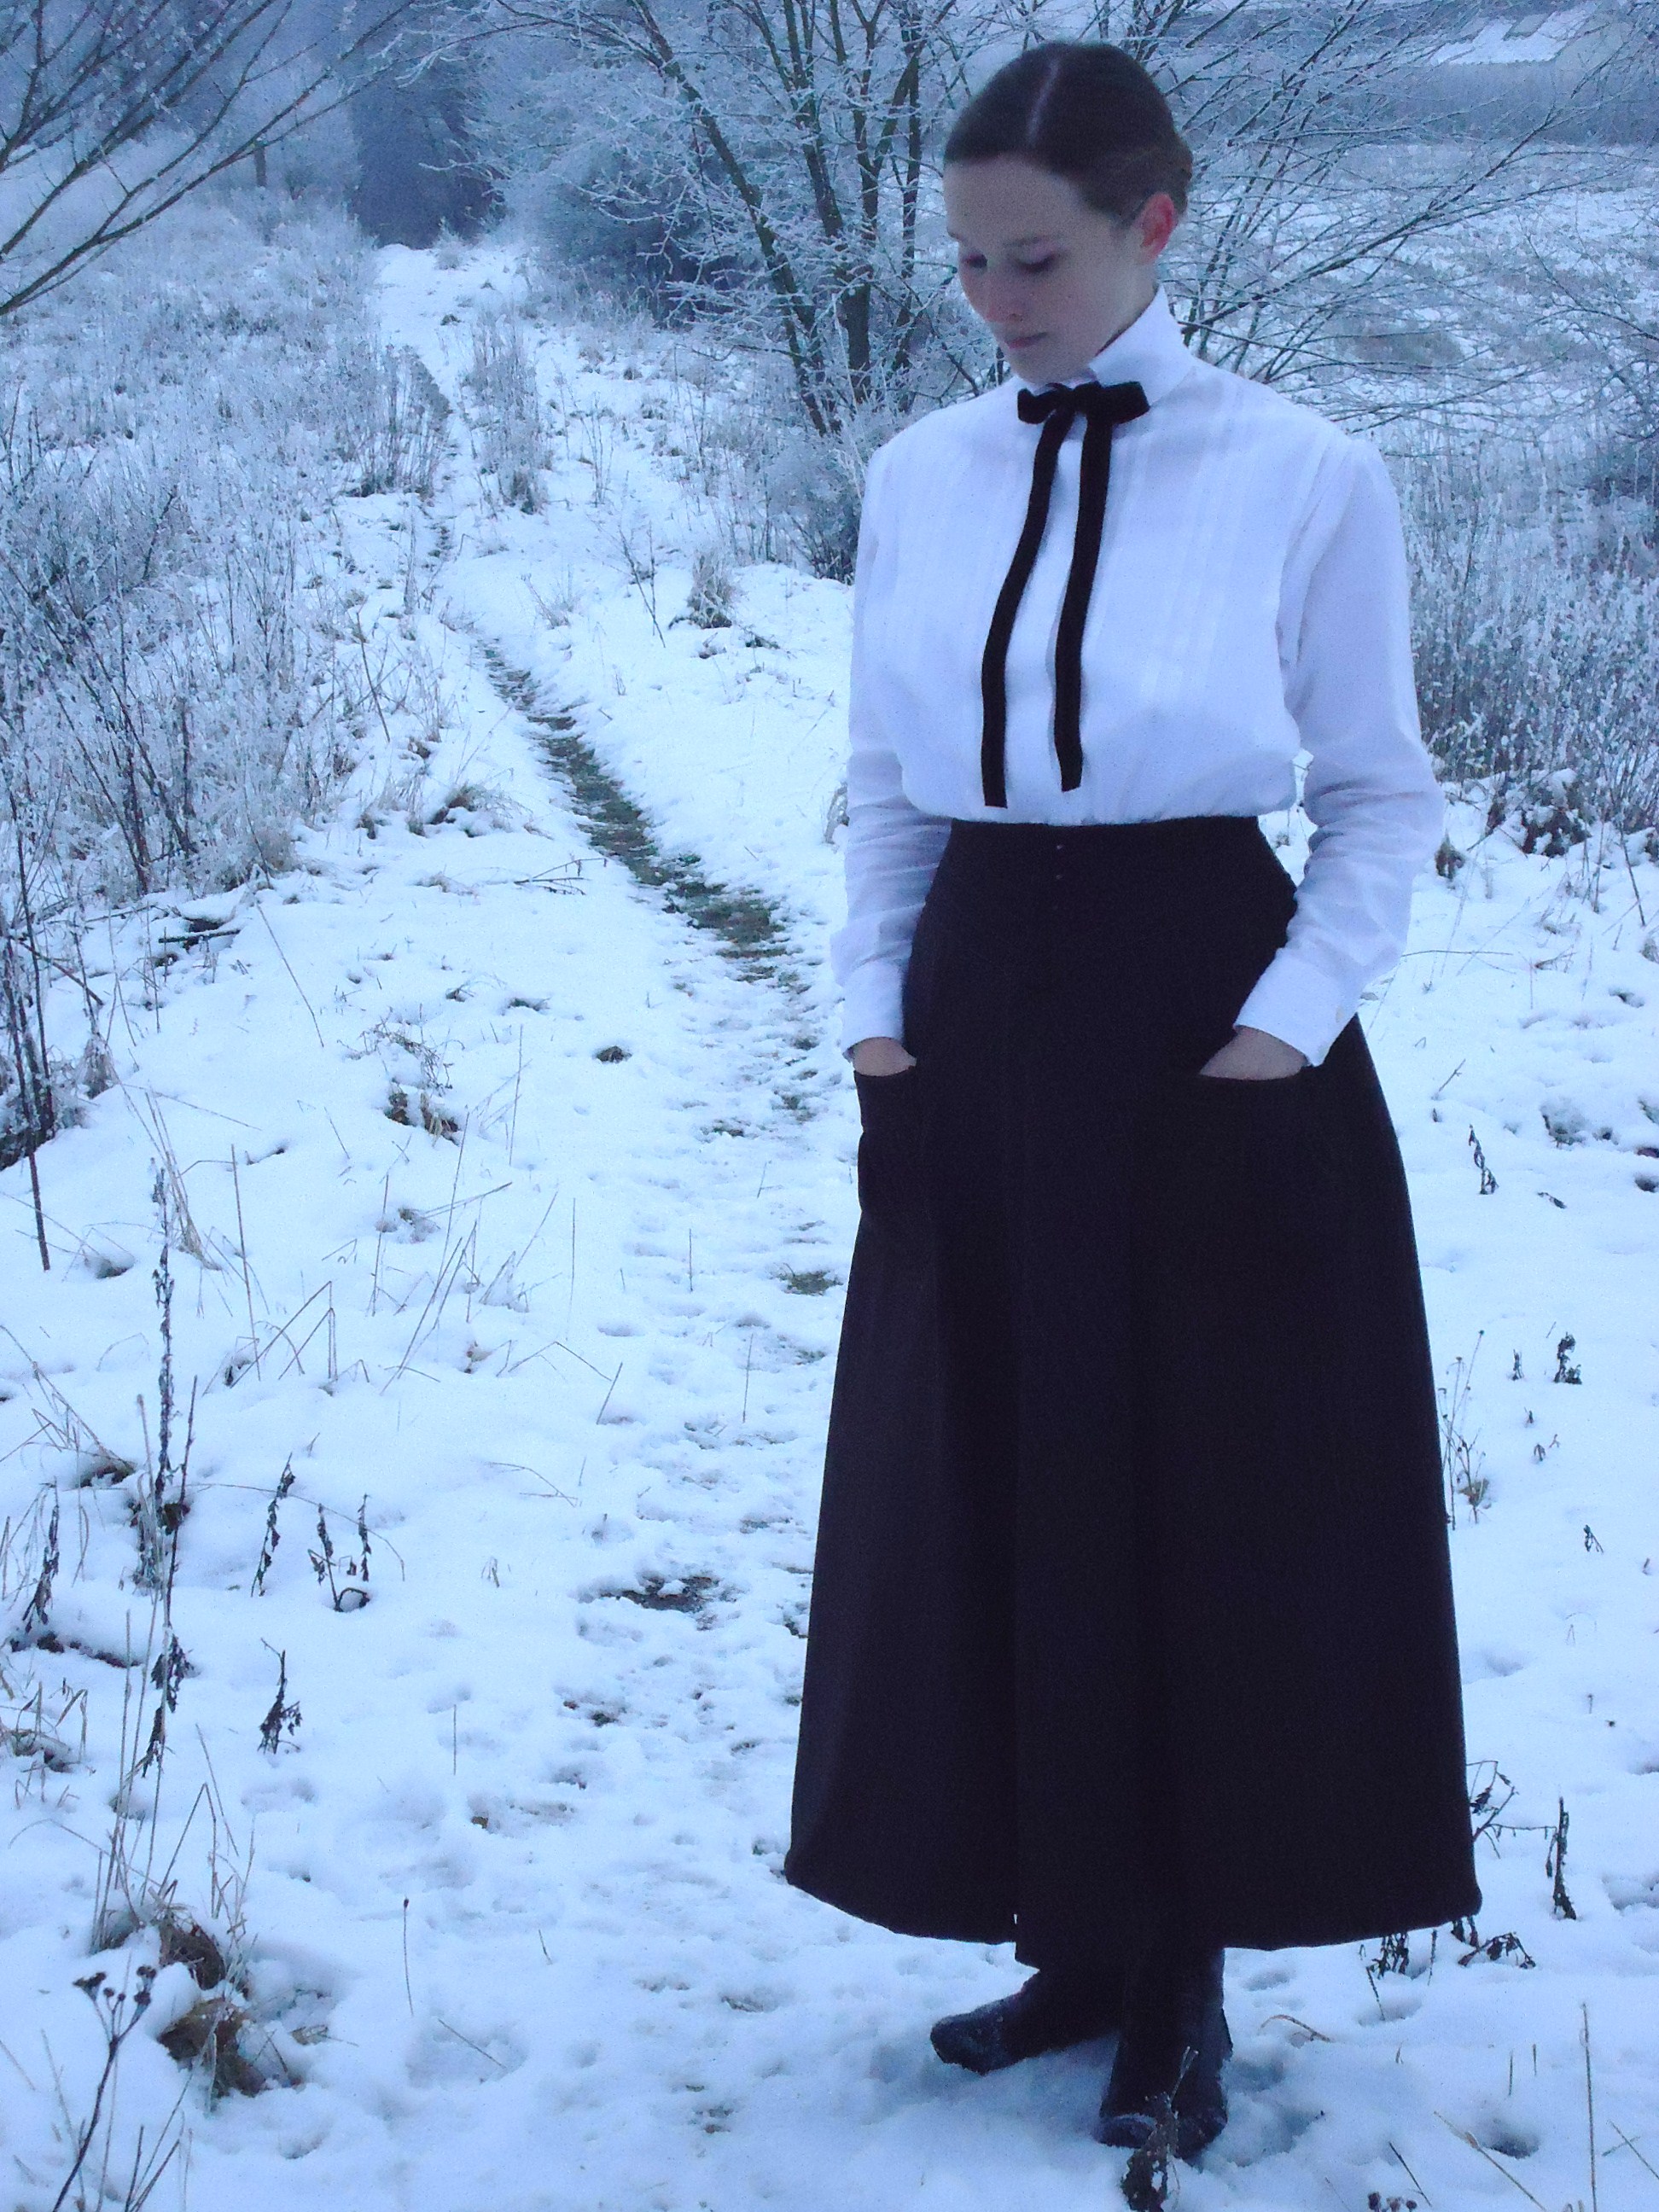
Then I gathered the top and bottom of the arms, so that the became poofy. I reinserted the the original cuffs, but shortened them and used the wrong side out, as this was less stained.
Sedan rynkade jag upptill och nedtil på ärmarna, så att de blev puffiga.Jag satte tillbaka de ursprungliga manchetterna, men förkortade dem och vände ut avigan, eftersom den var mindre fläckig.
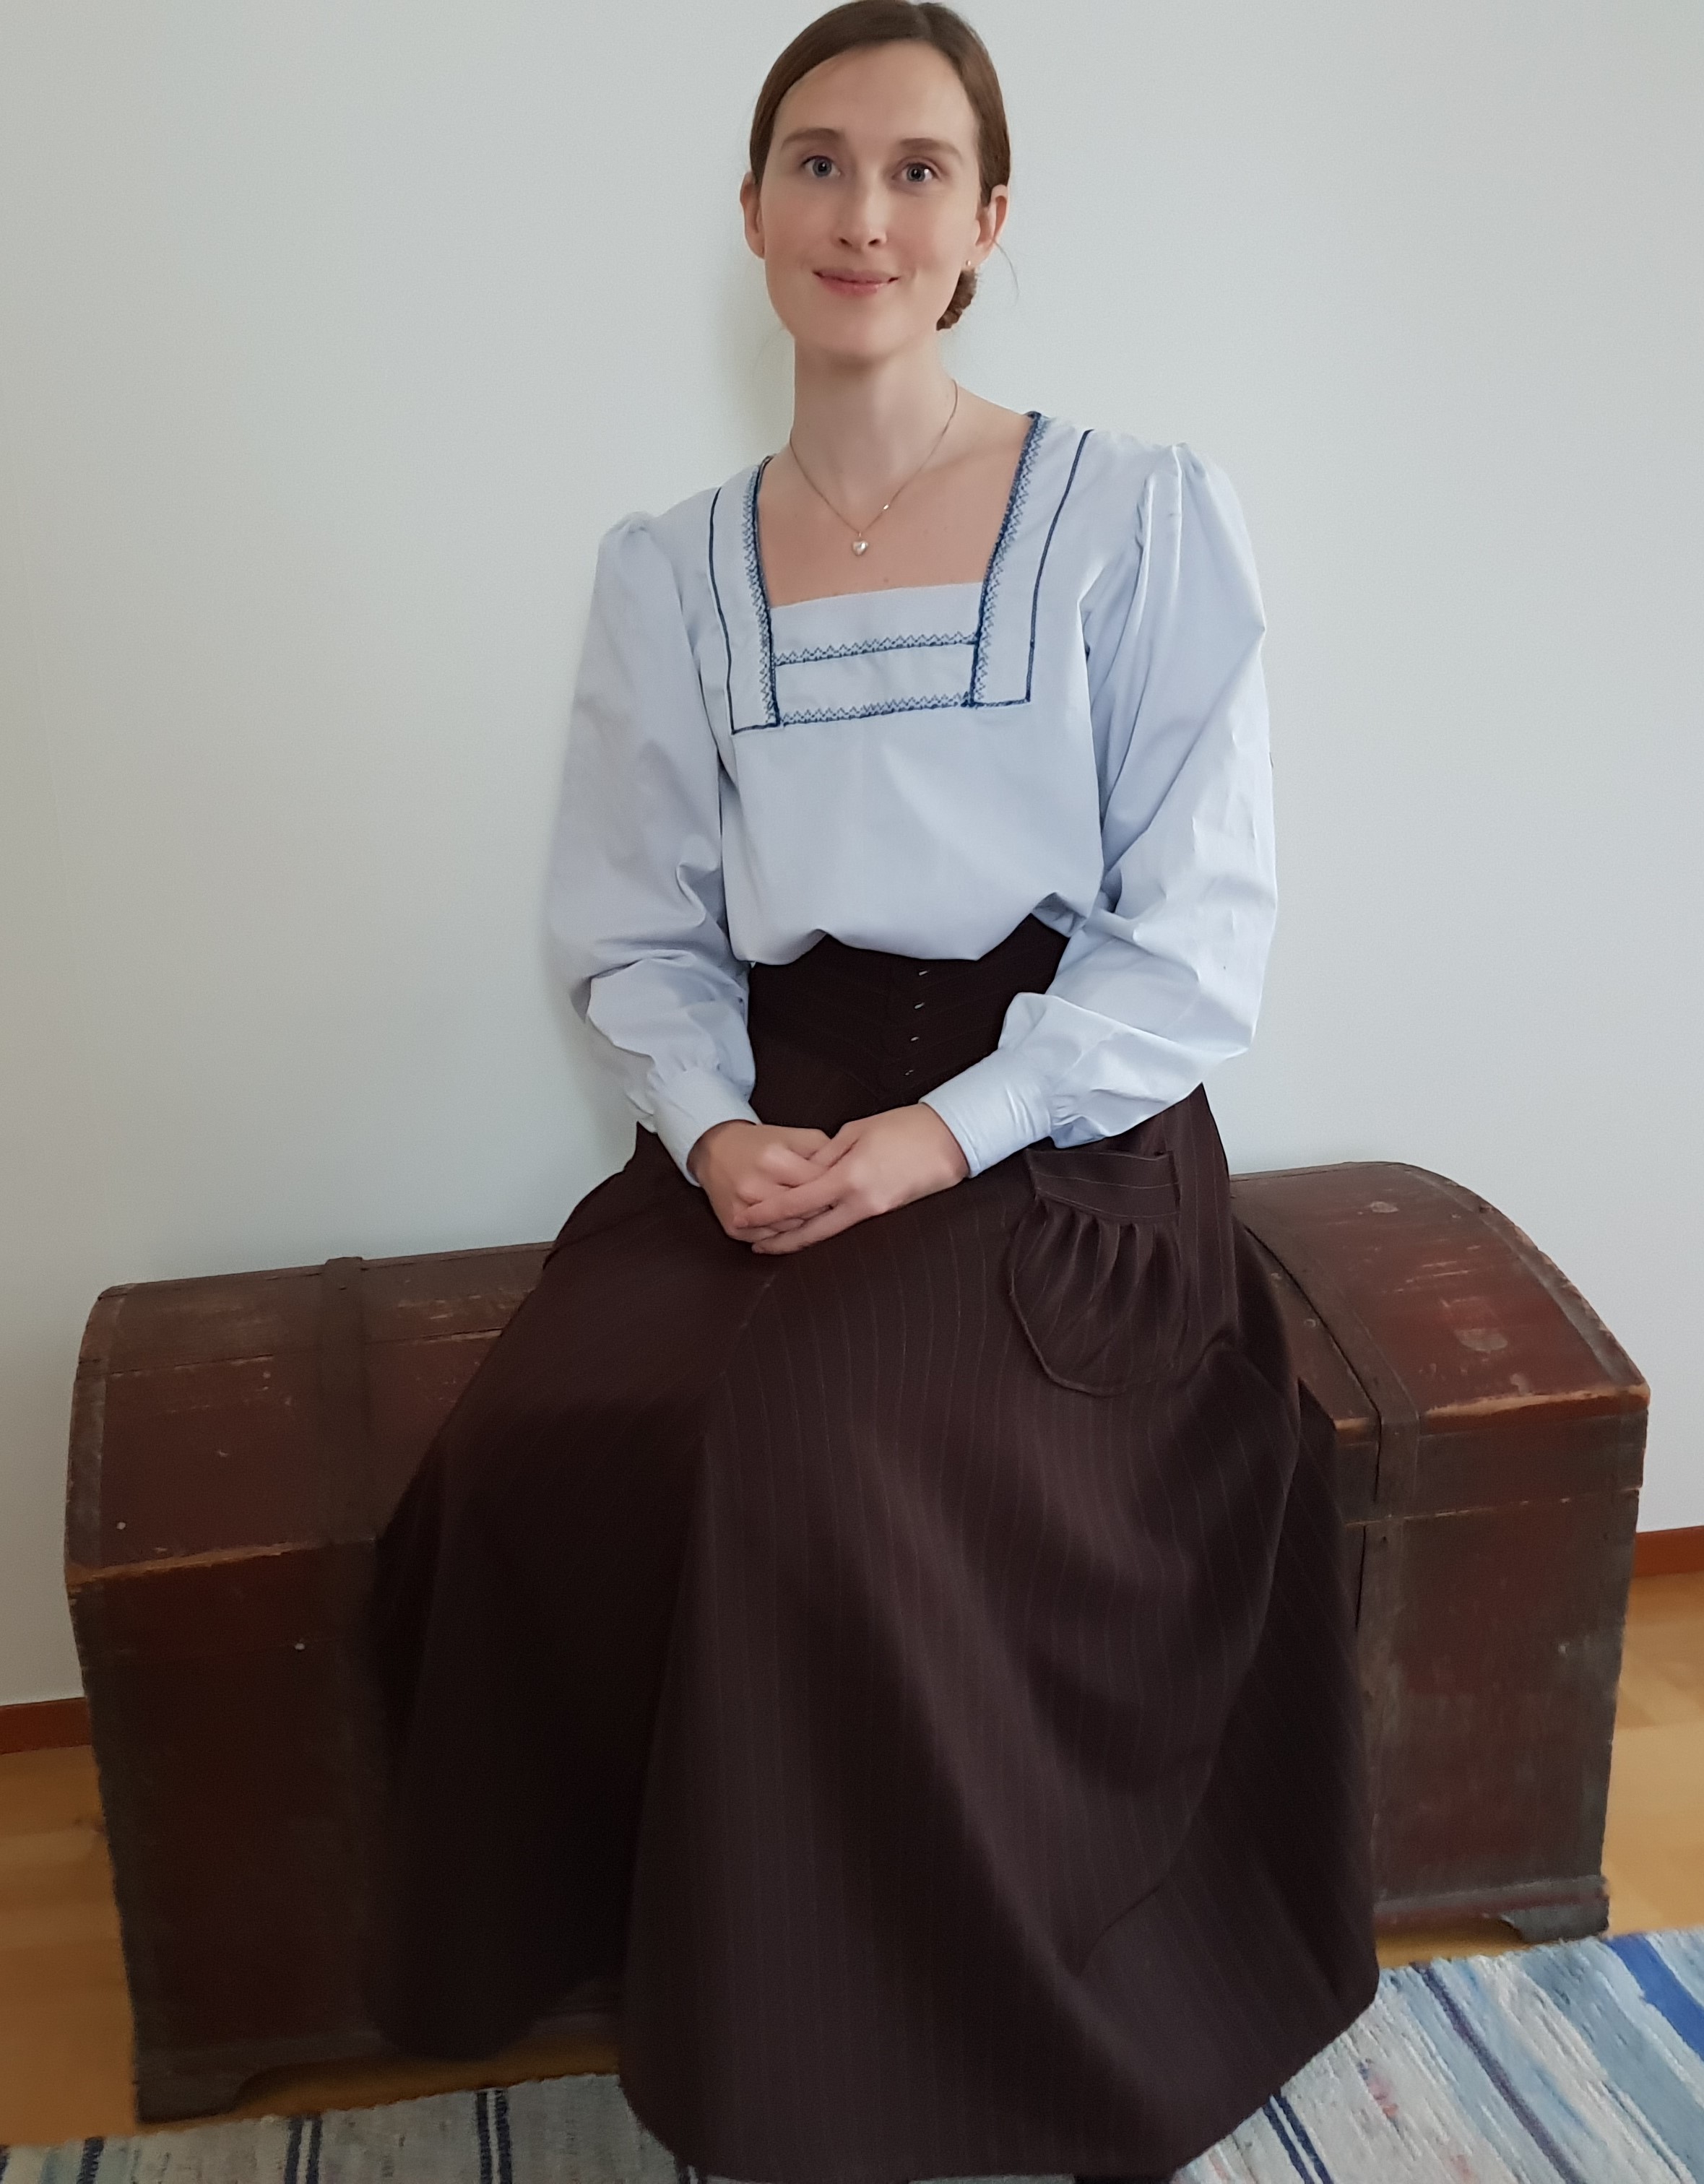
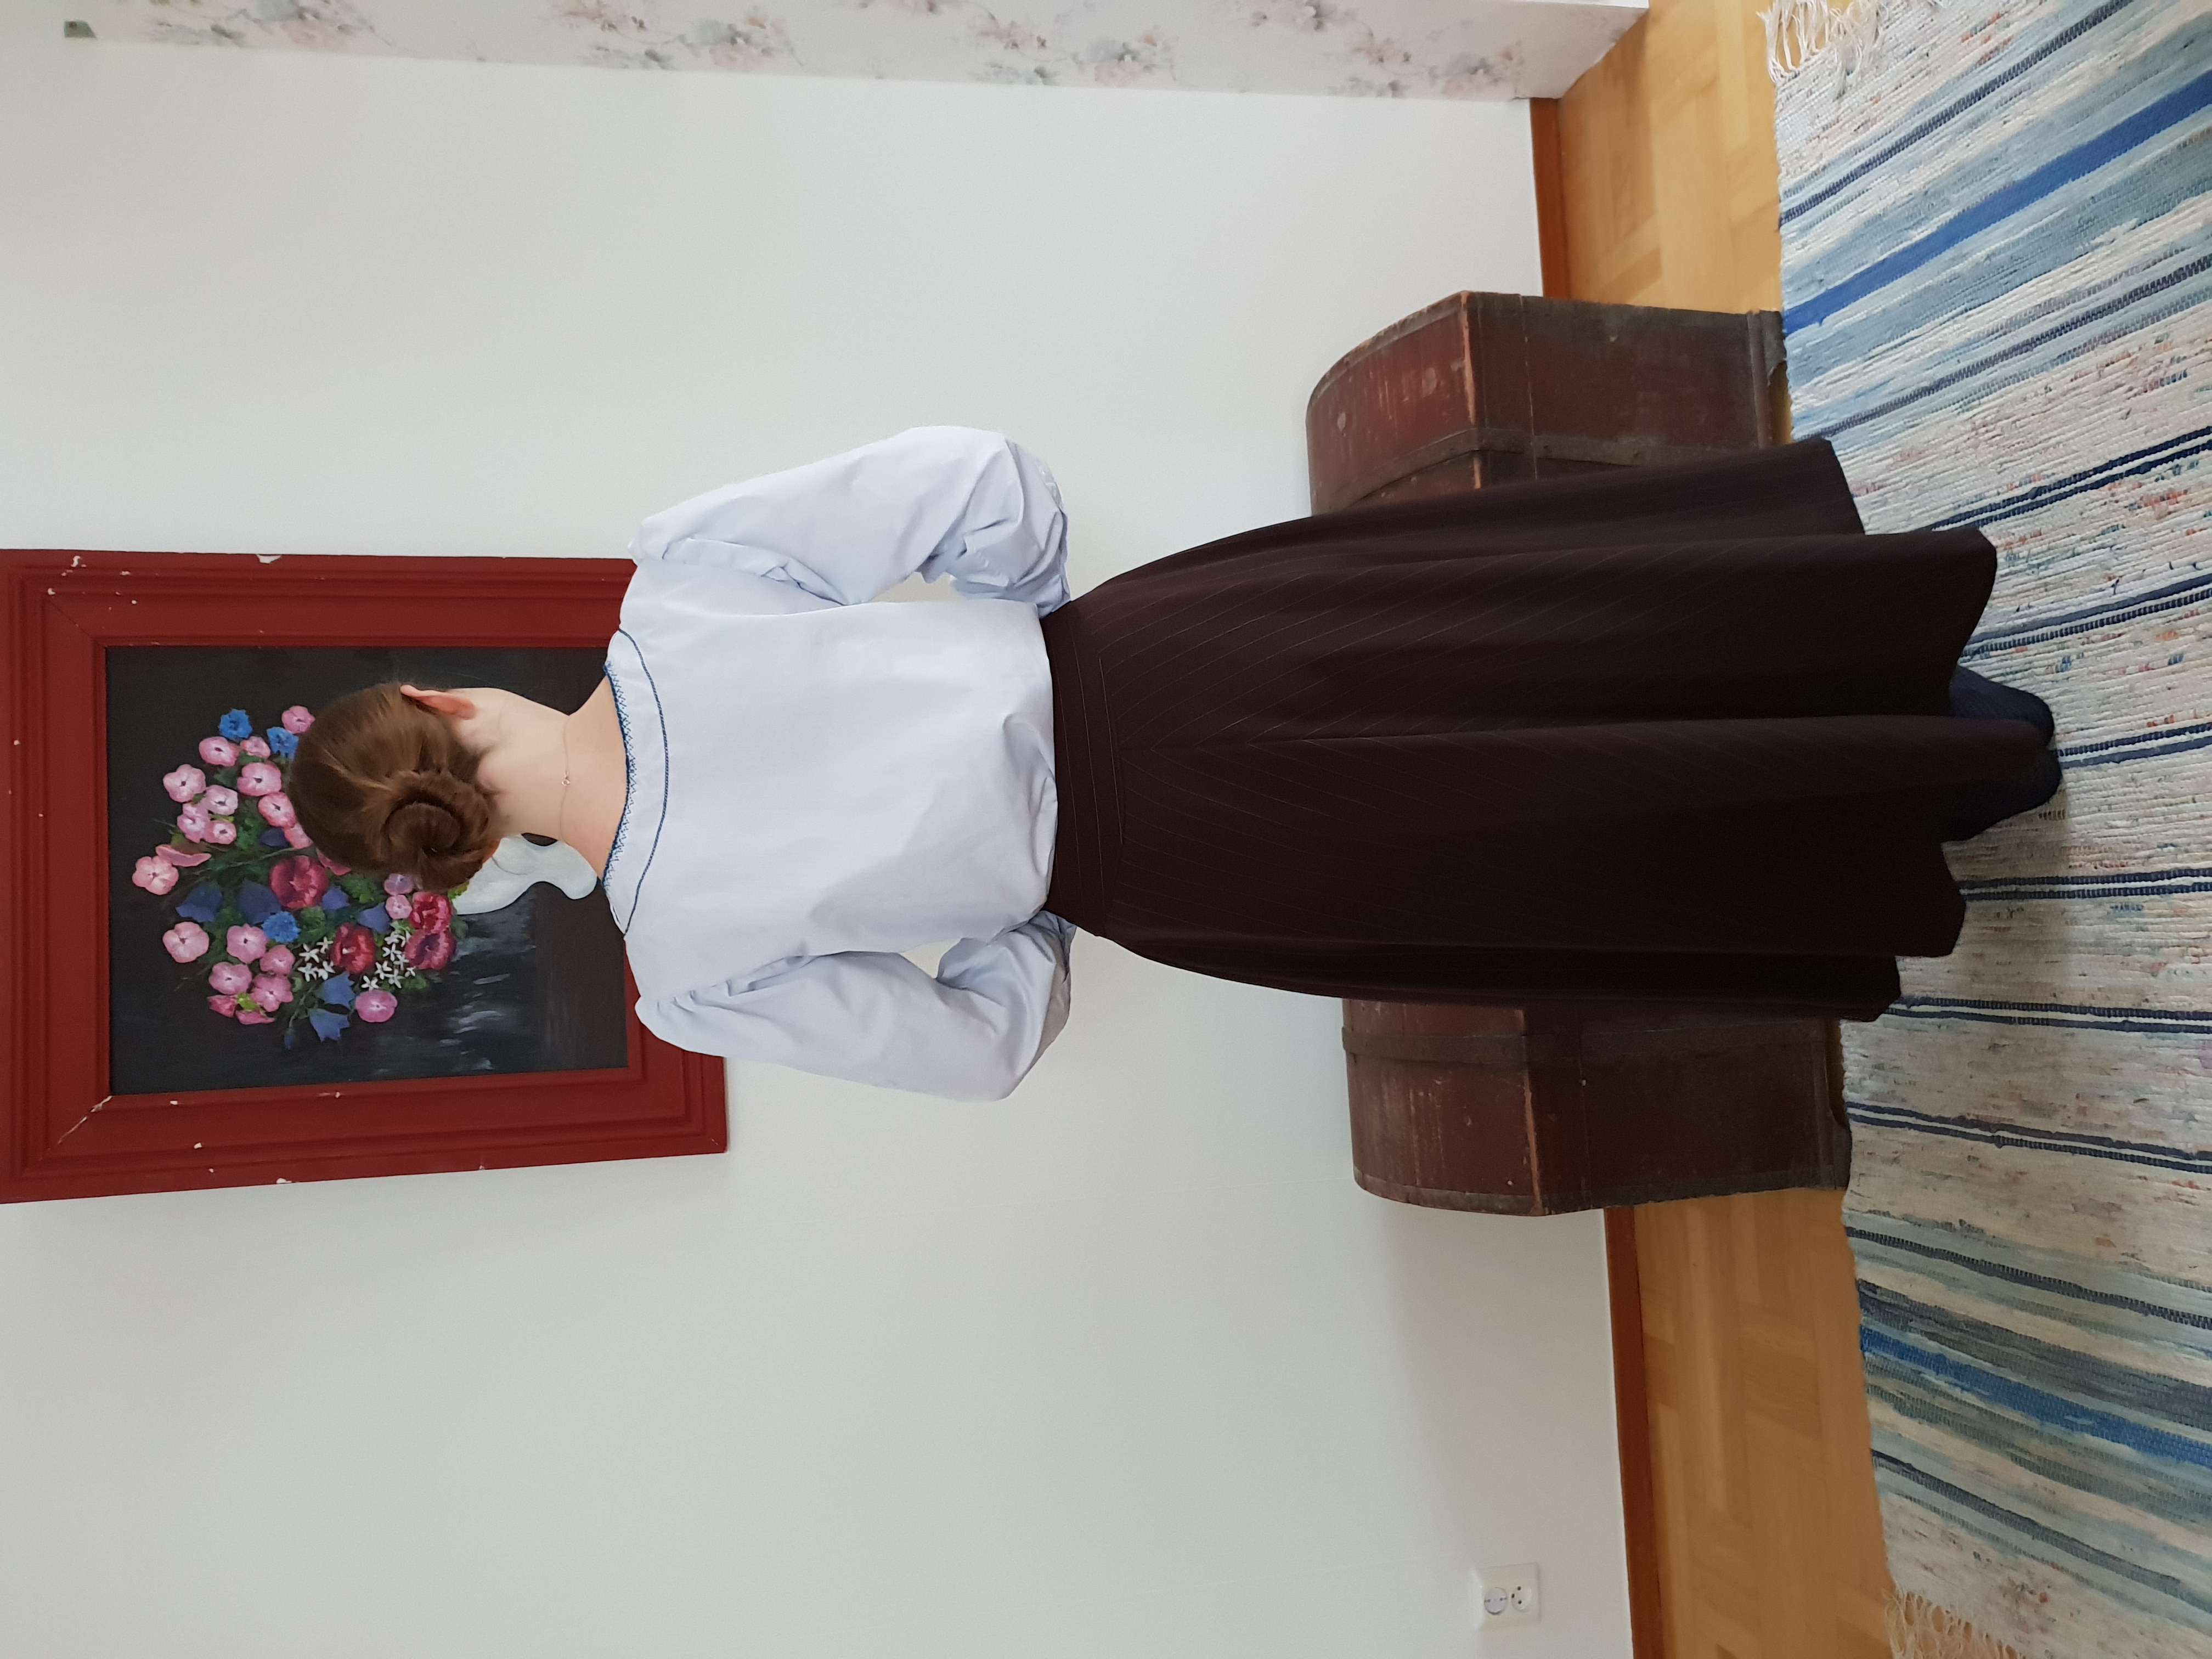
The stains remain, but you just see them when looking for them. As I made this blouse in a hurry, there is a vast amount of mistakes, but as I am to wear it at home, I am quite happy with the outcome.
Fläckarna är fortfarande kvar, men man ser dem bara när man letar efter dem. Eftersom jag sydde blusen snabbt och slarvigt är det galet många misstag här och där, men jag ska ju bara använde blusen hemma och jag är nöjd med slutresultatet.
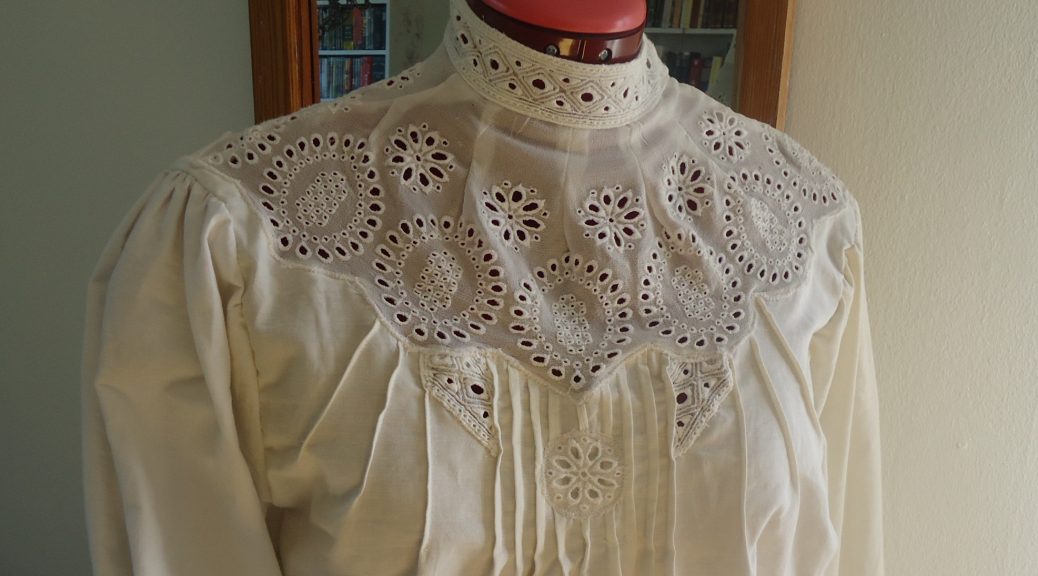
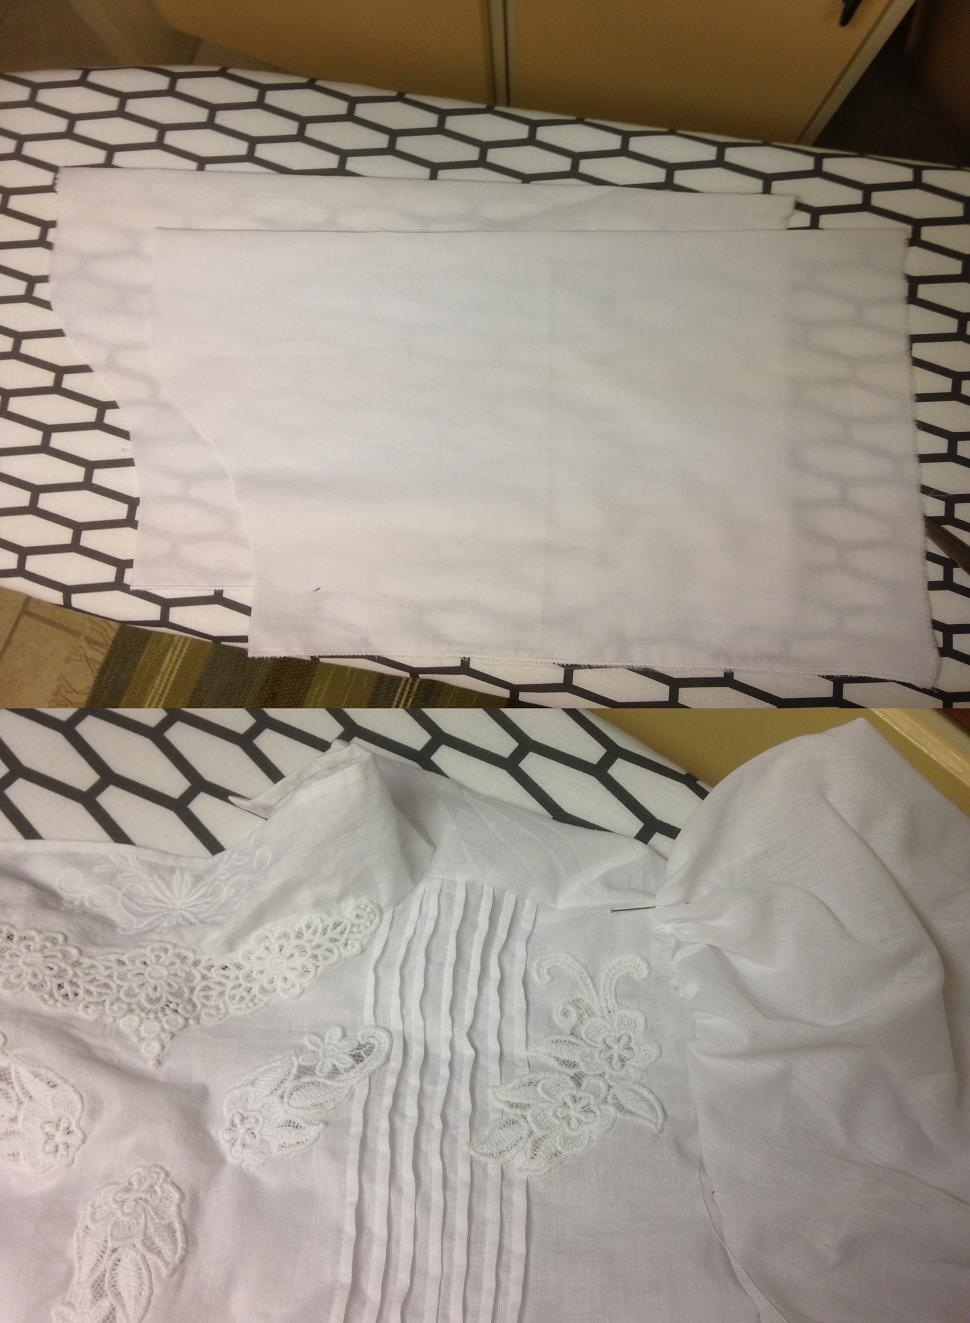
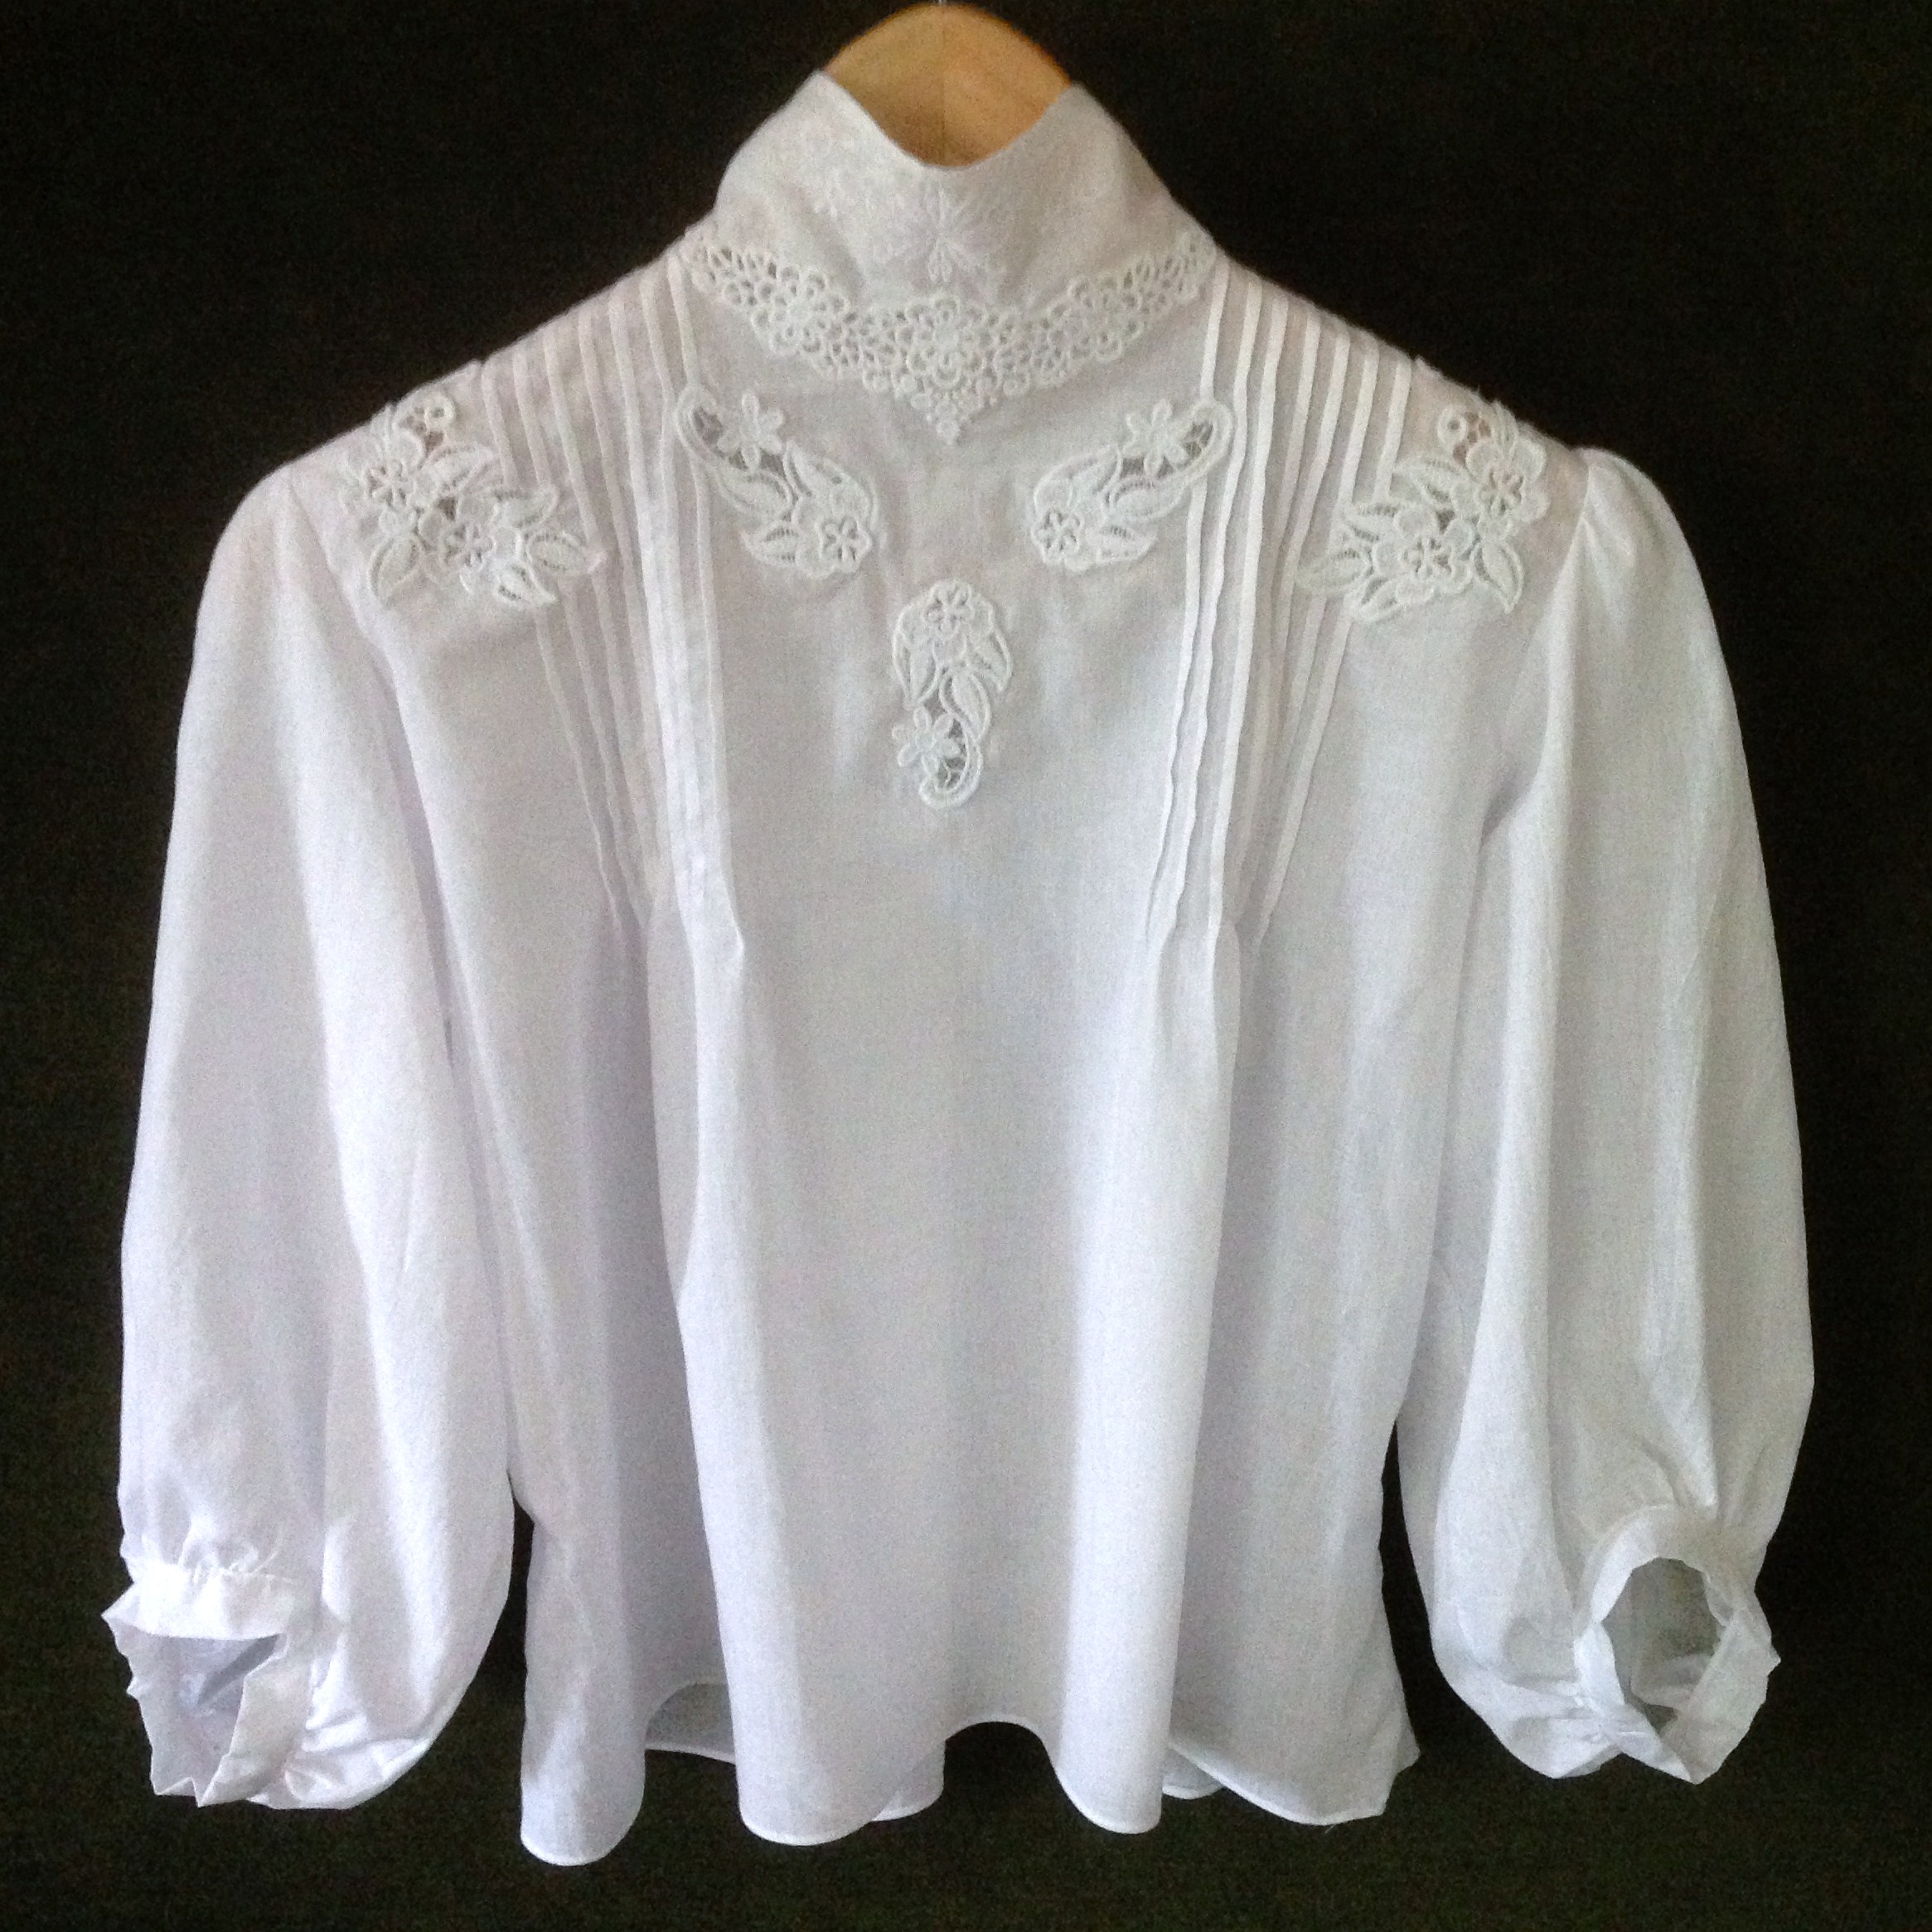
I have a dear friend, who loves historic fashions and has swooned over my Edwardian lady outfit. She has had a really rough time, so I wanted to do something for her, and promised her that she would have the outfit. Then I decided to make a new blouse for her, that would have long arms to protect her sensitive skin and that she would be able to close by herself. I dug deep into my stashes and found some lace left from the tank top that I used for the regency chemissette, and a matching off white cotton from other recycled materials.
I layed out the pieces of lace on the mannequin in order to find the best design. Then I added the cotton fabric to fill the great voids. I used the same techniques as in the last high collar blouse:
I started with two rectangles of fabric – the back as wide as half of the bust measurement and the front 10 cm wider than the back
I stitched 5 mm wide pin tucks in the front, starting in the middle and working my way to the sides with 1 cm spaces between the tucks.
I stitched the lace to the fabric, then I cut the fabric away on the wrong side and hemmed from the wrong side.
Then I added three pin tucks more on each side.
First I stitched the piece of lace to the right side of the fabric, then I cut the fabric away from underneath the lace and last I hemmed the edges.
When this was finished, I stitched the front to the back on the shoulders and sides. Then I attached the great piece of lace and high collar to the bodice in the same way as the other pieces of lace.
Next, I made the very simple arms: I measured the circumference of the armholes, cut to pieces of fabric with this width plus 5 cm, made a rounded top and added lace at the gathered end of the arm.
After attaching the arms to the bodice, I put push buttons and hooks and eyes for closing at the side of the neck. Then the blouse was finished. I can’t wait to see my friend in this outfit.
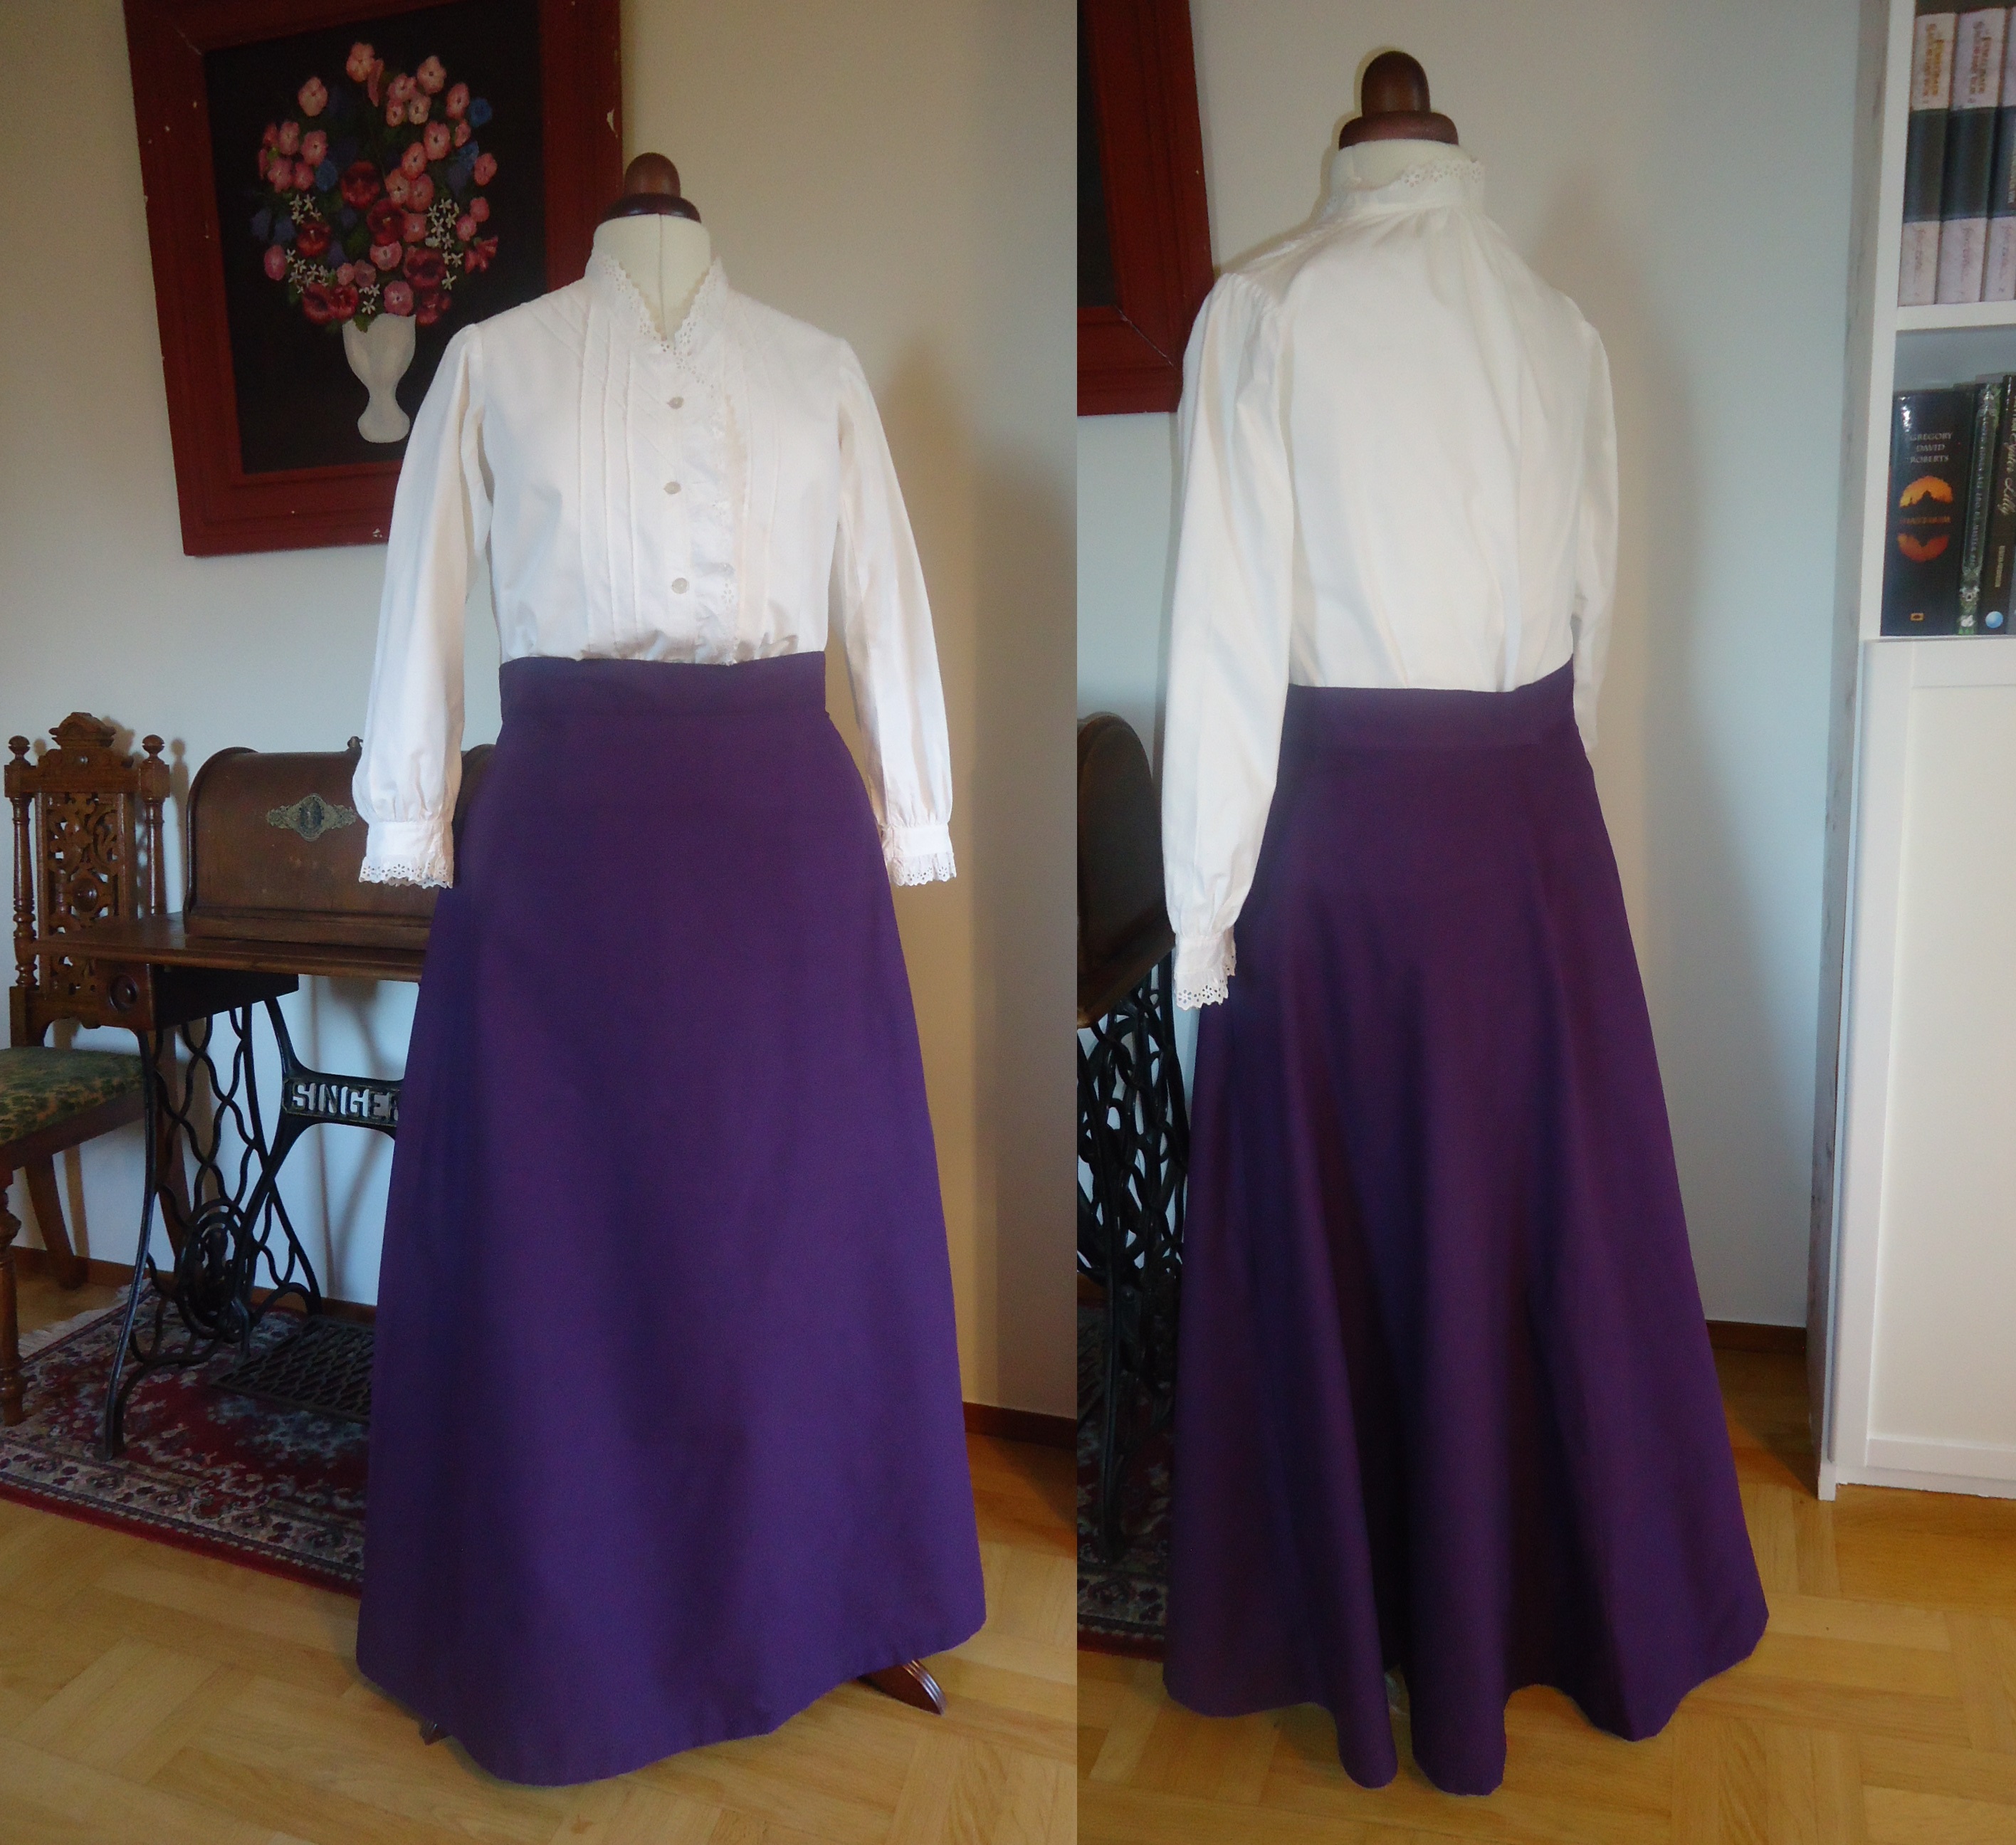
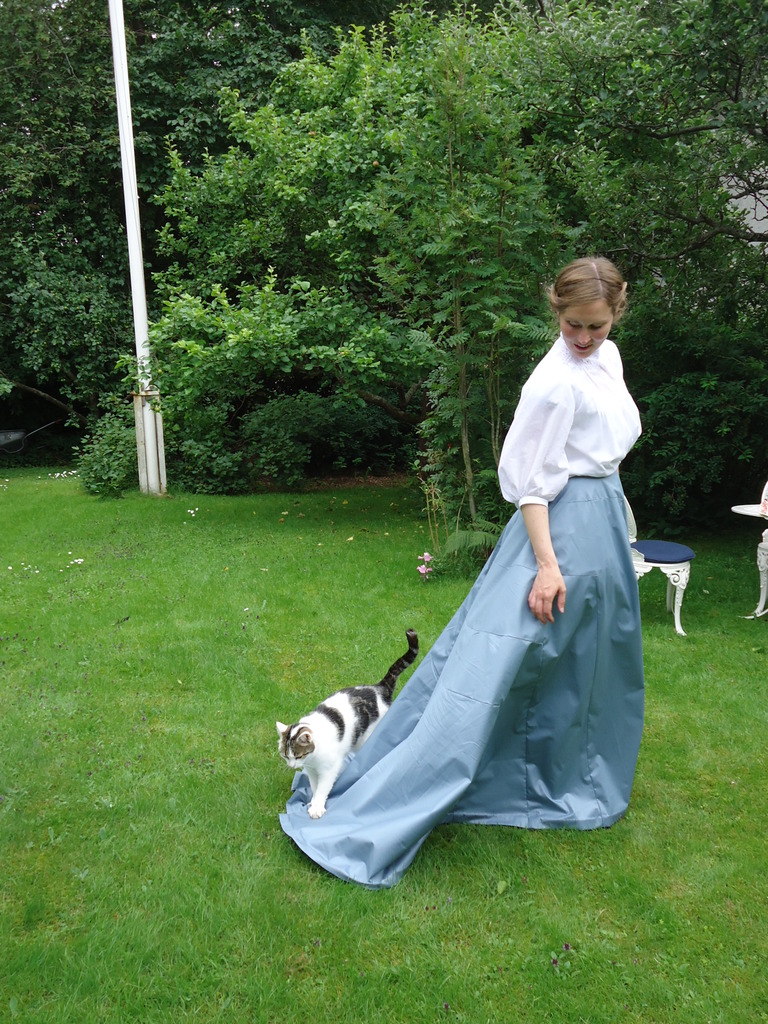
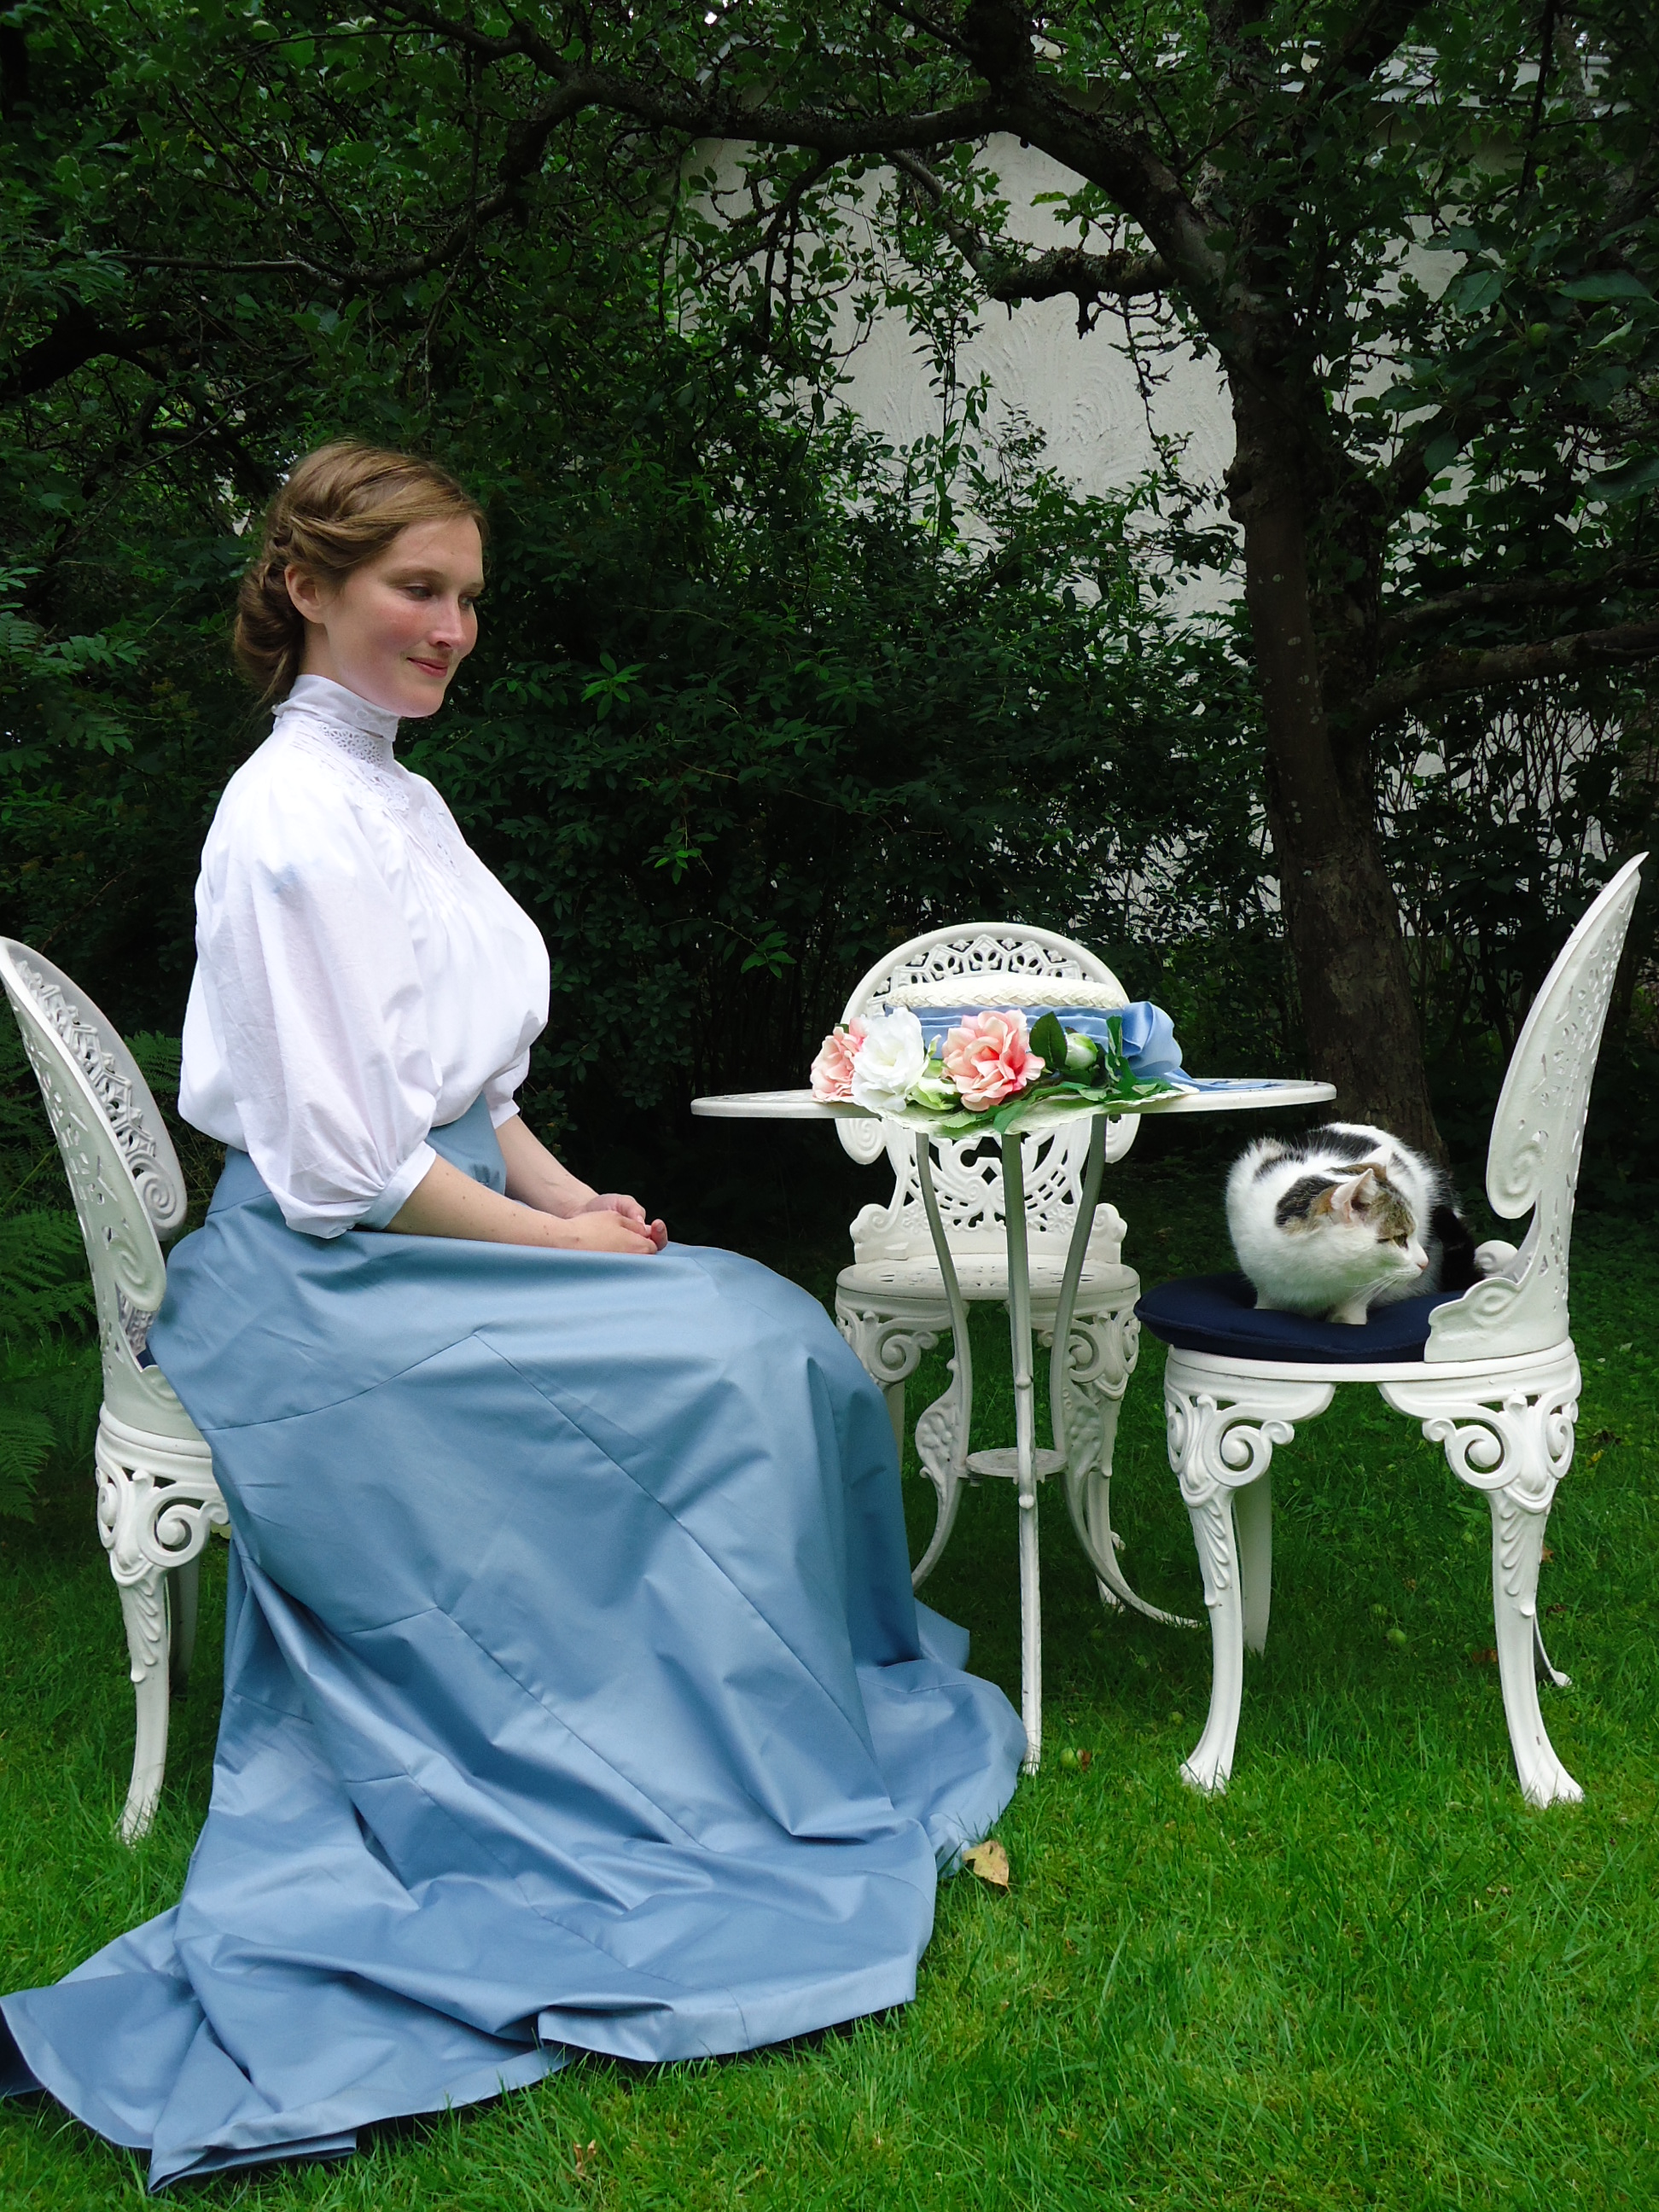
This summer I got a commission to make an Edwardian suit. This would be used at events where my customer would heighten the atmosphere together with her horse. She wanted a skirt, blouse and an apron. What a dream project! I was so eager to get started, but every step was taking unusually long time: I had to hunt down the package with the fabric order, as neither the fabrics, nor any note came to my post box. My pregnant body didn’t move as quickly and gracefully as it otherwise does, so the pattern making and cutting of fabrics was very challenging. Then there came this little boy… I missed out two deadlines, but thankfully, this dear customer told me not to hurry and just enjoy the first time with the baby.
I somras fick jag I uppdrag att sy en sekelskiftesdräkt, som skulle användas vid evenemang där min kund skulle agera stämningshöjare tillsammans med sin häst. Hon ville ha en kjol, en blus och ett förkläde. Vilket drömprojekt! Jag var så entusiastisk och hoppades på att kunna göra klart den innan förlossningen, men varje steg i processen tog ovanligt lång tid: När jag tyckte att jag väntat länge nog på tygerna var jag tvungen att spåra tygpaketet, eftersom de glömt att skicka en avi till min postadress. Min gravida kropp var långsam och otymplig, så det var en utmaning att kravla omkring på golvet för att göra mönstret och klippa tyg. Sedan kom den lille gossen… Jag missade båda kundens deadlines, men hon var förstående och uppmanade mig ta det lugnt och njuta av babytiden istället.
Costume suitable for a farmers wife.
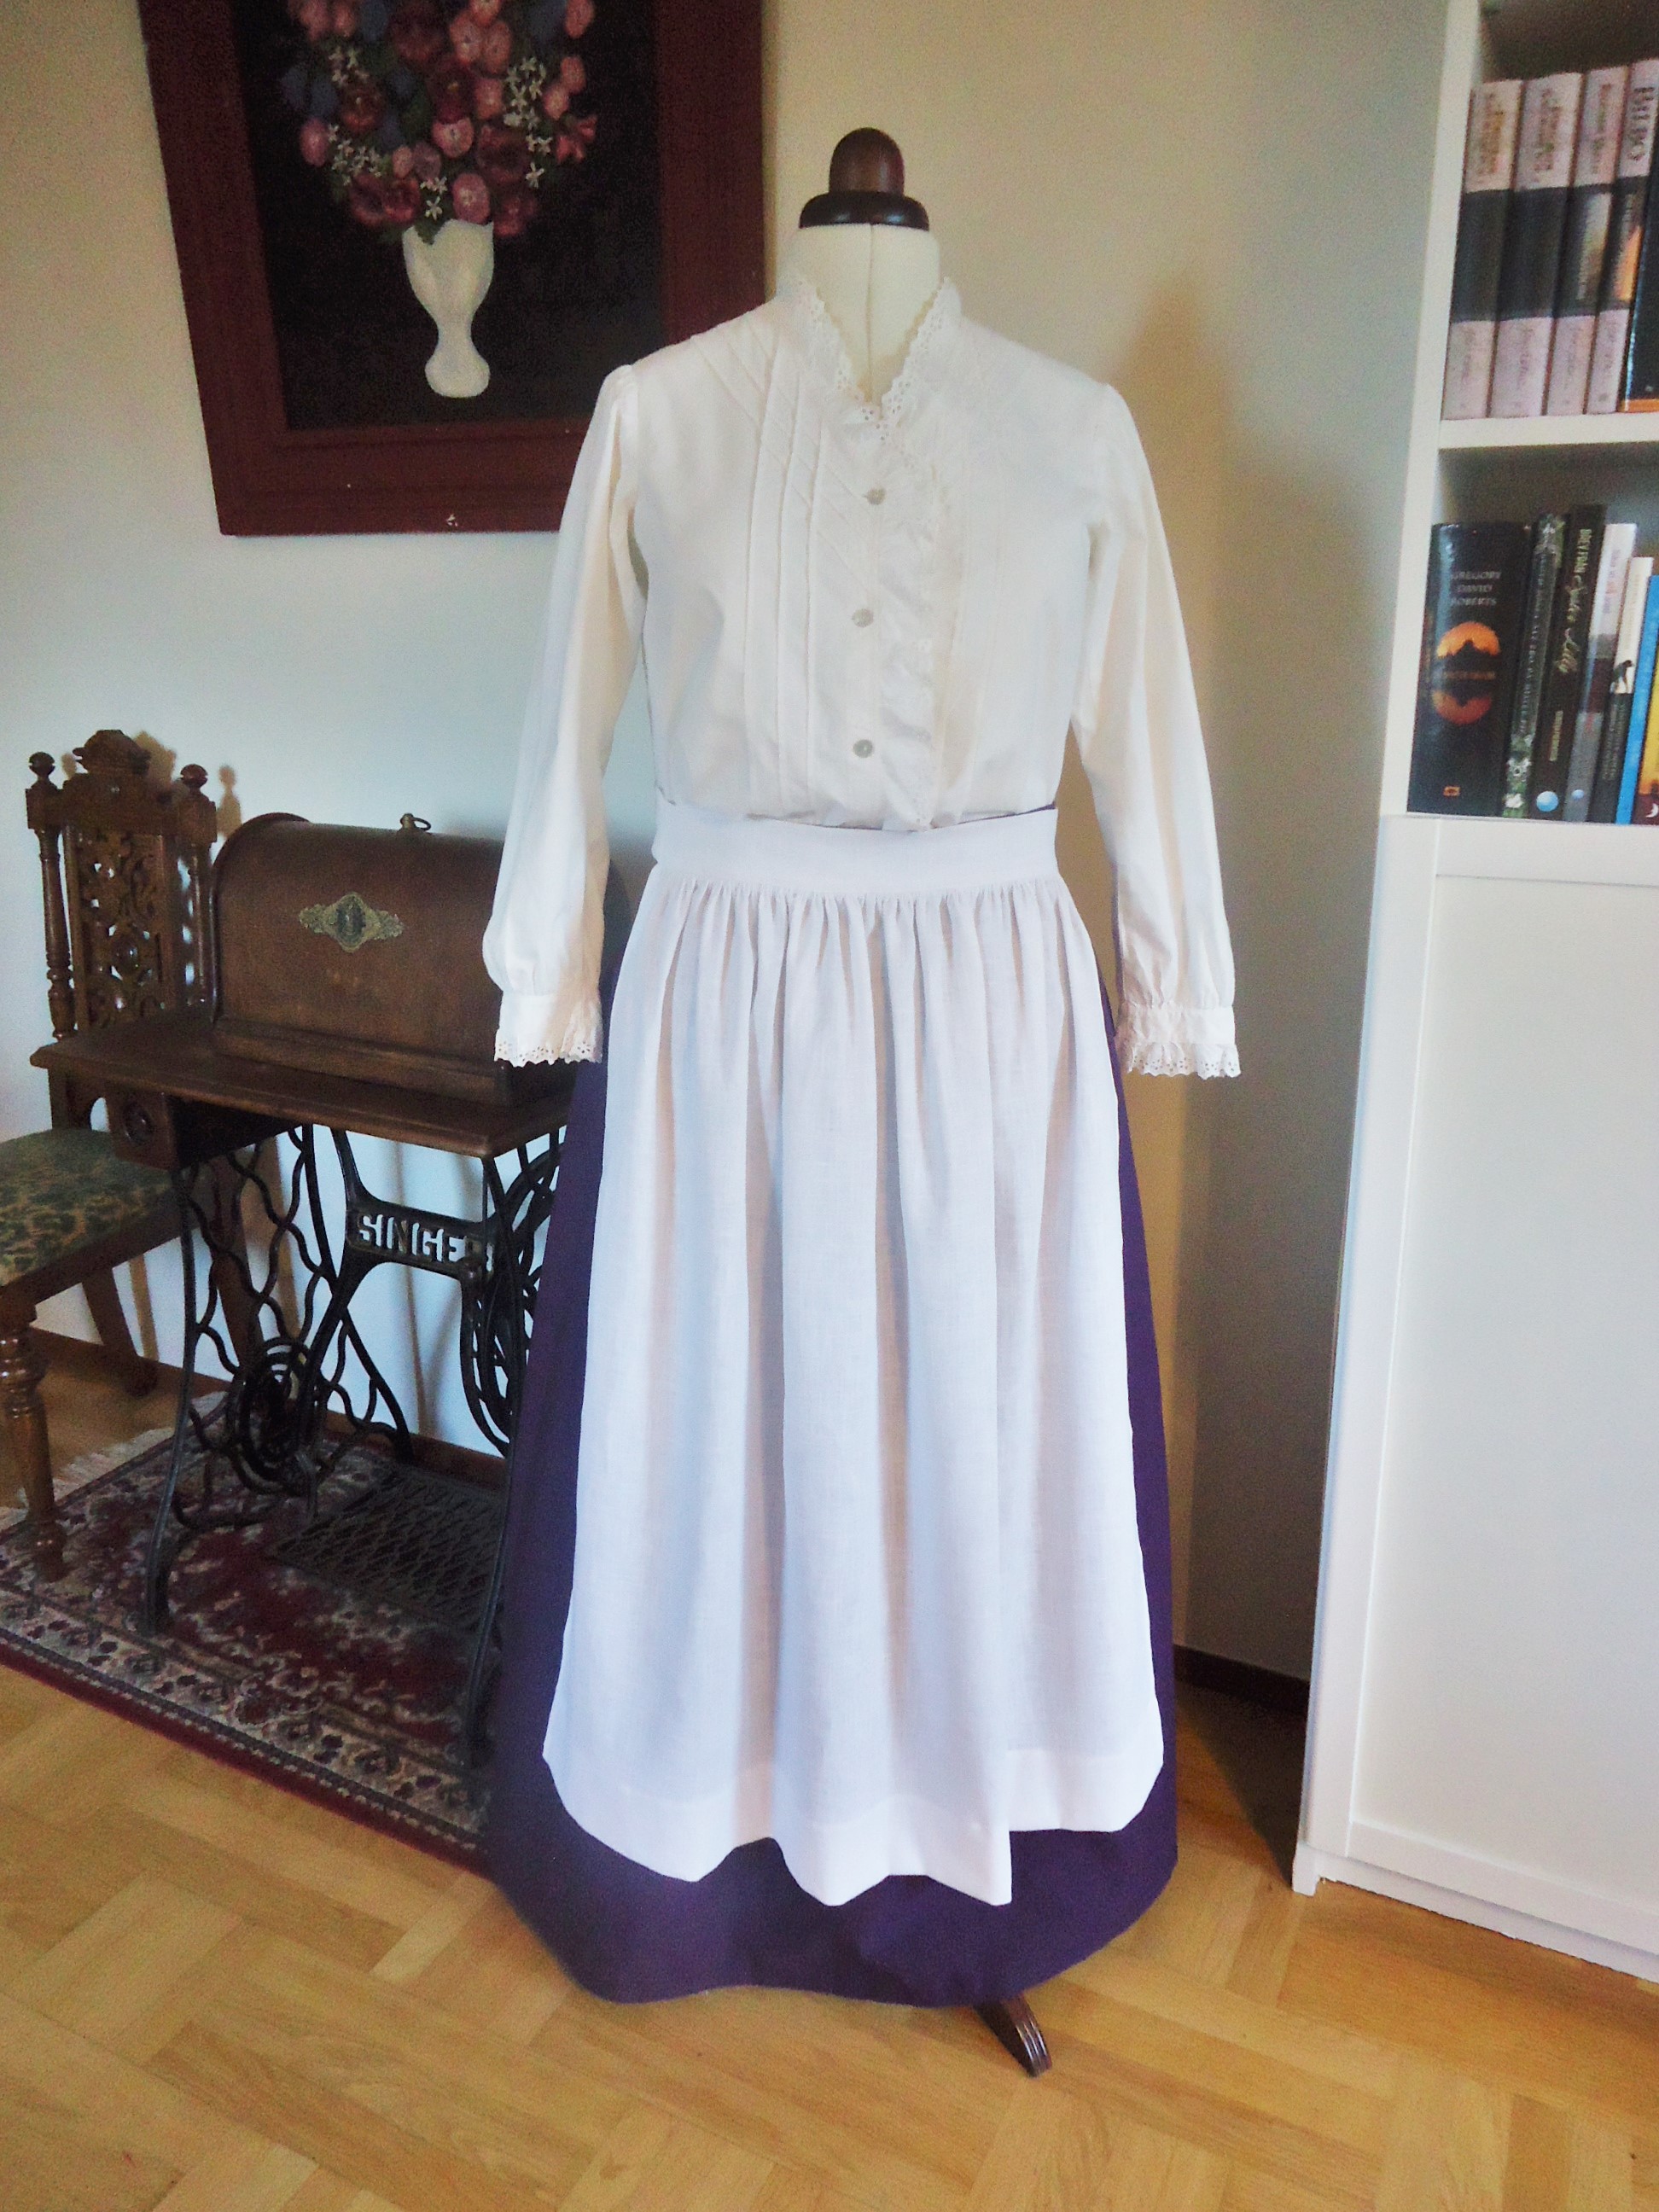
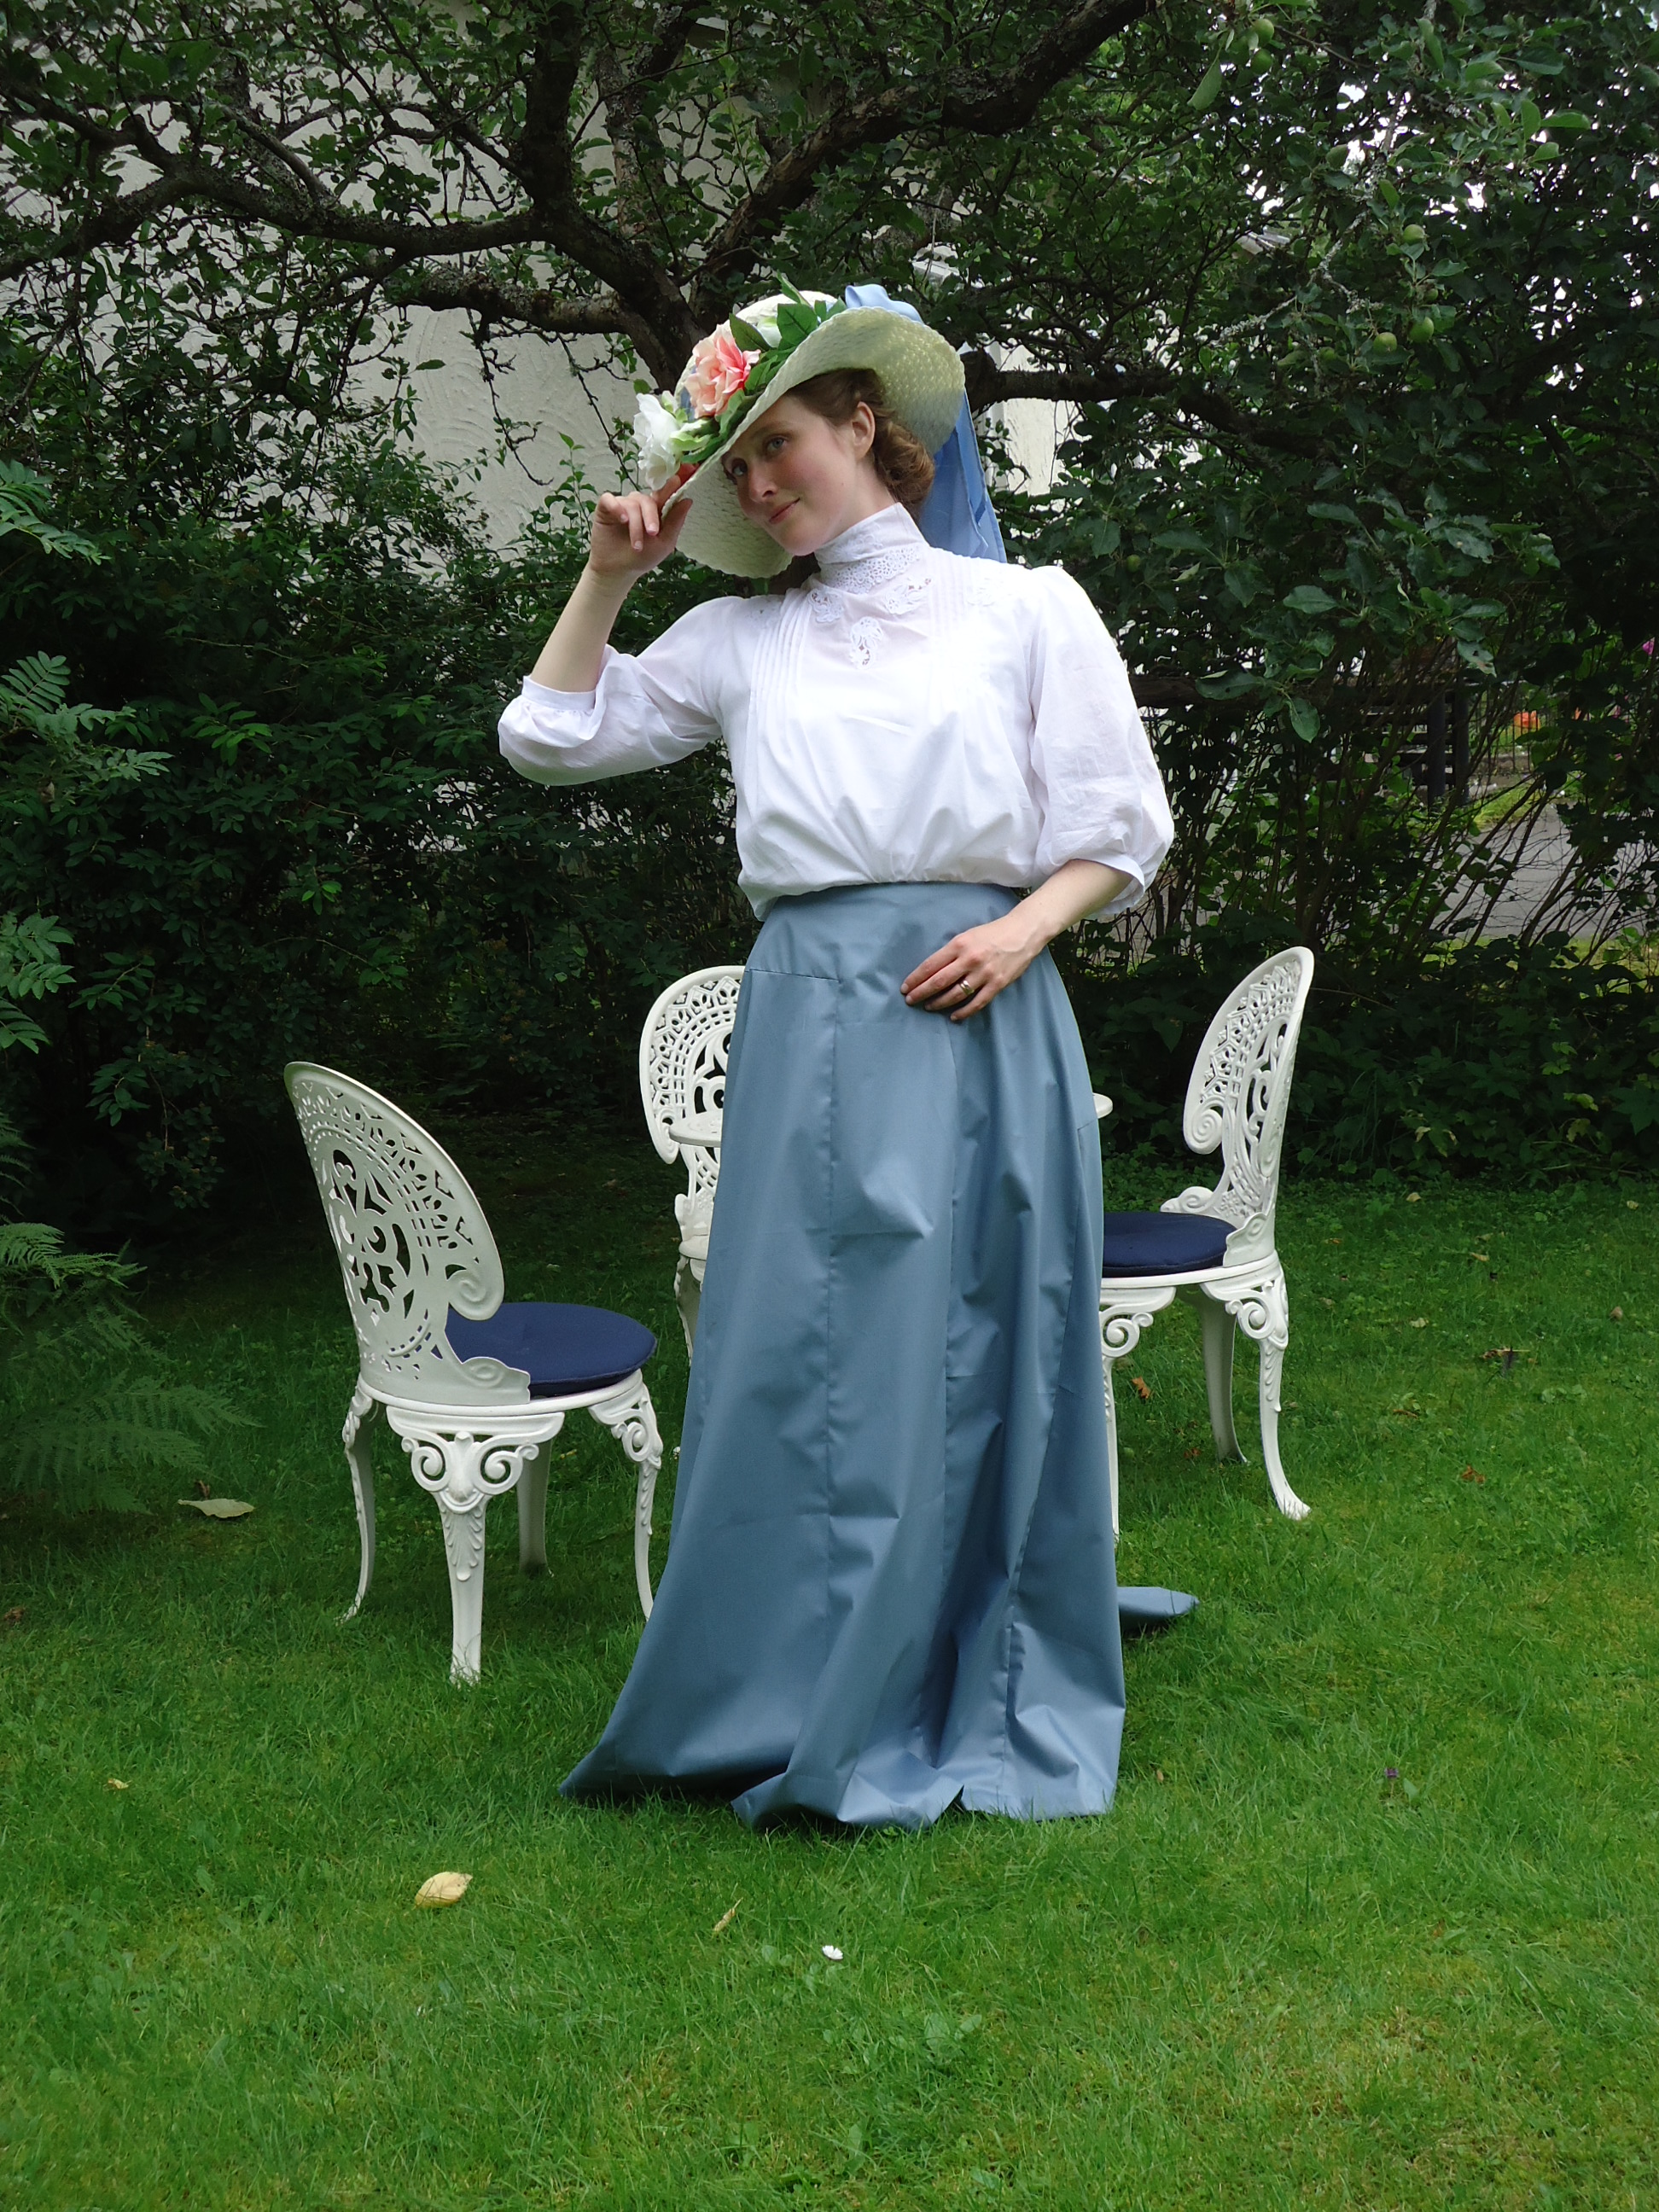
This week, I could finish the cotton skirt at last. It is made of three panels – one in the front and two in the back – and is closed with hooks and eyes. The linen apron was the only piece finished before the delivery. I had made a mock up for the blouse, but still wait for an opportunity to fit it on my customer before I cut the fashion fabric. In the meantime, she can wear this lovely vintage blouse.
Den här veckan kunde jag äntligen sy färdigt bomullskjolen. Den består av tre paneler – en fram och två bak – och stängs med hyskor och hakar. Linneförklädet var det enda plagget som var färdigt innan förlossningen. Jag hade gjort en toille för blusen, men väntar fortfarande på ett tillfälle att testa den på min kund innan jag sätter saxen i blustyget. Tills blusen är klar får hon använda denna underbara vintageblus.
Mockup for the blouse and skirt. After tracing the skirt mockup to pattern paper, I made an petticoat of it.In order to keep the price down, I made the pleats on machine. It took two hours to make, except for prewashing and calendering.This is the Edwardian vintage blouse. It is made from quite heavy weight cotton and every seam is made on machine. It does not look home made.The skirtThe whole costume
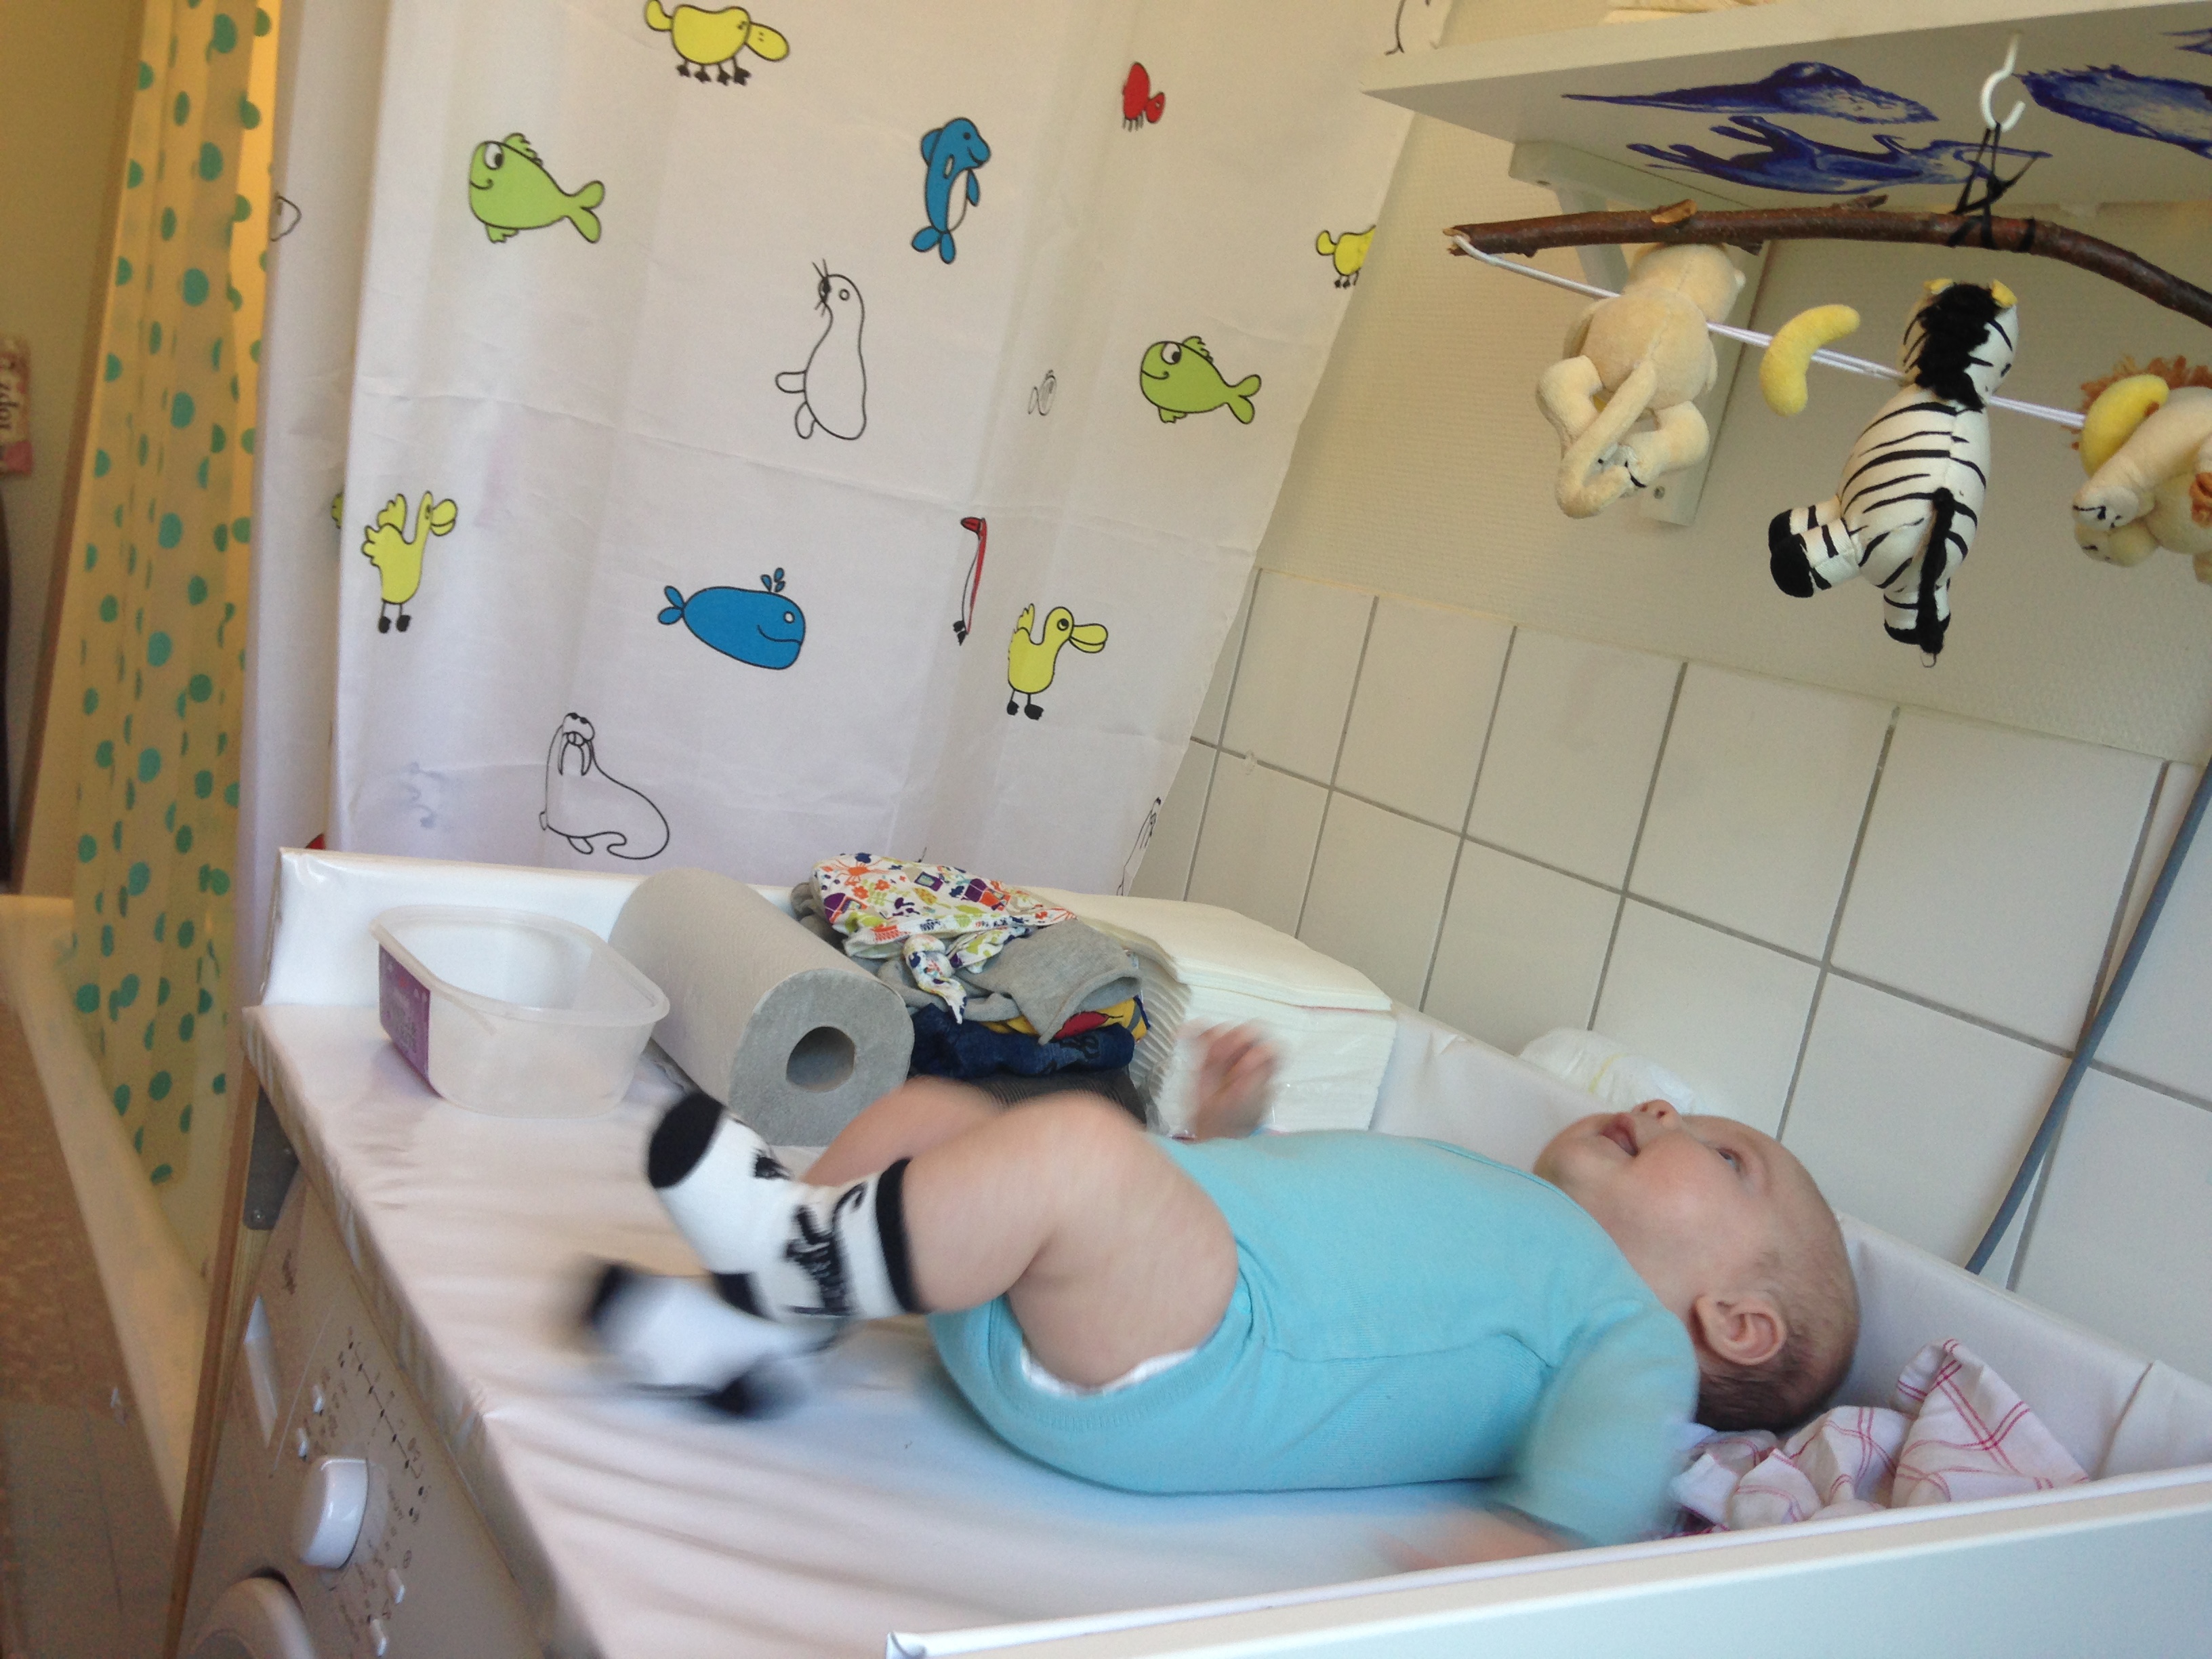
Today, I have also finished the changing table! My kind father in law bought the wanting piece of wood that would prevent the baby from falling down. I sawed this into three pieces and screwed them together. The inside was lined with camping mattress underneath oilcloth, fastened with glue gun. Then this frame was fixed to the changing table with screws. The frame serves both as a stabilizer and protection. I know that the changing table could have been steadier and more nice-looking if I had put more money into the right materials and if I had been able to construct it without interruptions. It does not look completely abhorring though, and it is steady when standing over the washing machine. As it answers our present needs, I am really happy with the outcome.
Idag blev skötbordet fullbordat! Min snälle svärfar köpte en fin mdf-skiva att ha som kant. Jag sågade till tre bitar, som jag skruvade ihop. Med limpistol limmade jag sedan fast liggunderlag och vaxduk på insidan av träramen. Sedan skruvade jag fast ramen på själva skötbordet. Förutom att skydda barnet från att rulla ner från skötbordet, stabiliserar den också själva bordet. Jag är medveten om att skötbordet hade kunnat bli både stadigare och finare om jag hade lagt mer pengar på rätt material och om jag hade kunnat jobba ostört. Nu kom vi i alla fall billigt undan och det ser inte helt fasansfullt ut. Eftersom det tillgodoser våra behov nu, är jag faktiskt riktigt nöjd med resultatet.
Our baby loves being on his changing table, beneath the shelf that I made for him. During the last week, he has also started talking to the animals at the shower curtain.
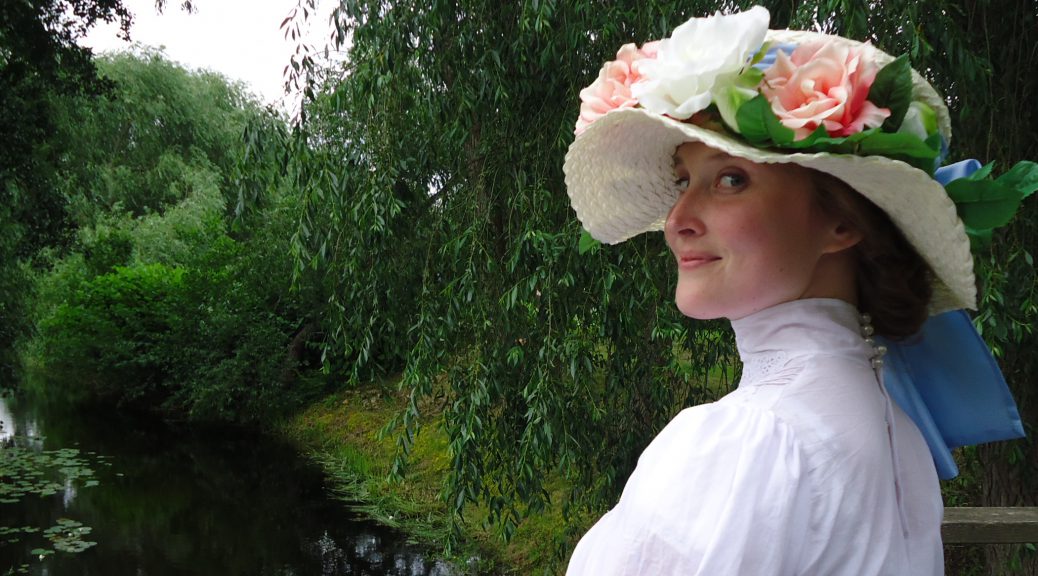
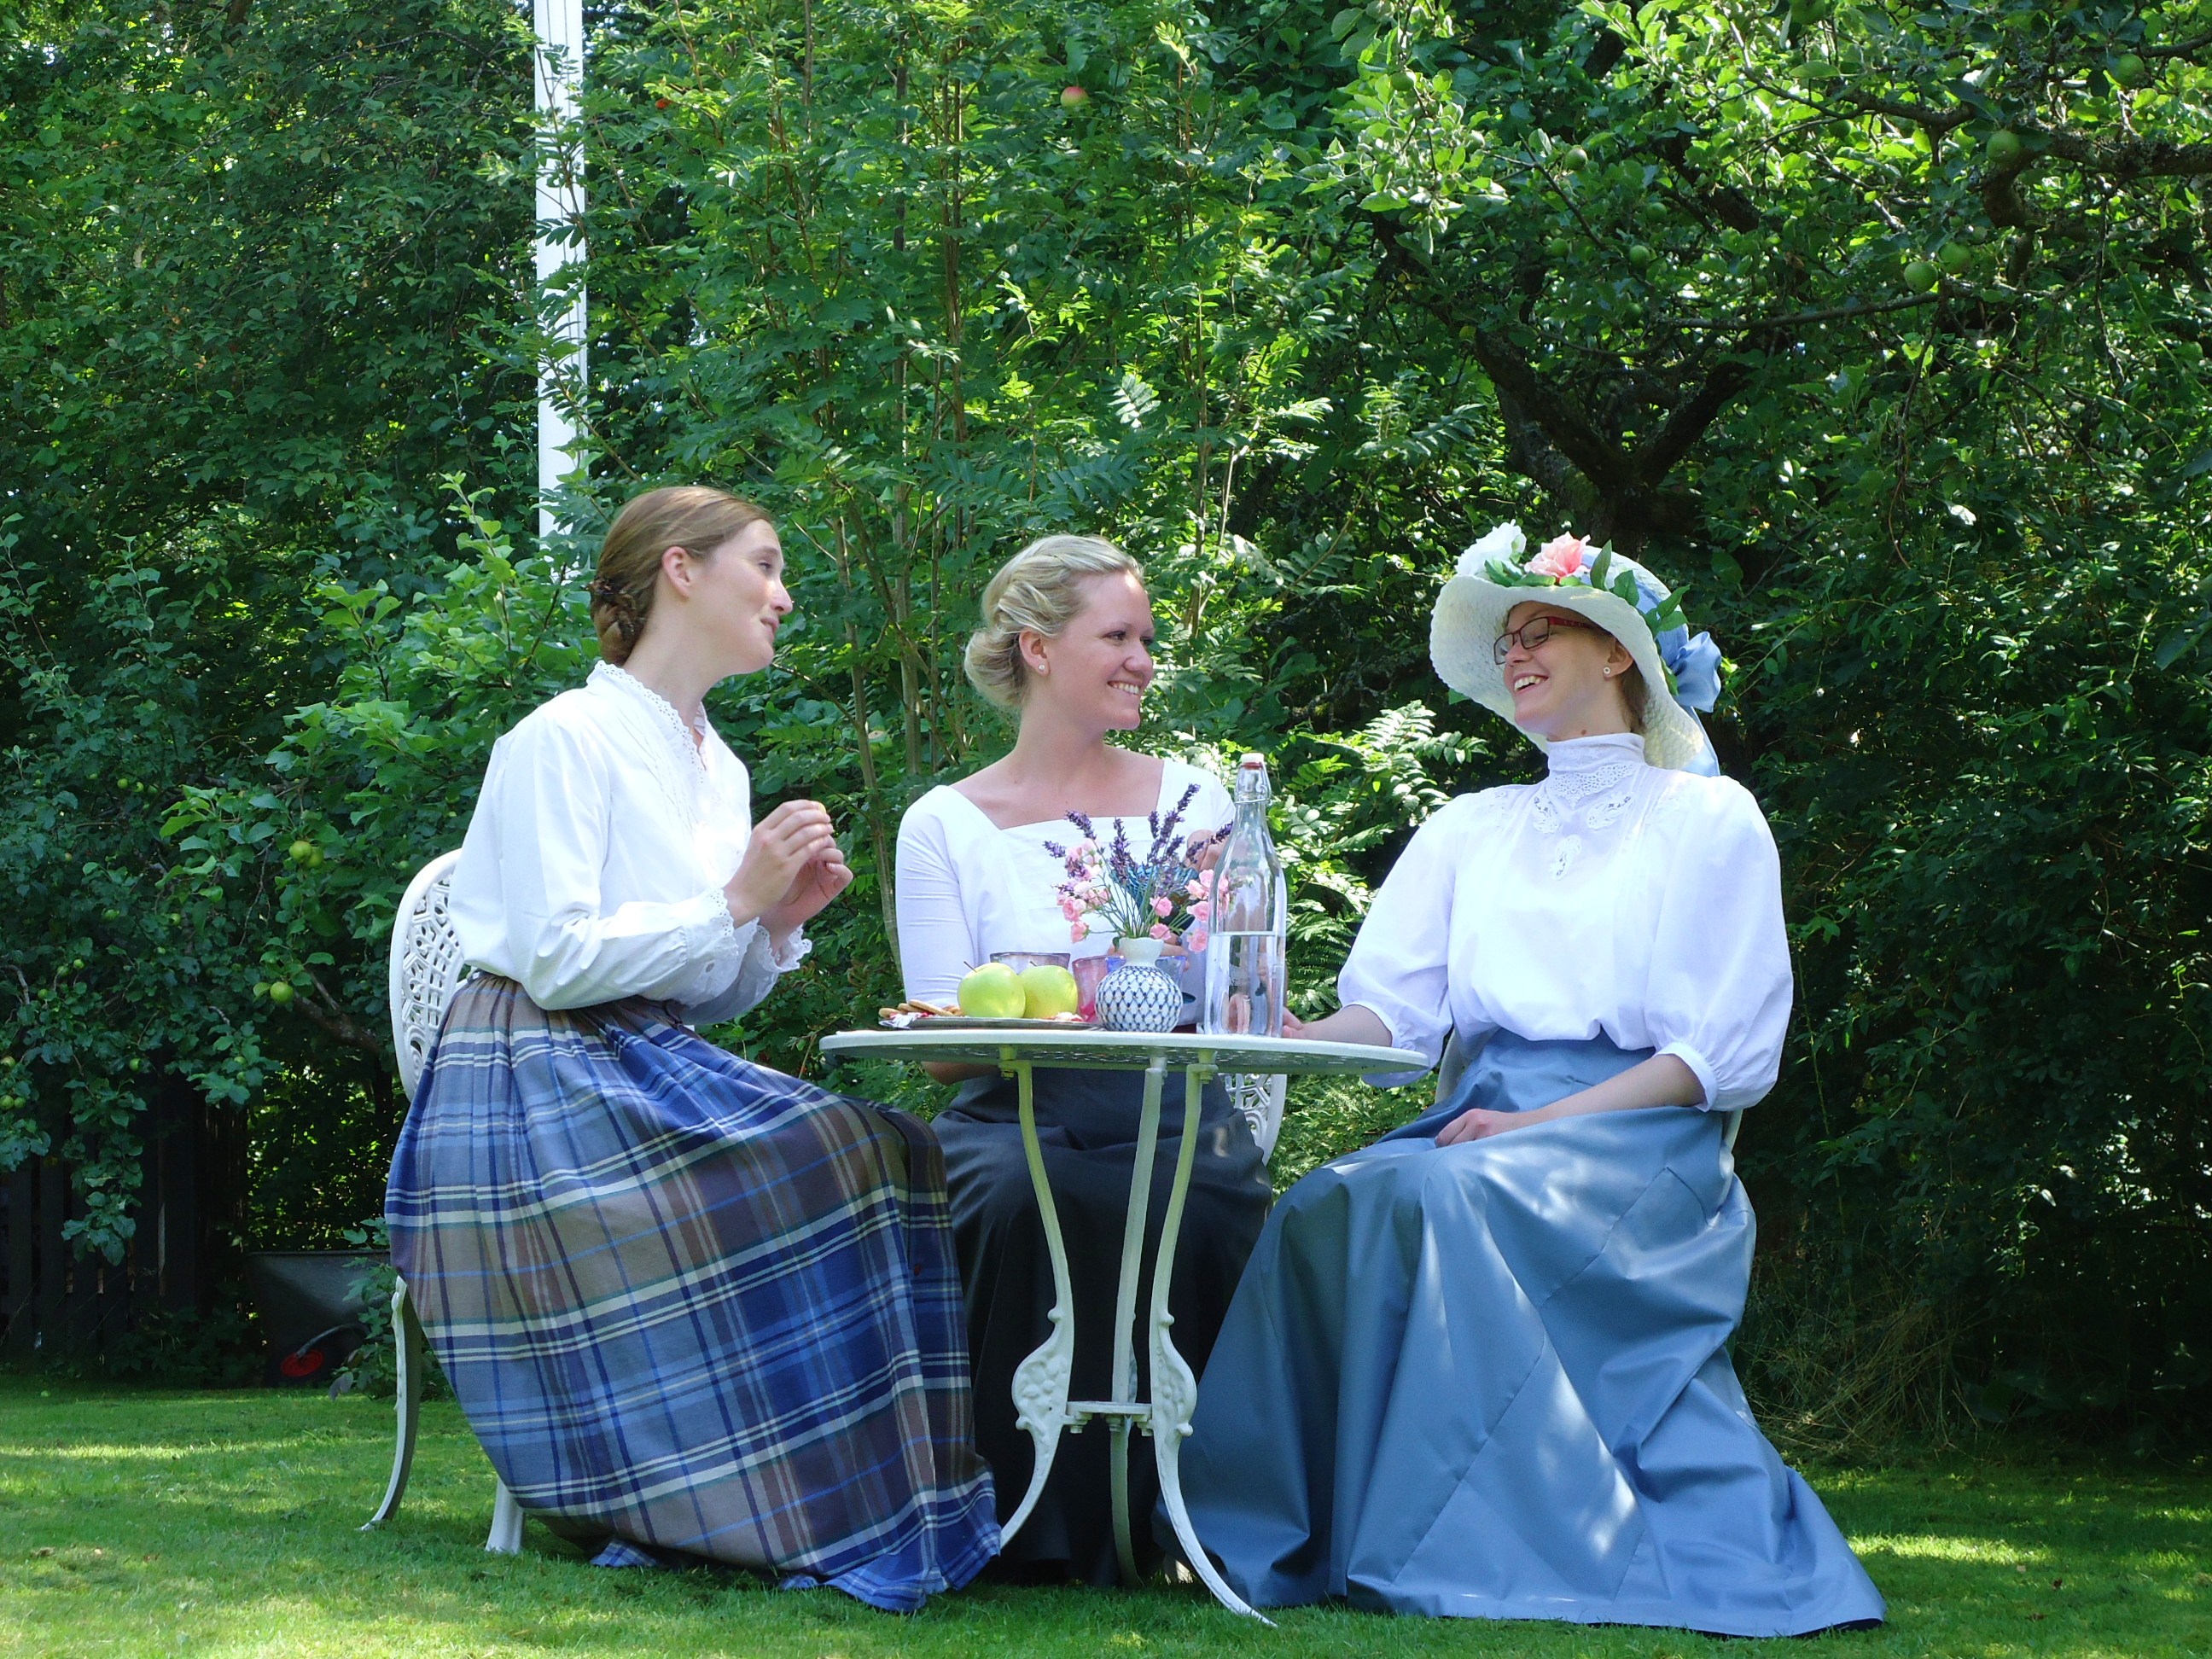
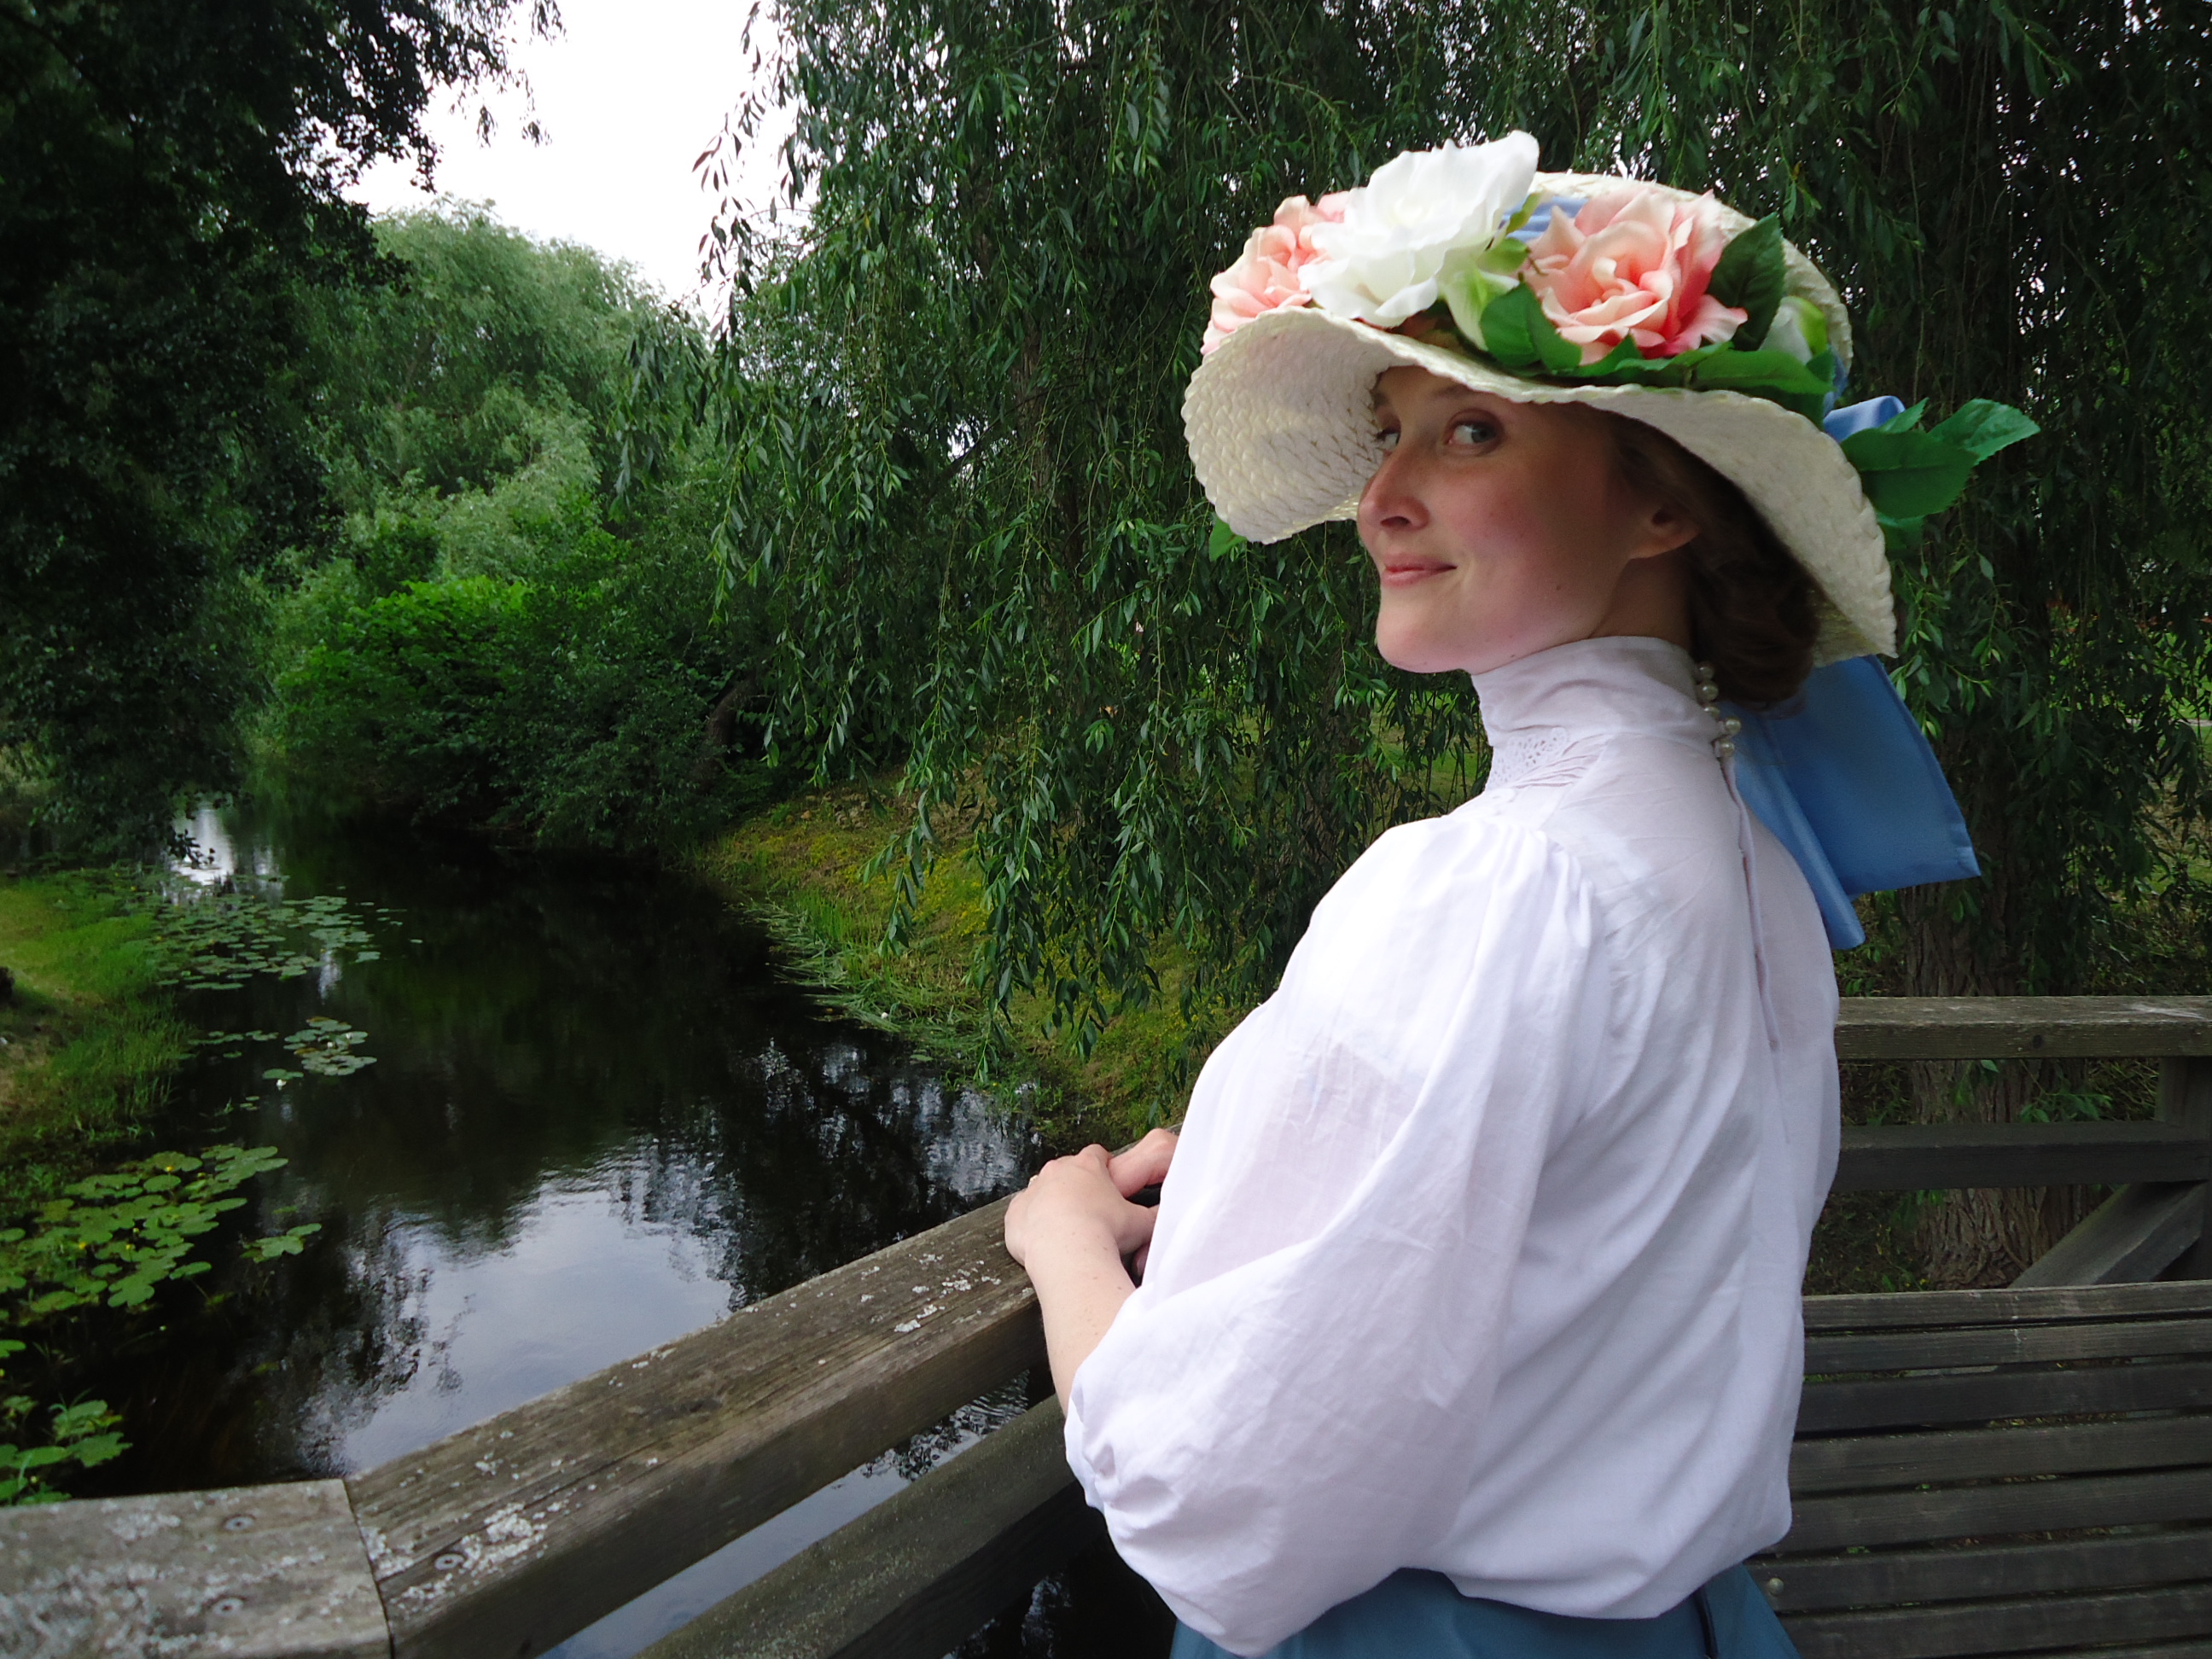
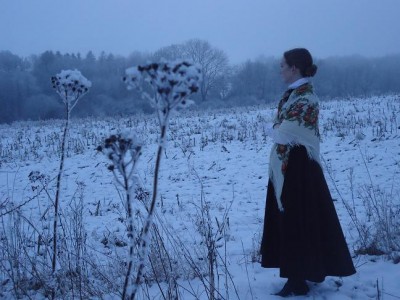
This summer, I had the opportunity to join my first event with the Swedish 19th Century Society. We were meant to show clothes that could have been worn by the people who did not have to emigrate from Sweden, during the famines of the 19th and early 20th century. I wanted to bring a friend, so my beloved edwardian Sunday look was reserved for her. My budget and time was extremely limited, so my bigger projects were discarded. Instead, I decided to take the opportunity to just have fun, making something I would never wear otherwise – a look for a wealthy lady, in 1903.
By the stream in Kisa, at 19th century event. Photo: Josefine Antonsson
For me, the first years of the Edwardian era, represents an unloved fashion, as its’ over-the-top garments, with pigeon breast and flowery decorations, contrast so much with the later, more refined fashions.
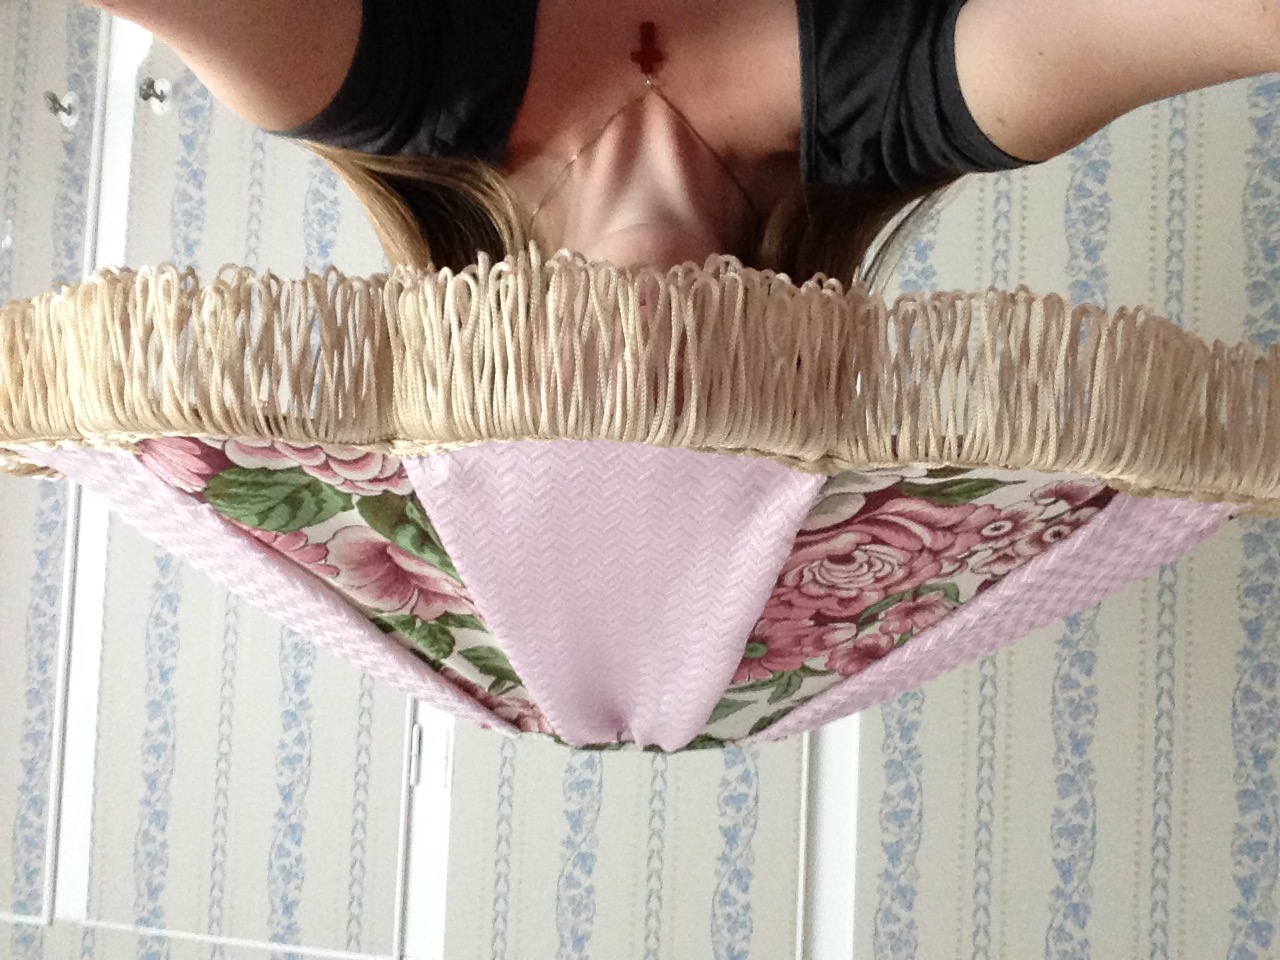
Because I had to make the whole look in between exams and work, most of the sewing was done either in the company of my family, in front of the TV, or out in the sun with my relaxing friends. My small budget only allowed me to use plastic table tablets and IKEA-roses for the hat, an old curtain for the skirt and a cotton fabric for the shirtwaist. The most expensive and time consuming part, was buying and making the whitework machine embroidery, before I left my own sewing machine for the summer.
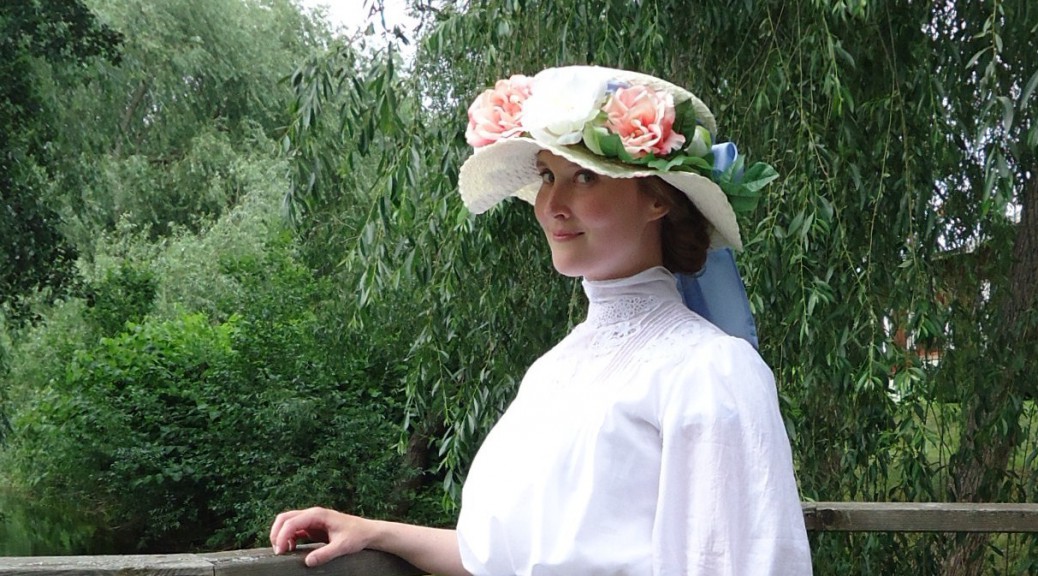
Rosenhatt i rosengård.
I basically followed patterns found in Janet Arnold’s “Patterns of Fashion 2” and was inspired by pictures found at Pinterest. I had great fun making the overly decorated hat, and my little niece enthusiastically gasped: “This is the biggest and most beautiful hat I have ever seen”. Alas, I had neither time, nor material for putting the finishing ribbons onto the skirt. At the event I felt like a cheap, walking flower garden, but to my great surprise I got many compliments for this look. Maybe it is not such an unloved fashion after all?
At least, this is obivously not a fashion unloved by my cat. Photo: Christian AntonssonHatten på sin ägarinna
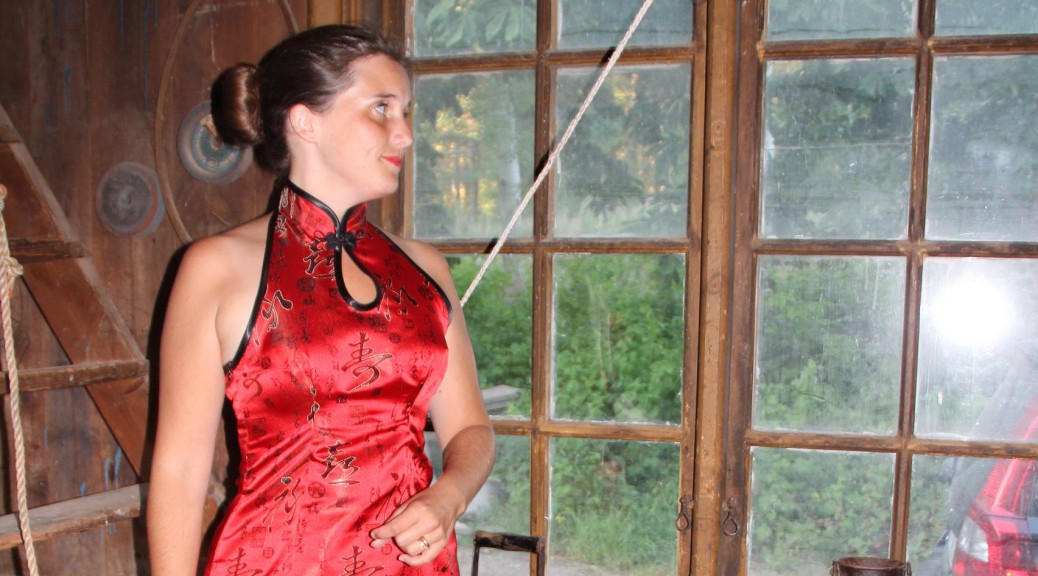
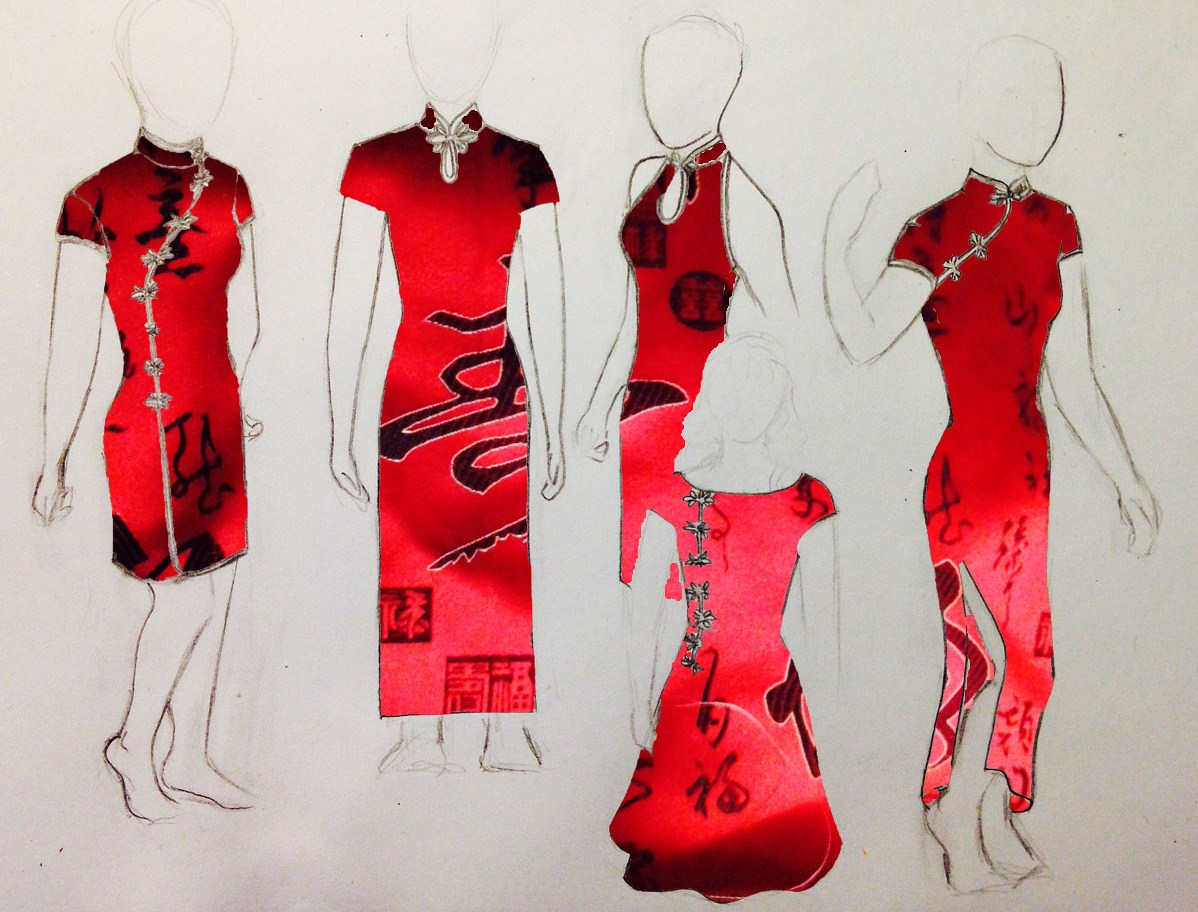
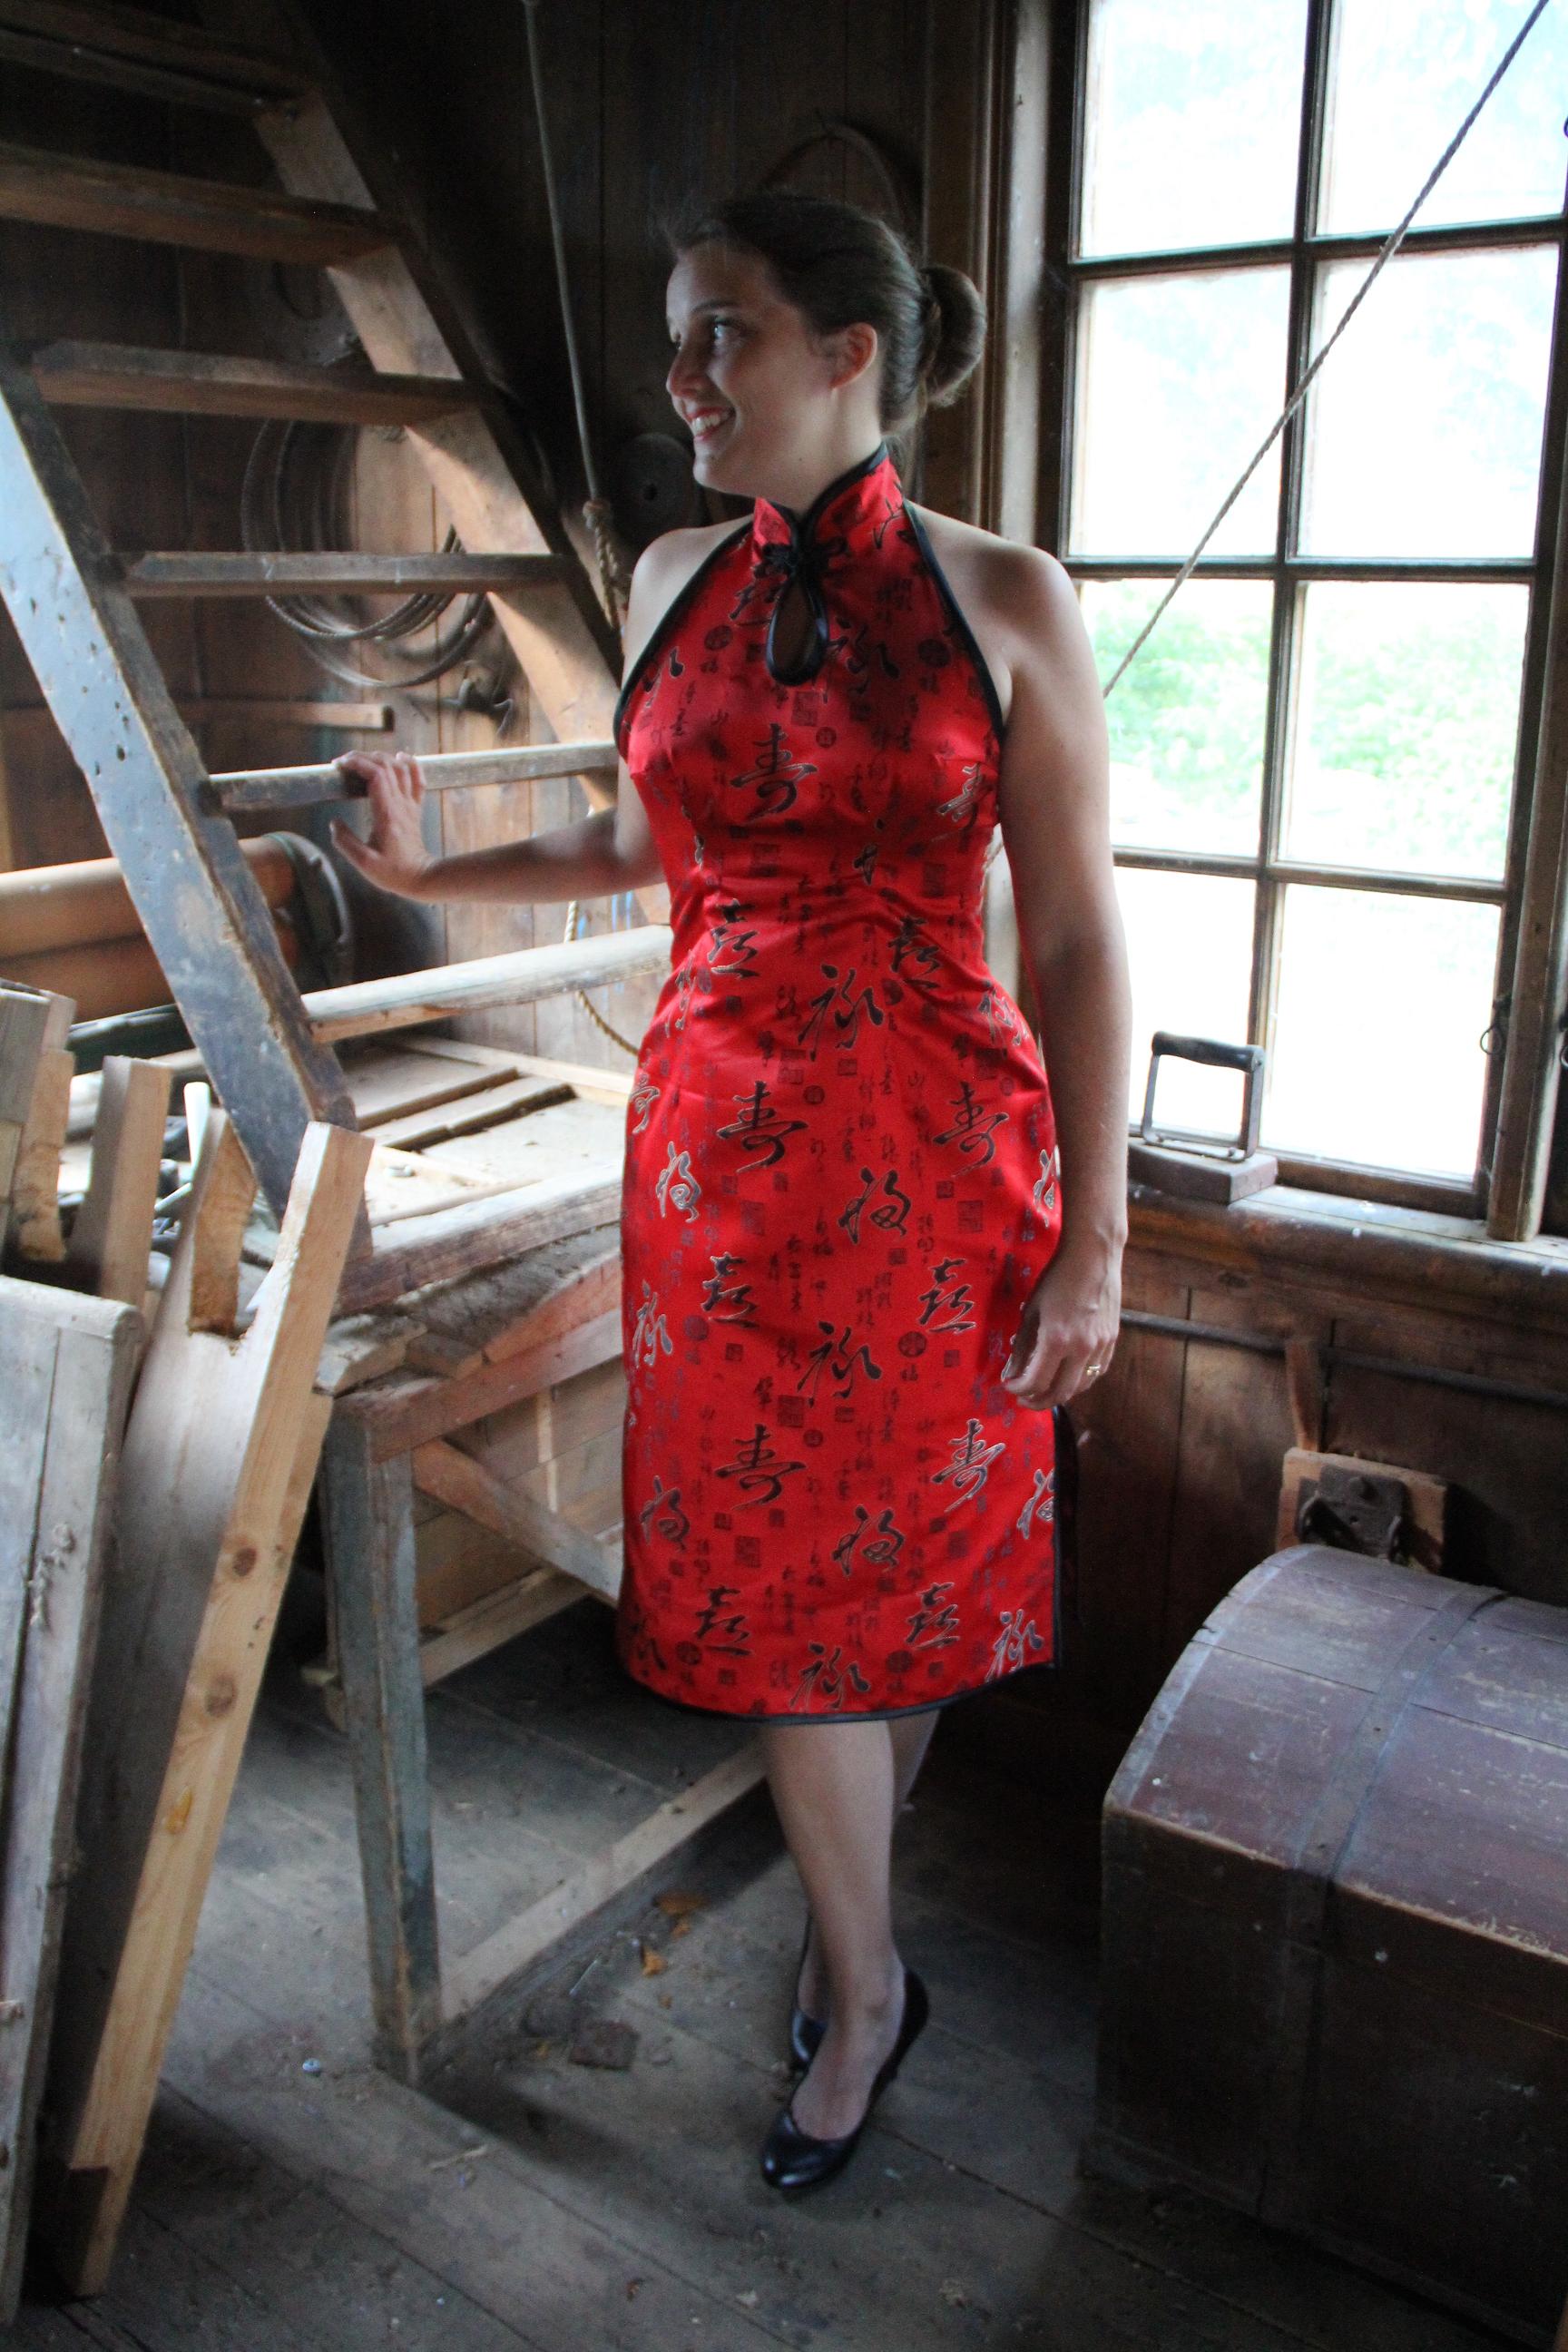
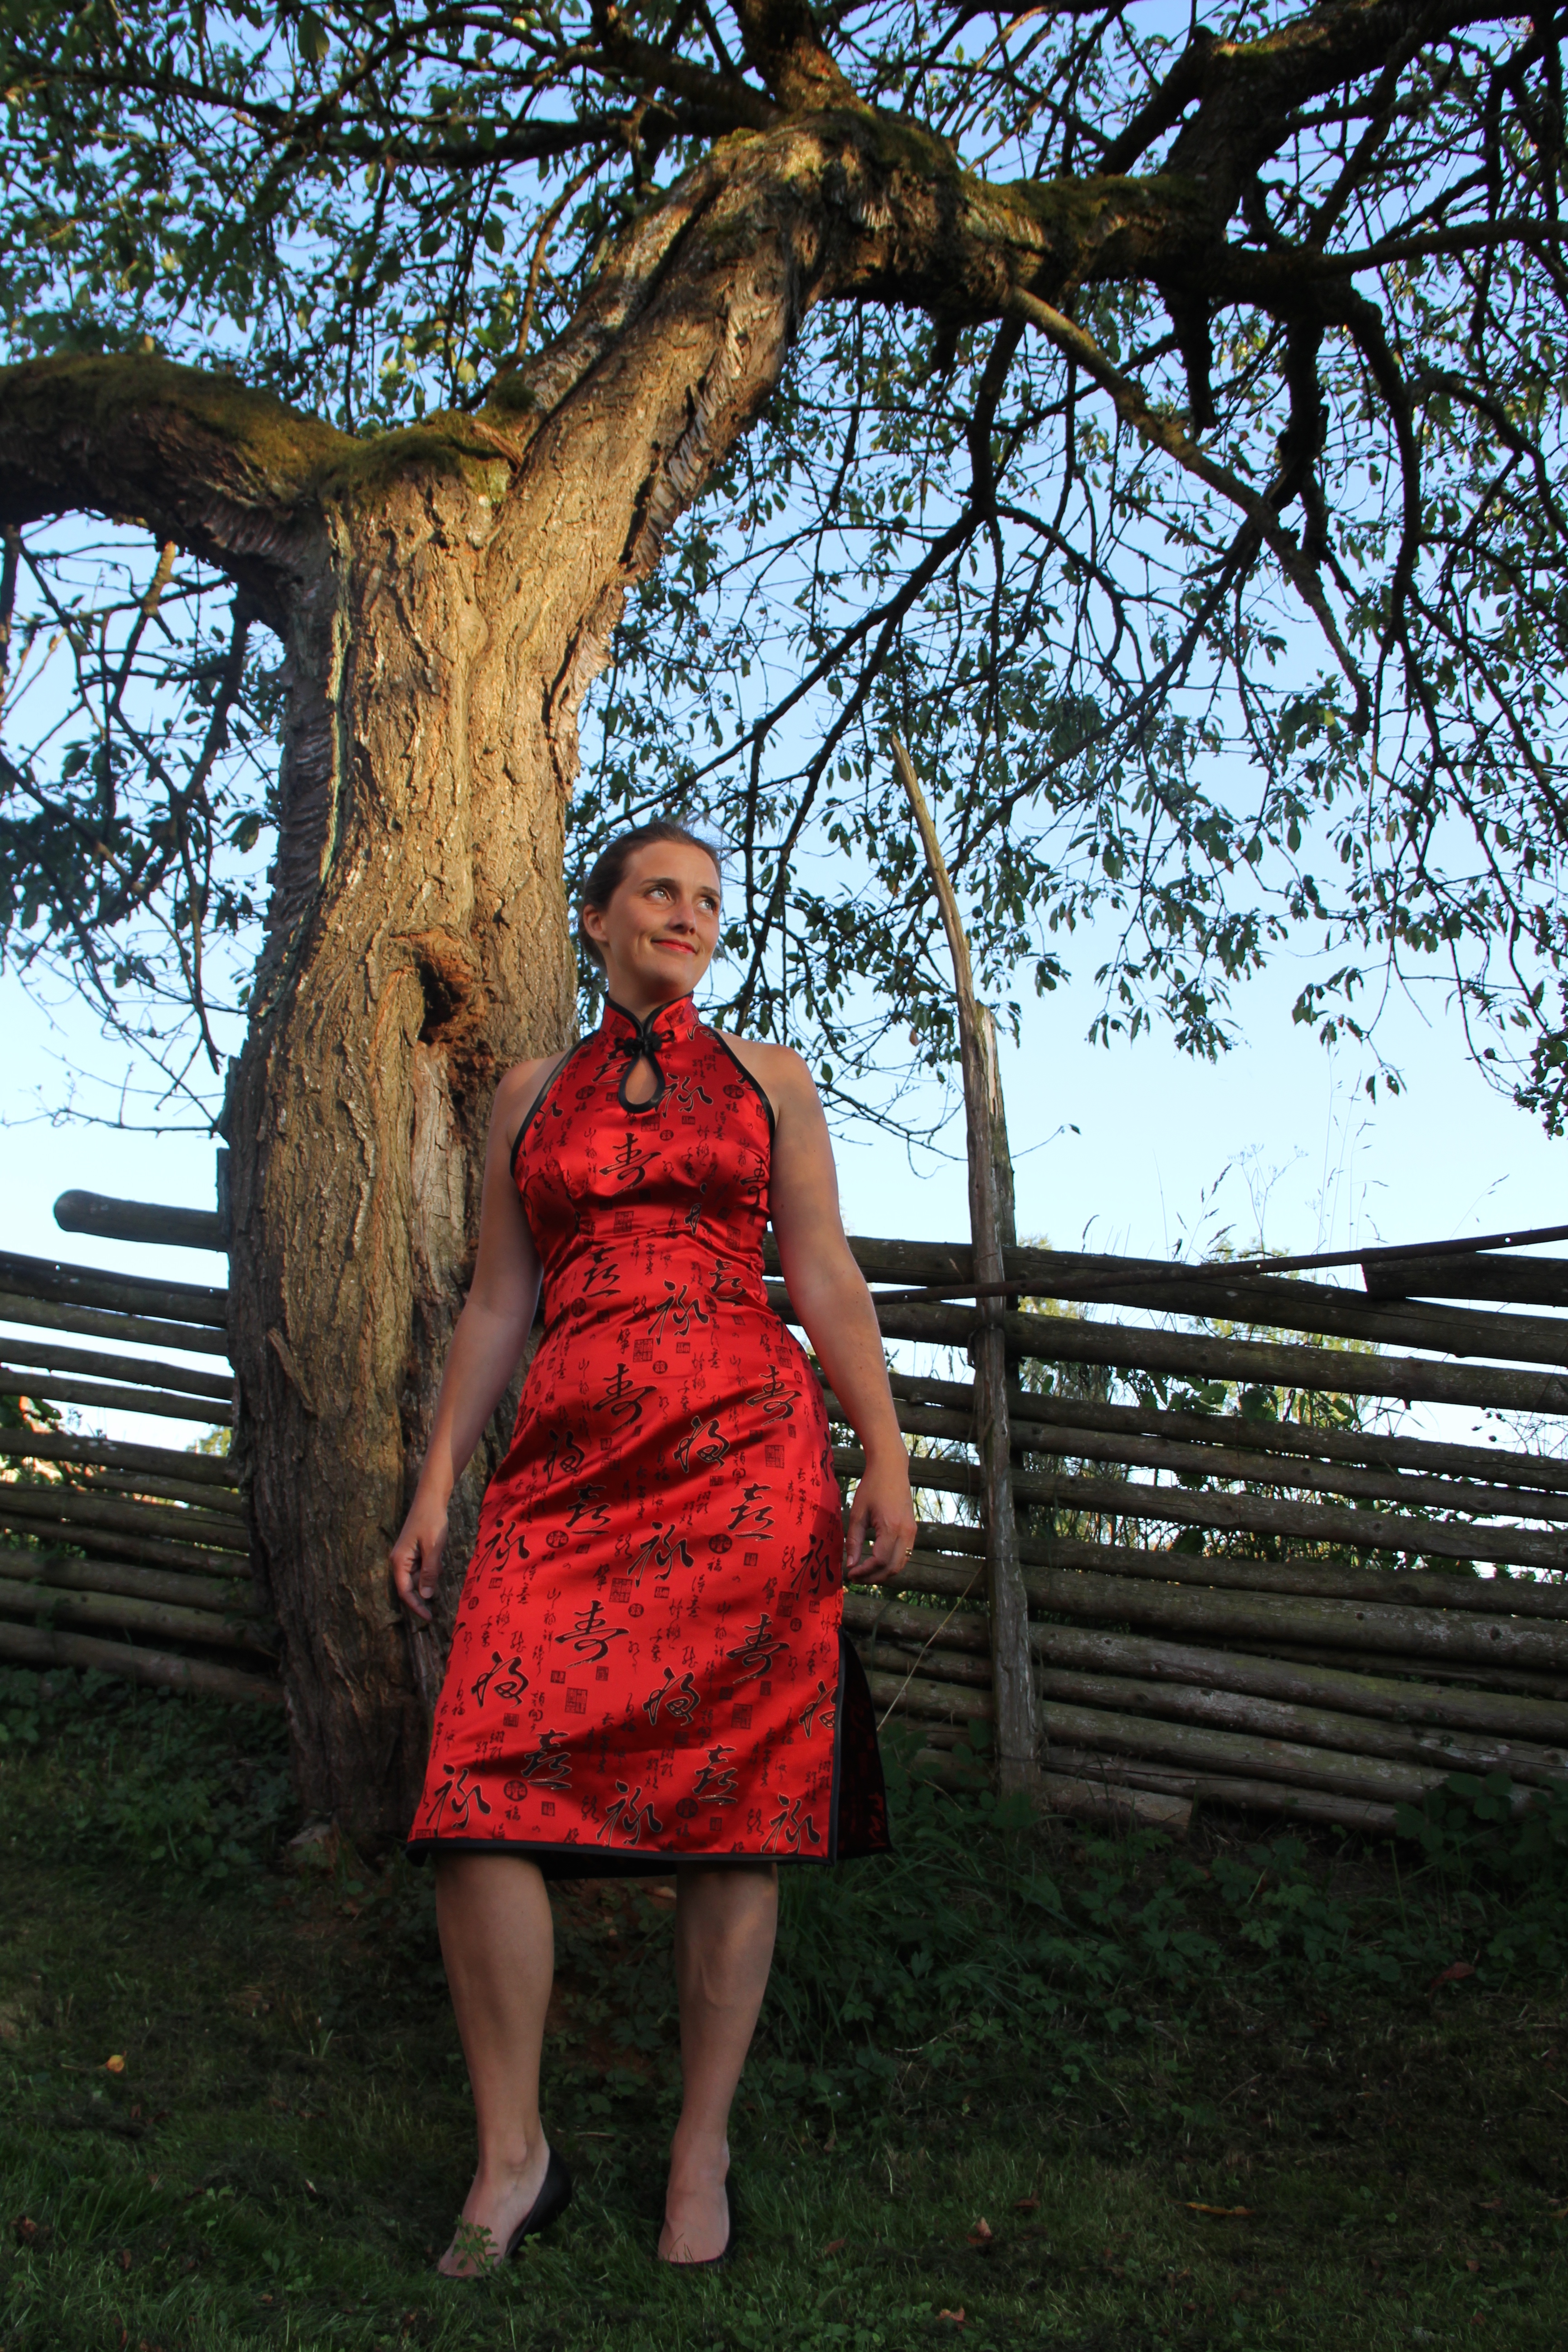
Idag är min sista dag i Sverige. I våras gav jag min syster löftet att sy en klänning av det vackra tyget, som mamma tagit med från Kina. Hon fick välja mellan modellerna på denna skiss.
Today is my last day in Sweden, for this summer. This spring I gave my sister the promise of making her a dress out of the beautiful fabric that our mother had brought home from China. She could choose from these models.
Hon valde den som är lite skymd av en annan. Jag fick hennes mått via mail och började göra en toille. När jag kom hem till Sverige kunde jag justera toillen och börja klippa i det riktiga tyget, som var 1*4 m långt.
Sedan har jag jobbat och haft en massa andra projekt, så jag planerade att åtminstone bli klar innan sommarens slut. Nu i veckan hade vi provning. Jag har sytt som en tok och igår blev klänningen klar!
She chose the model that is a little hidden behind another. I had her measurements by email and stared making a pattern. When I got home to Sweden, I just had to ajust the pattern and start cutting the real fabric, which was 1 x 4 metres.
Then I had worked and had a lot of other projects, so I planned to at least be ready by the end of the summer. This week we tested it. I have sewn like crazy since and yesterday it was ready!
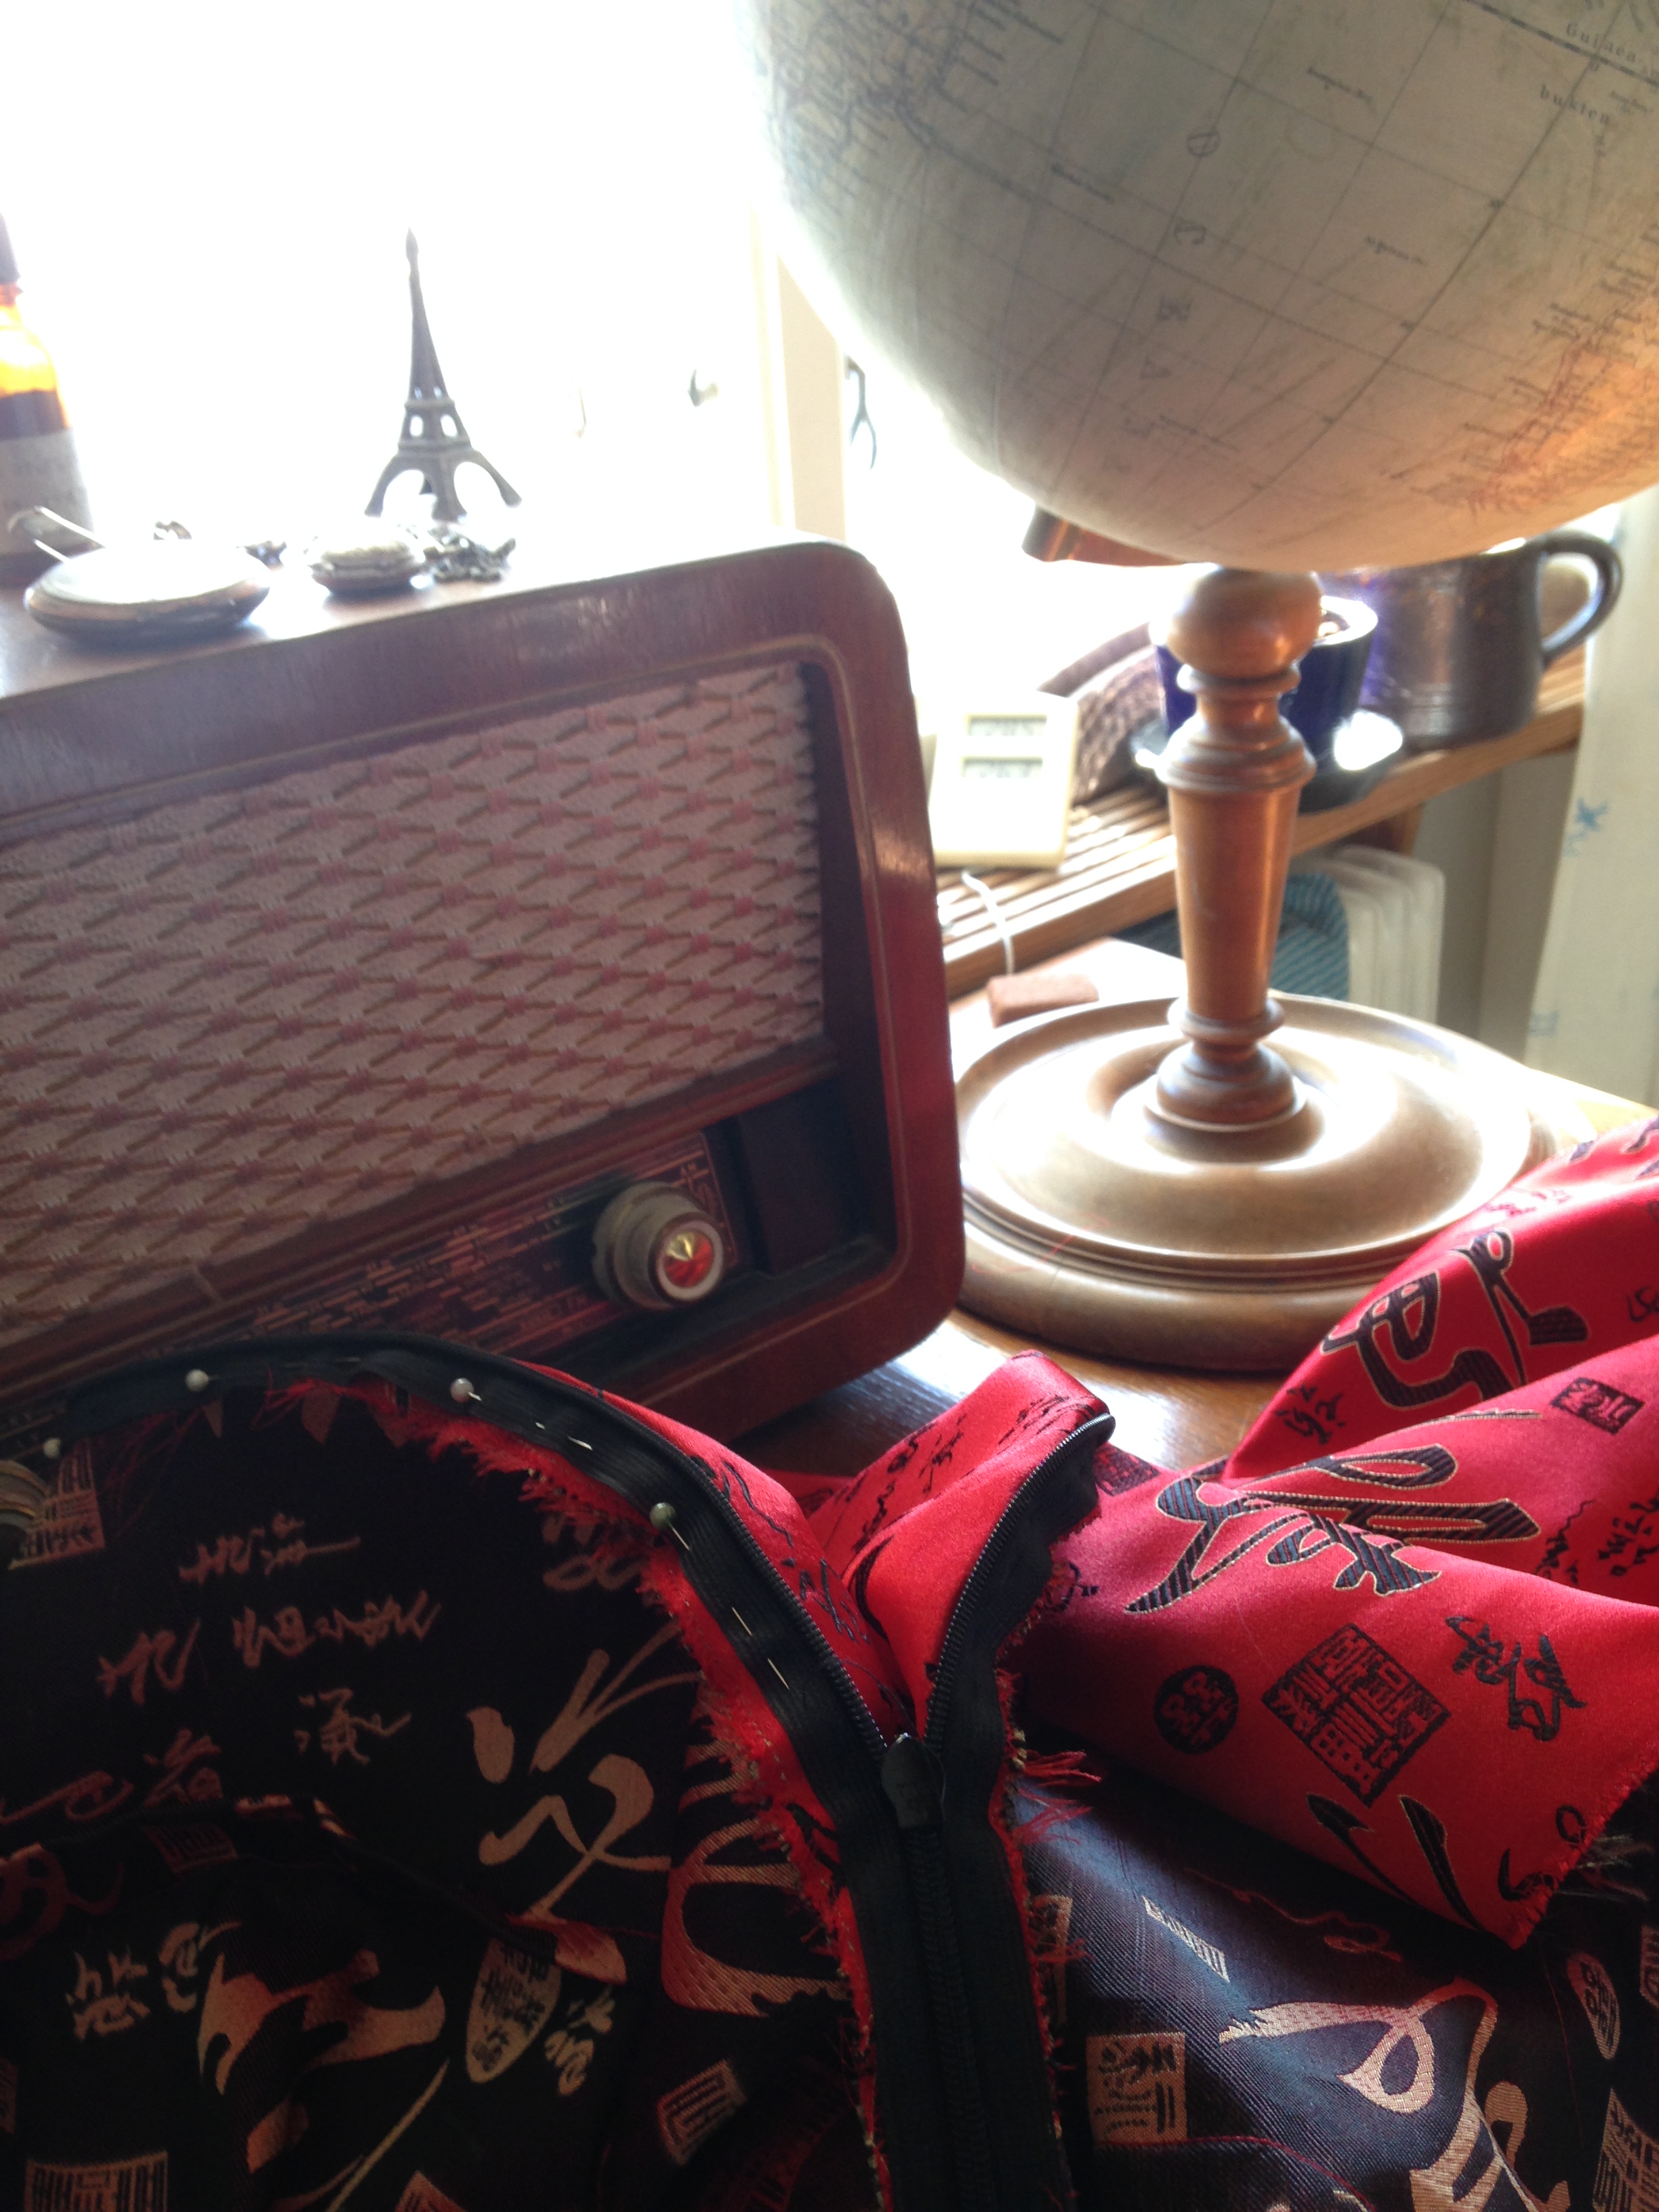
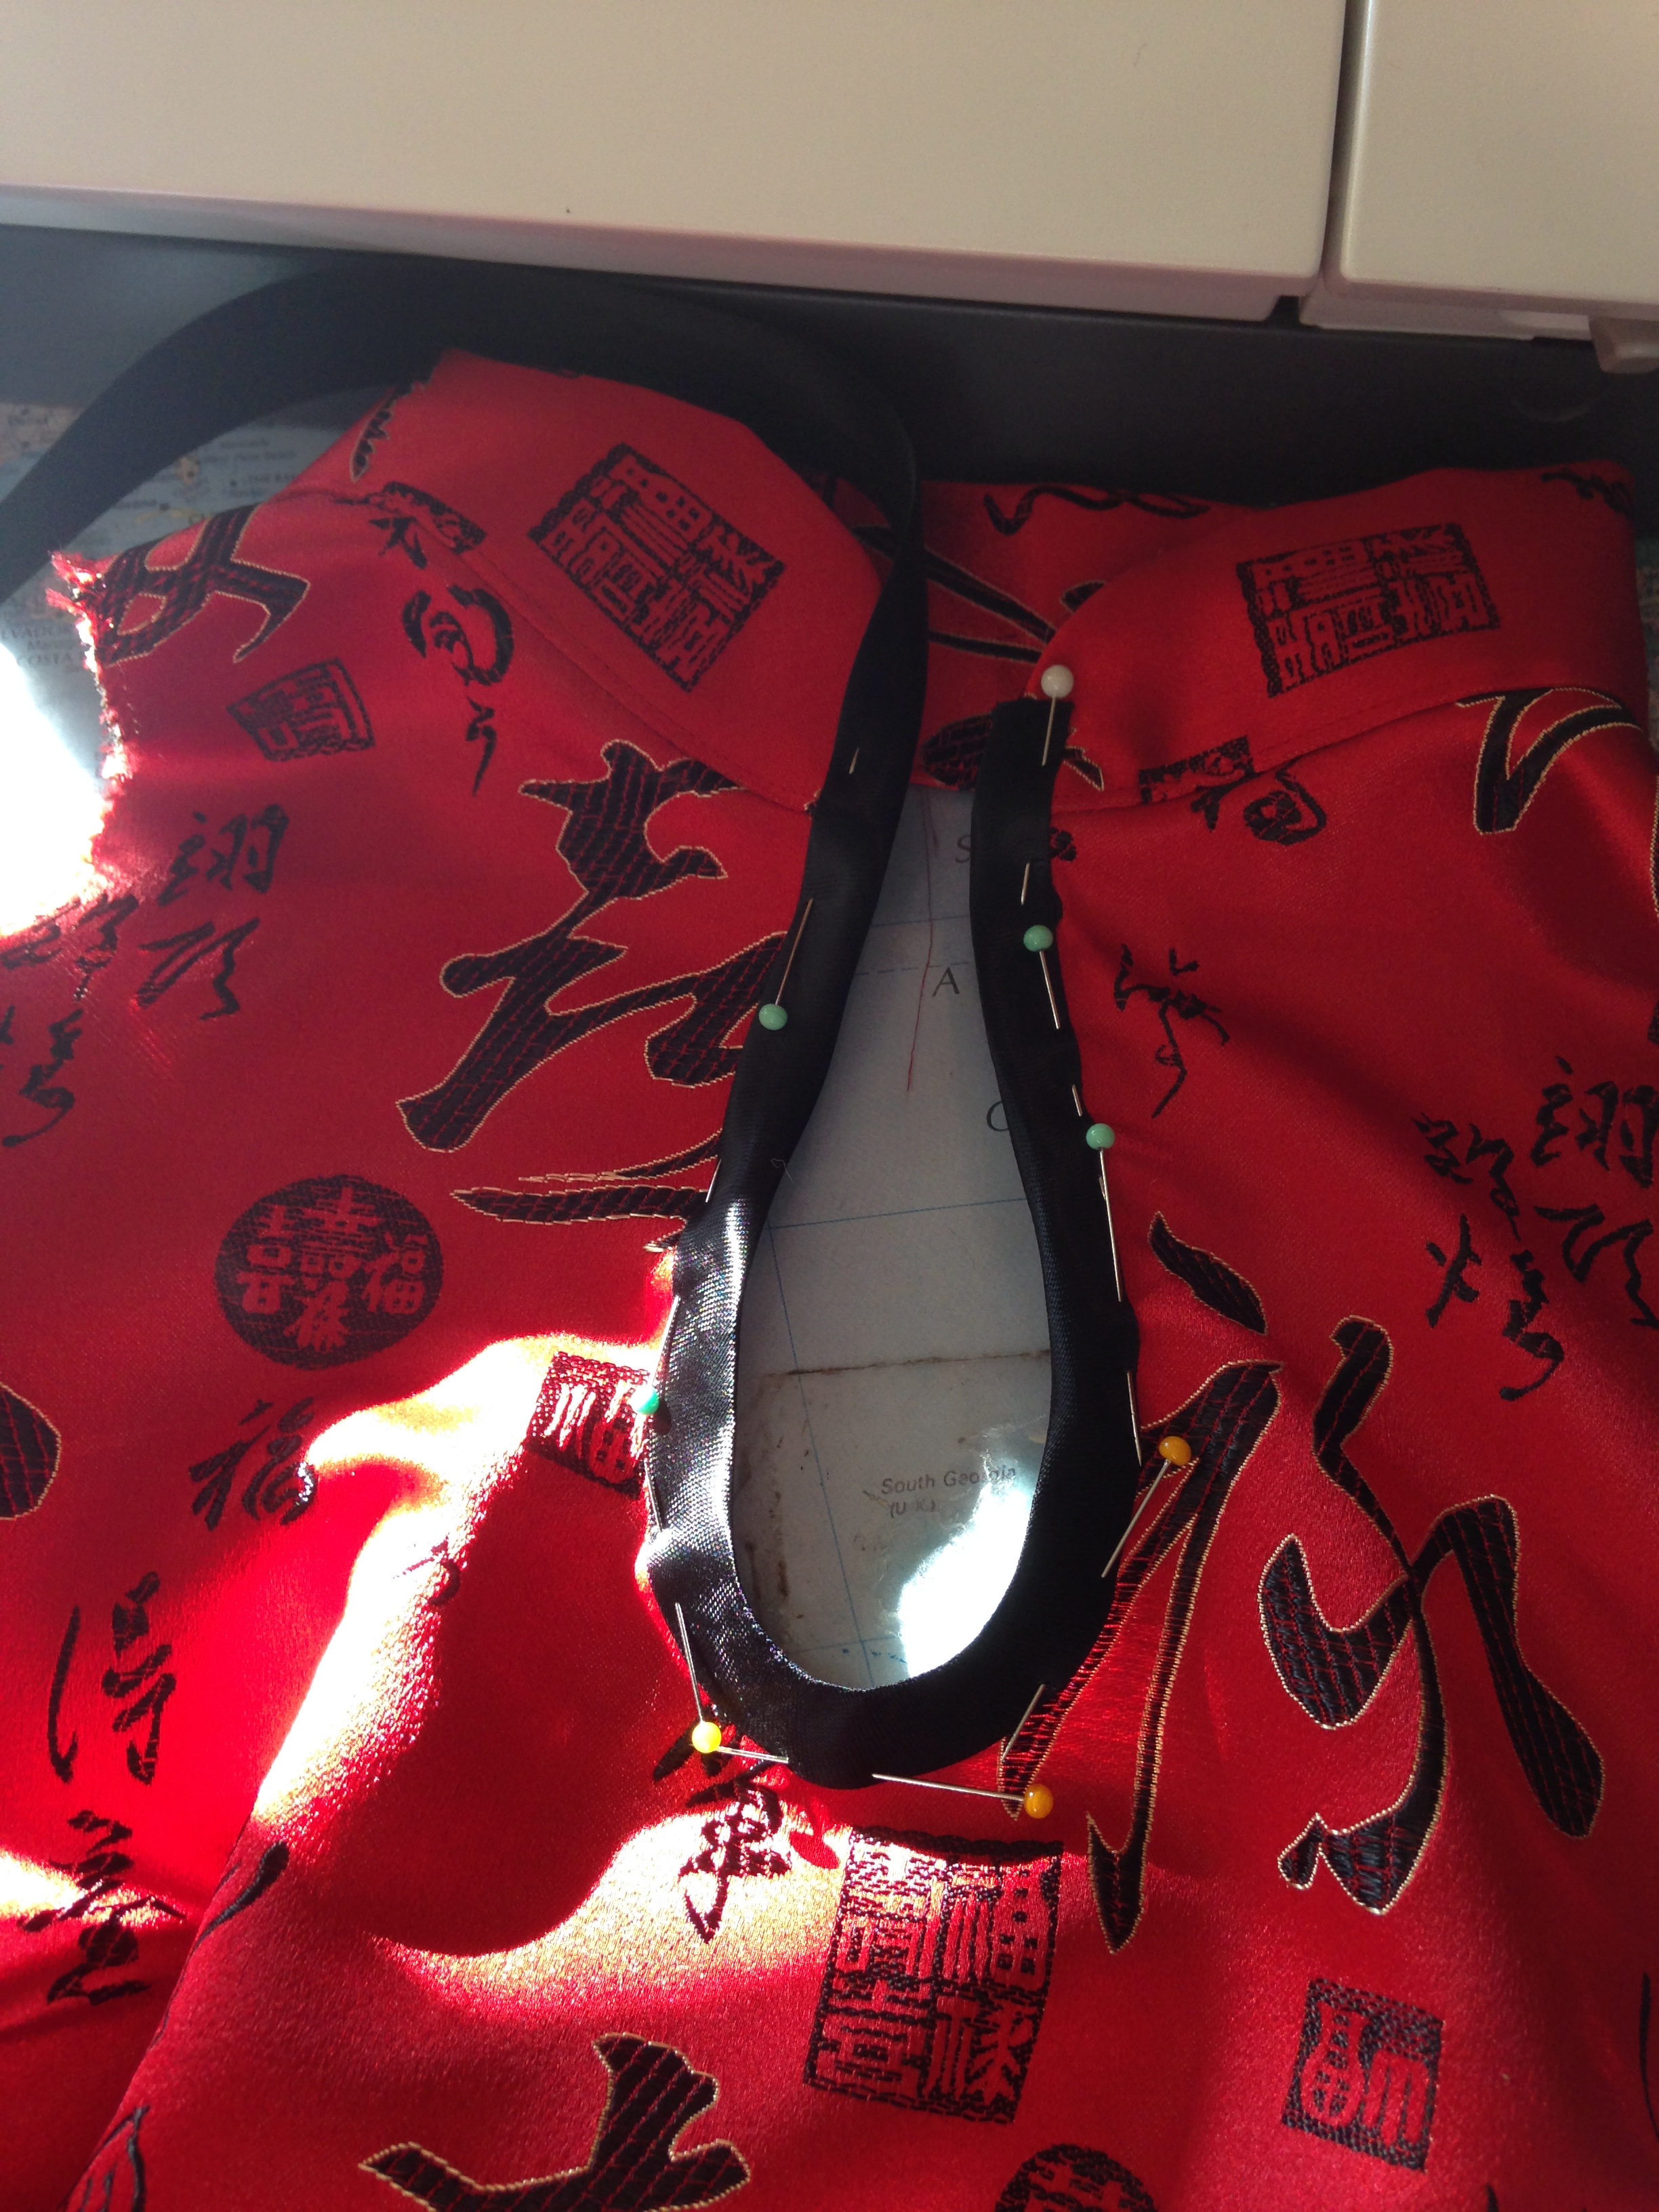
Min ovanligt trevliga syateljé, denna vecka. För instruktion om hur man syr i dragkedja, se inlägget om min rutiga klänning. // My unusually nice sewing studio, for this week. For instructions on how to put in a hidden zipper, se the post on “My checked dress”.Klänningen färdigsydd, men utan kantbanden. // The dress is ready, but still without its lining tape.Kantband i urringningen // Lining tape in the neckline
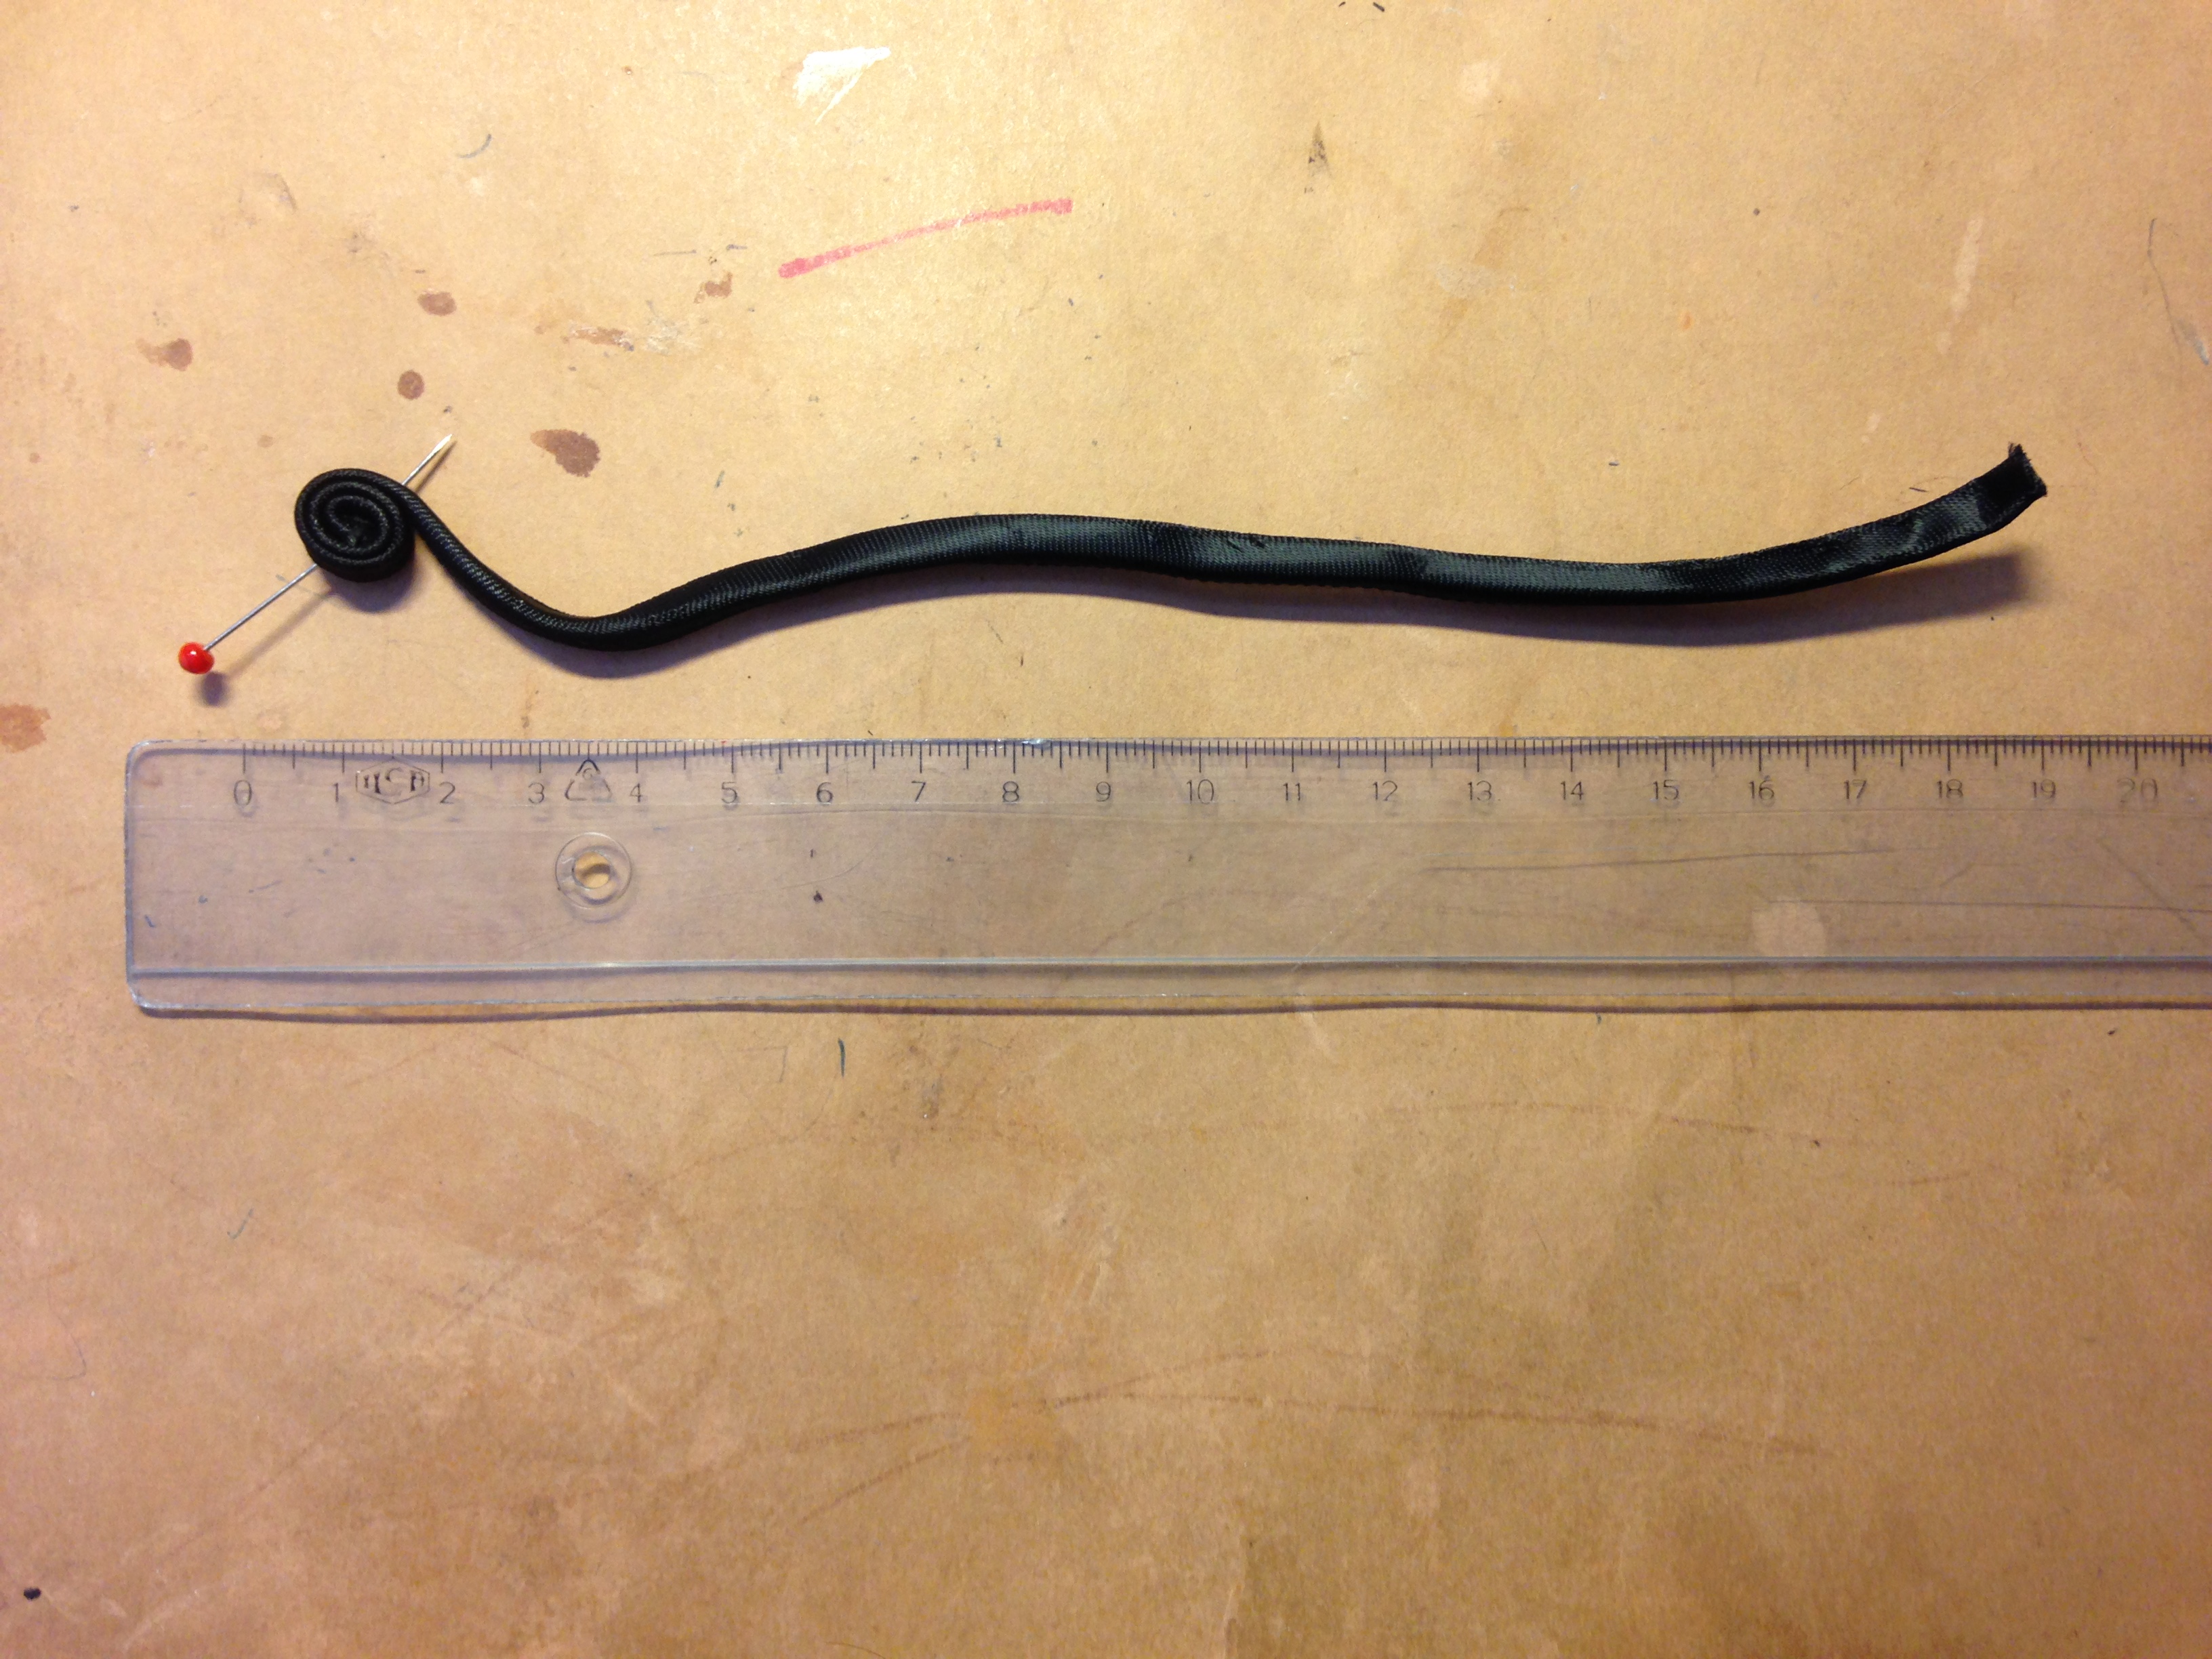
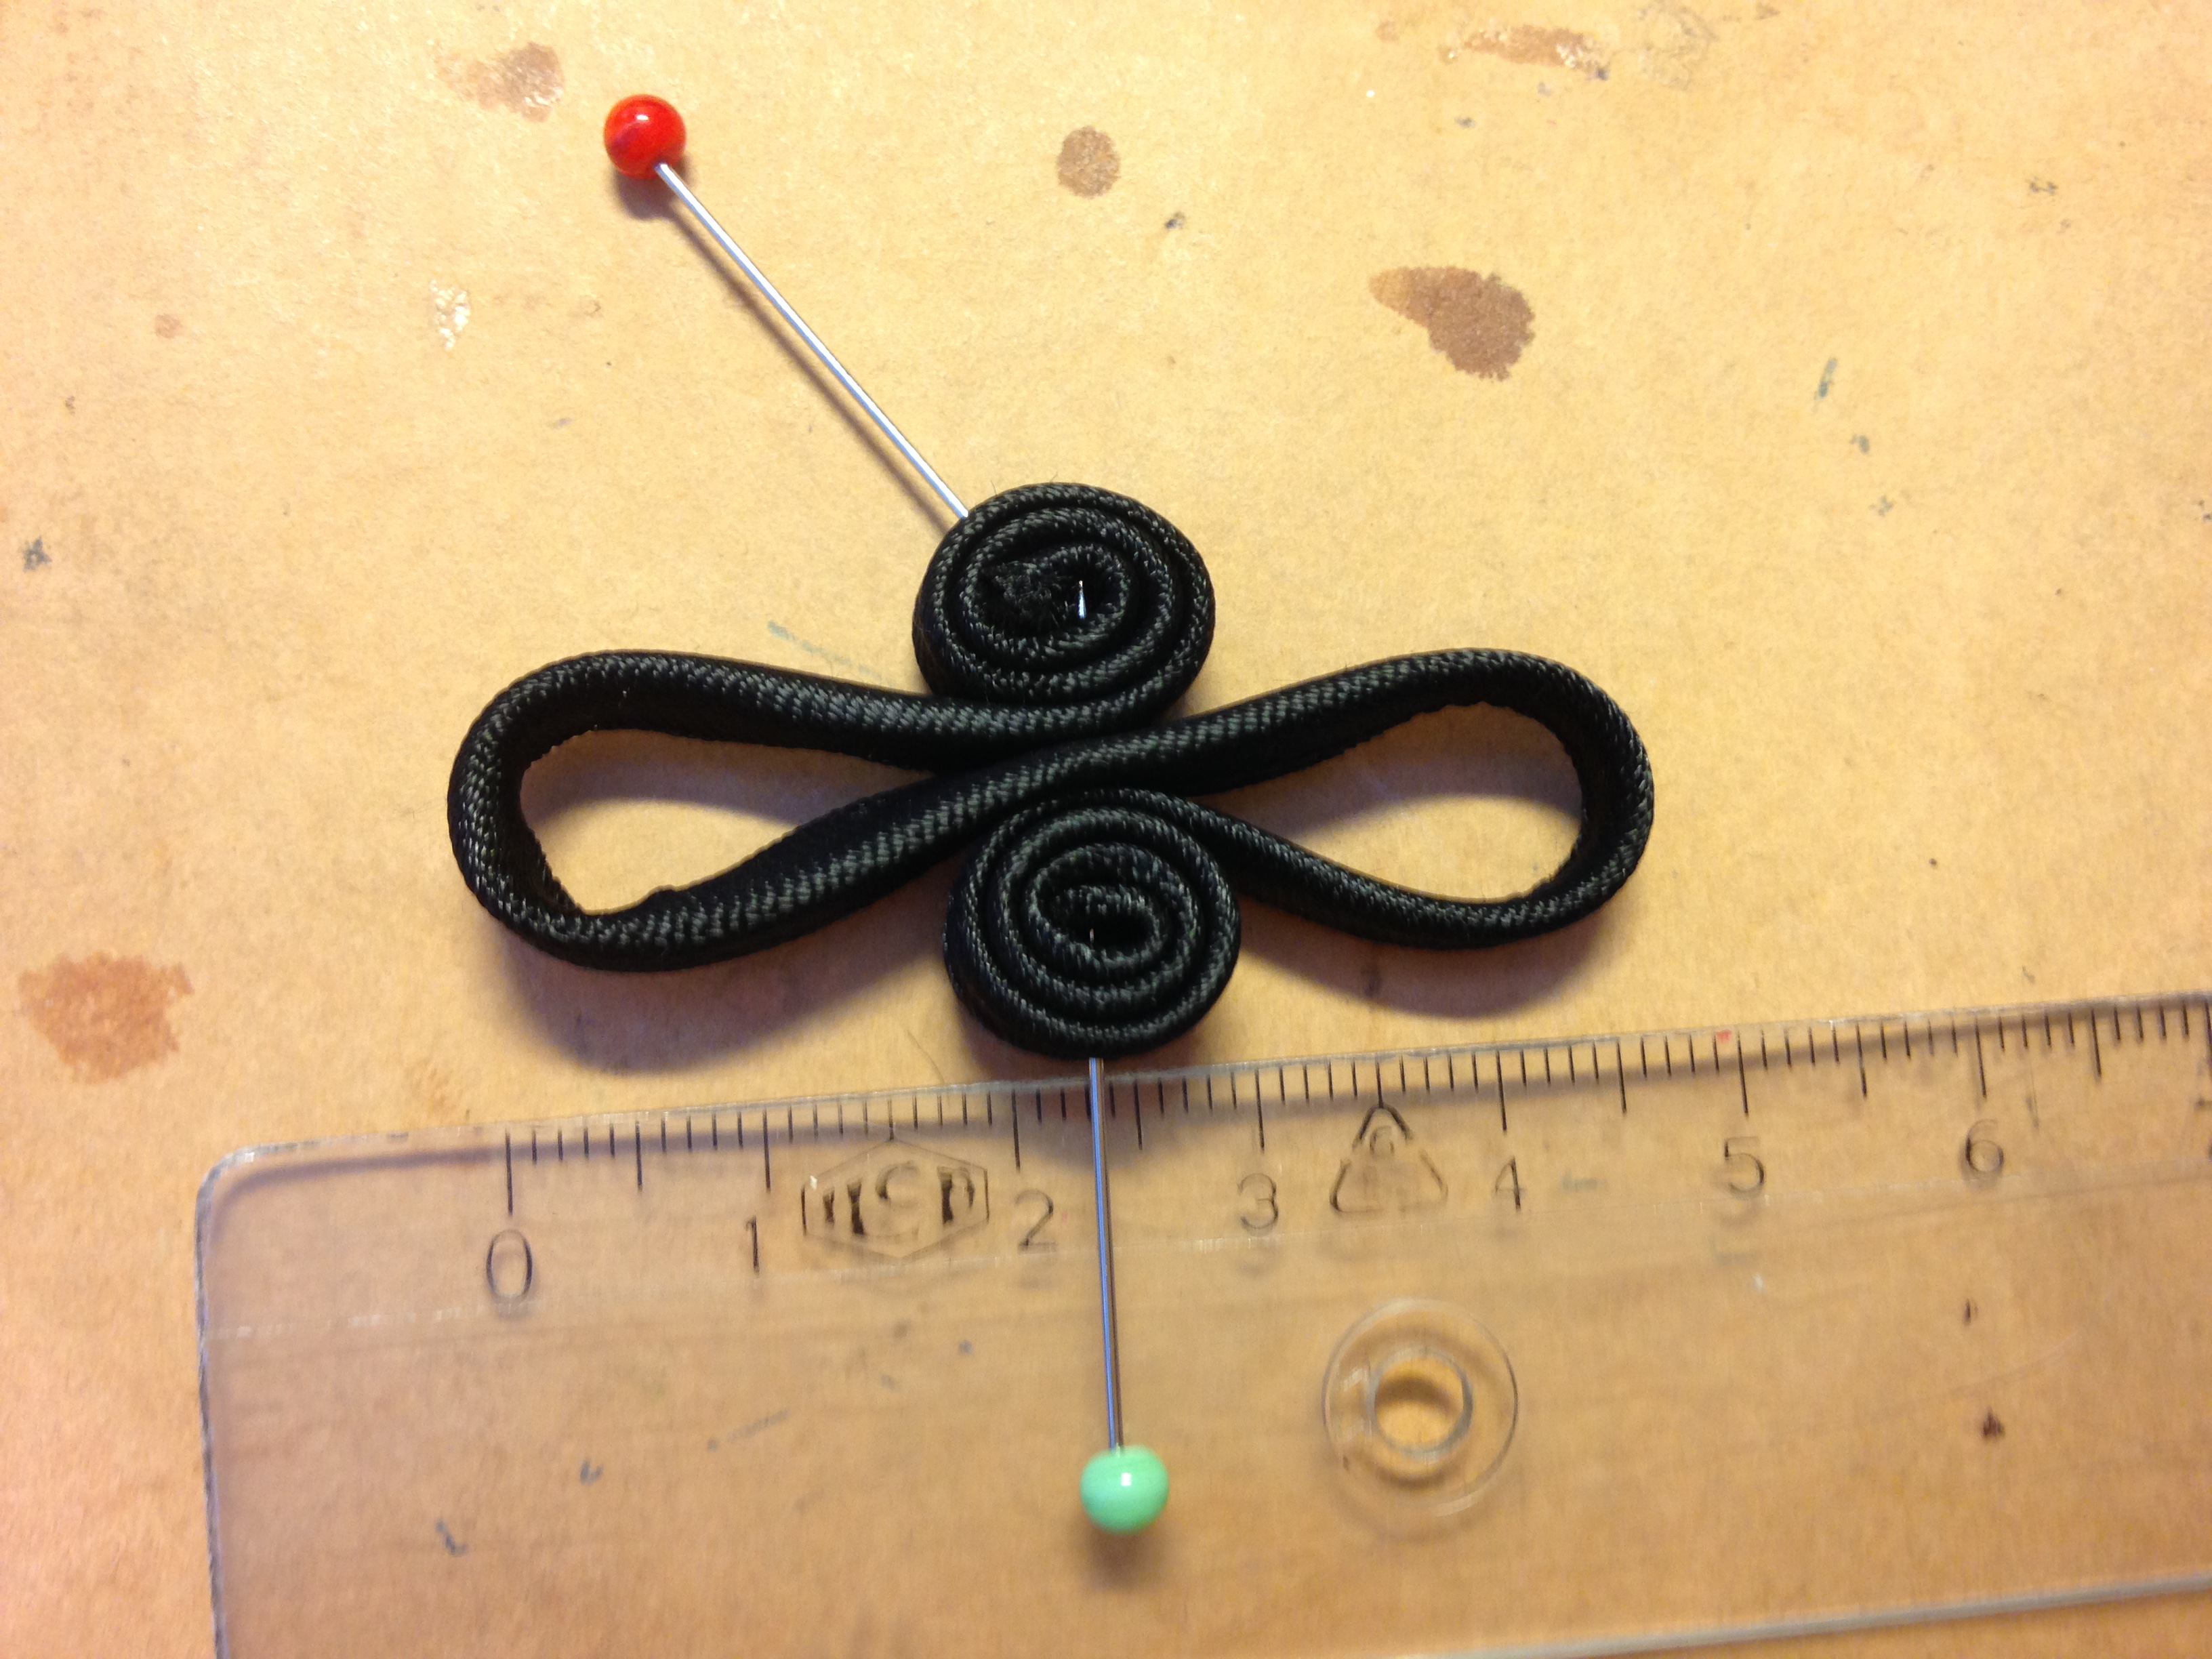
Eftersom ni ser i tidigare inlägg hur klänningar med liknande modeller, tar form på en provdocka, visar jag bara det som är unikt för denna klänning: de “kinesiska tygknapparna”:
Because you see similar models taking form on the mannequin in my earlier blog posts, I will only show you what is unique about this dress: the “Chinese buttons”.
Jag använde kantbandet, men vek och sydde ihop det på längden. Sedan vek jag det ytterligare en gång och började forma knappen av ca 24 cm långt band. // I used the tape, but folded it and stitched it on the long side. Then I folded it again and started to form the button from a 24 cm long ribbon.Jag rullade båda ändar och nålade ihop. // I rolled both ends and fastened wit needles.Sedan sydde jag // Then I sew.Och slutligen fäste jag knapparna i kragen. // I finished by adding the buttons to the collar.
Jag blev jättenöjd med klänningen och det var en fröjd att överräcka den. Hon är ju vacker som en dag och en av döttrarna utbrast: “Du är så vacker att jag måste krama dig!”. Dessutom fick vi några fina kort i deras coola verkstad och trädgård.
I was so satisfied with the dress and it felt so good to give it to my sister. She is beautiful. One of her daughters exclaimed: “You are so beautiful, I just have to hug you!”. We had some nice photos in their rustic work shop (?) and in their garden.
Förutom klänningen, visar jag här lite annat som jag sysselsatt mig med under sommaren:
Except for the dress, I show you some of the other things that have kept me busy during the summer.
Konserter
Den 7 juli hade jag konsert med Olle Långström, i Vimmerby kyrka och den 1 augusti hade vi vår årliga konsert på Kröngården – jag, Hanna Karlsson, Malin Karlsson, Kalle Sellbrink med vänner. Jättekul!
The 7th of July I had a concert together with Olle Långström, in the Church of Vimmerby. The 1st of August, we had our annual concert at Kröngården – Hanna Karlsson, Malin Karlsson, Kalle Sellbring and his friends, and myself of course. We had great fun!
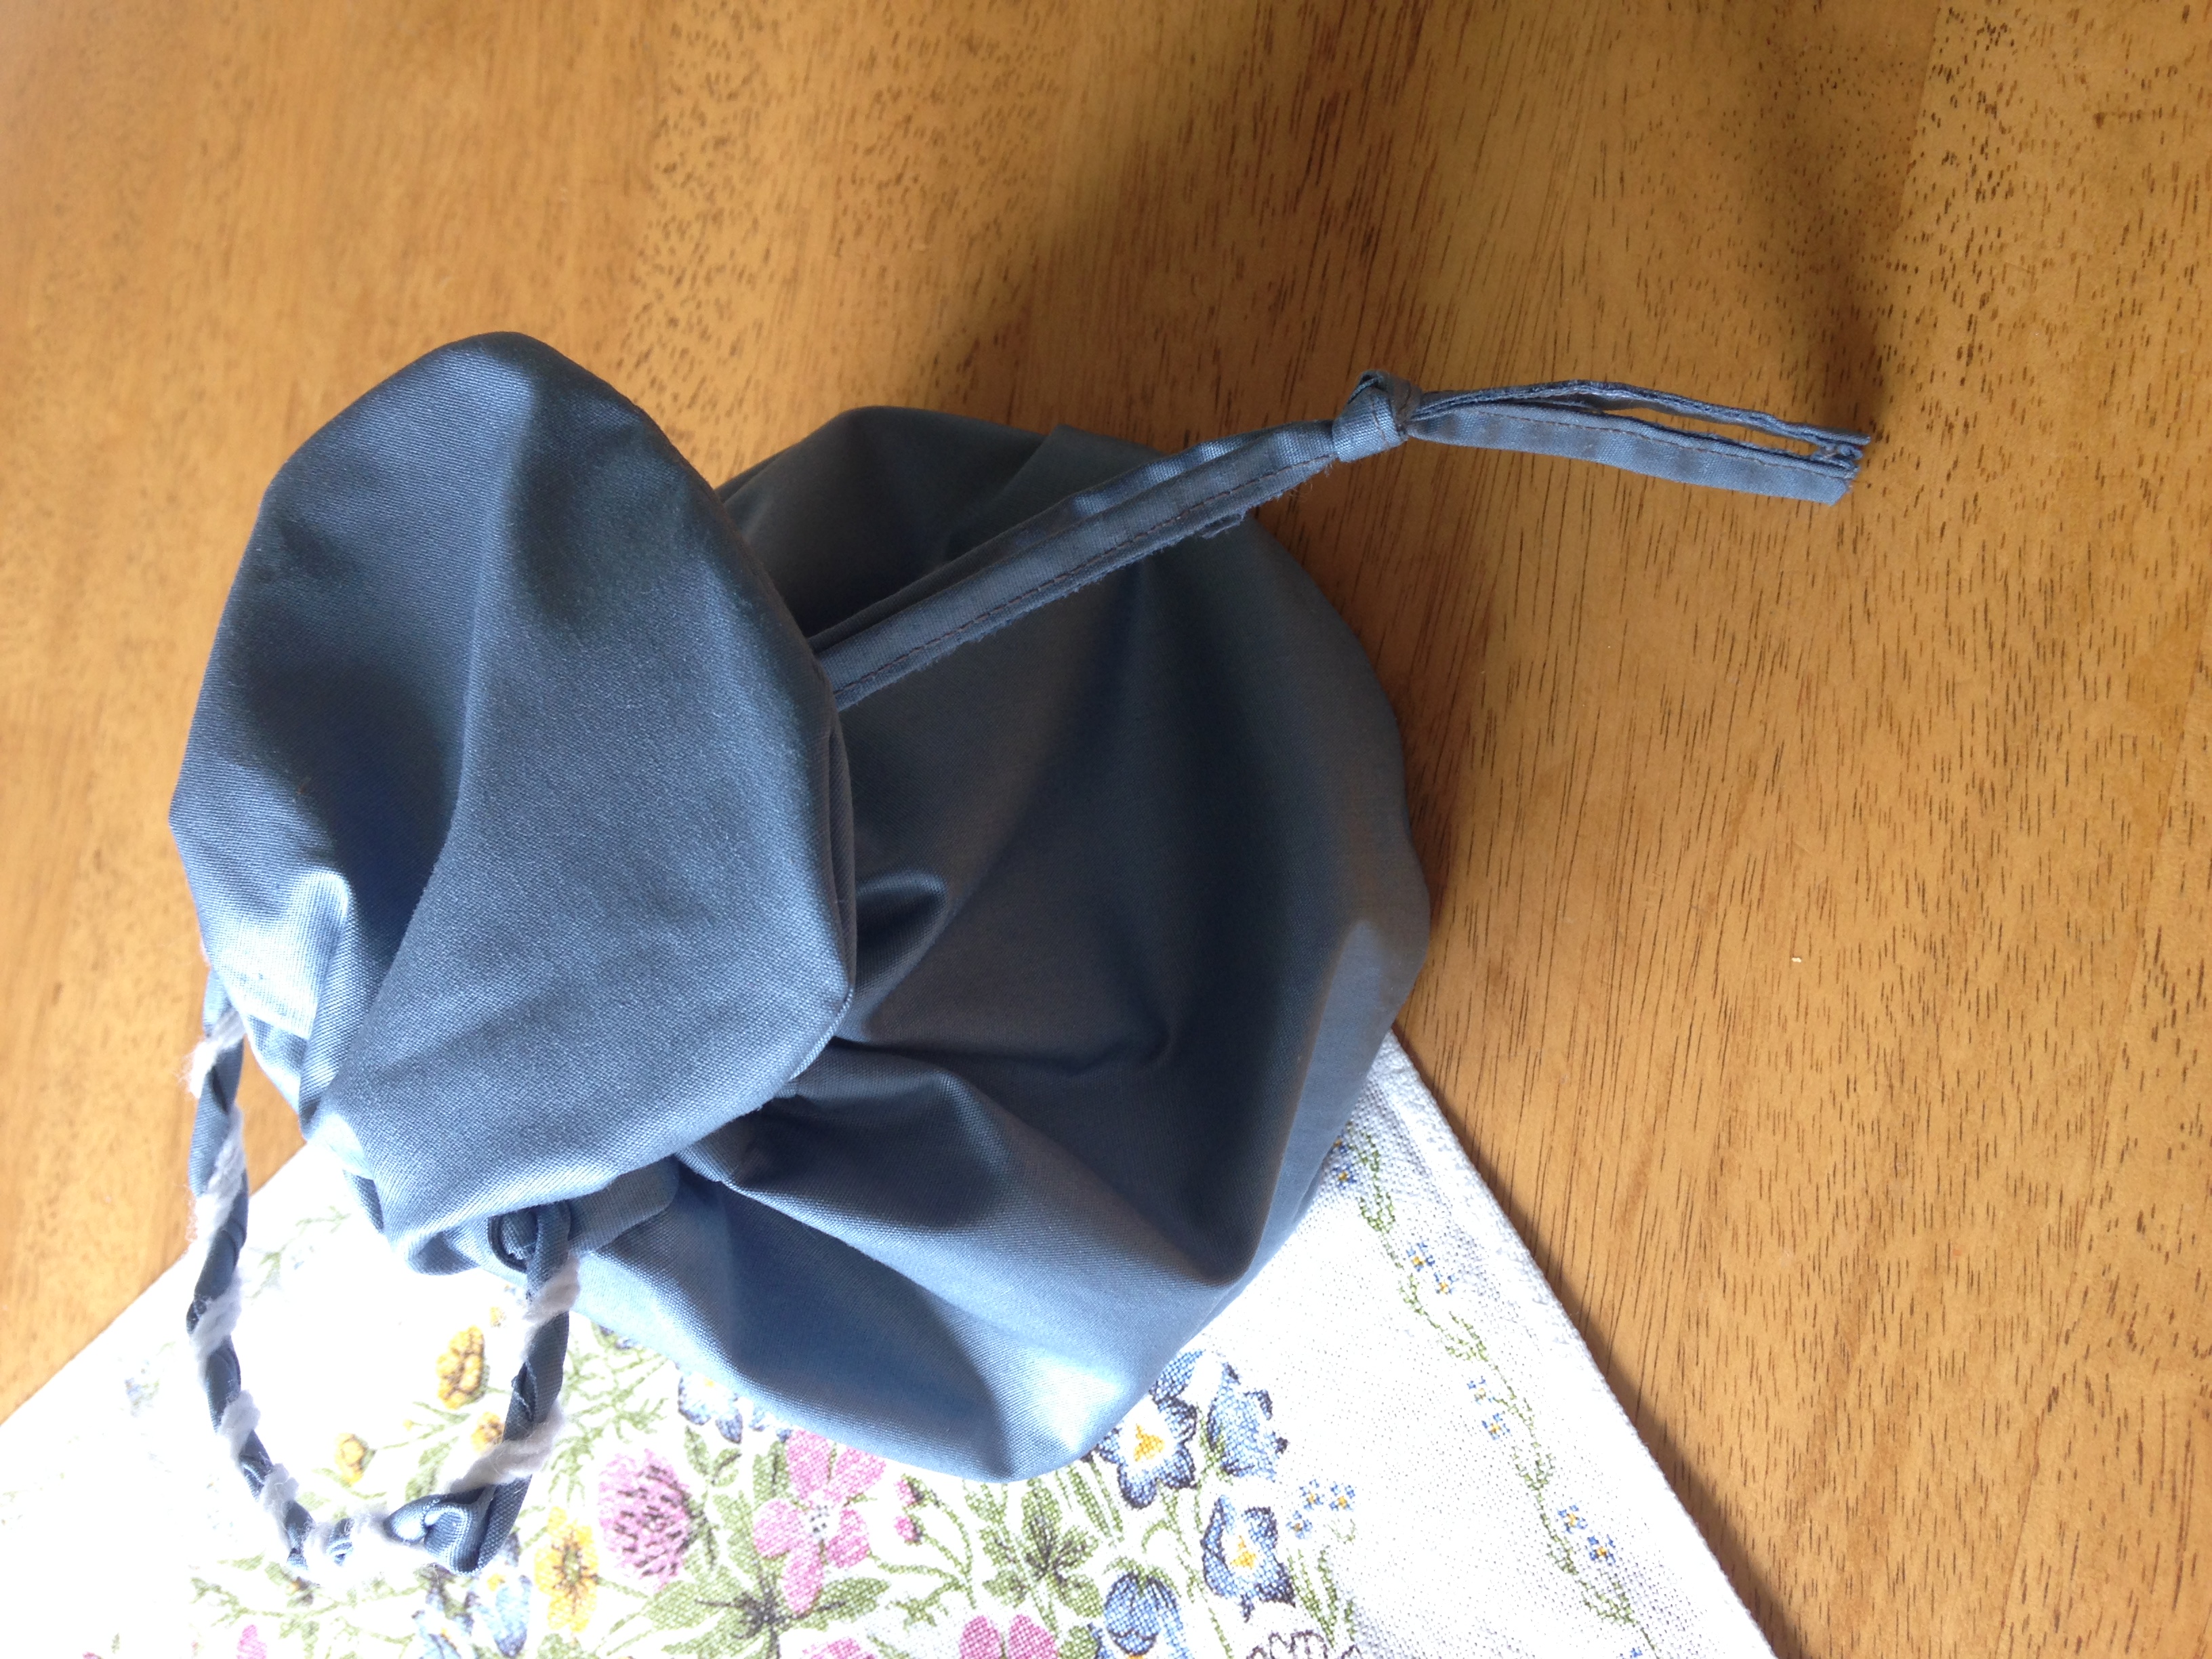
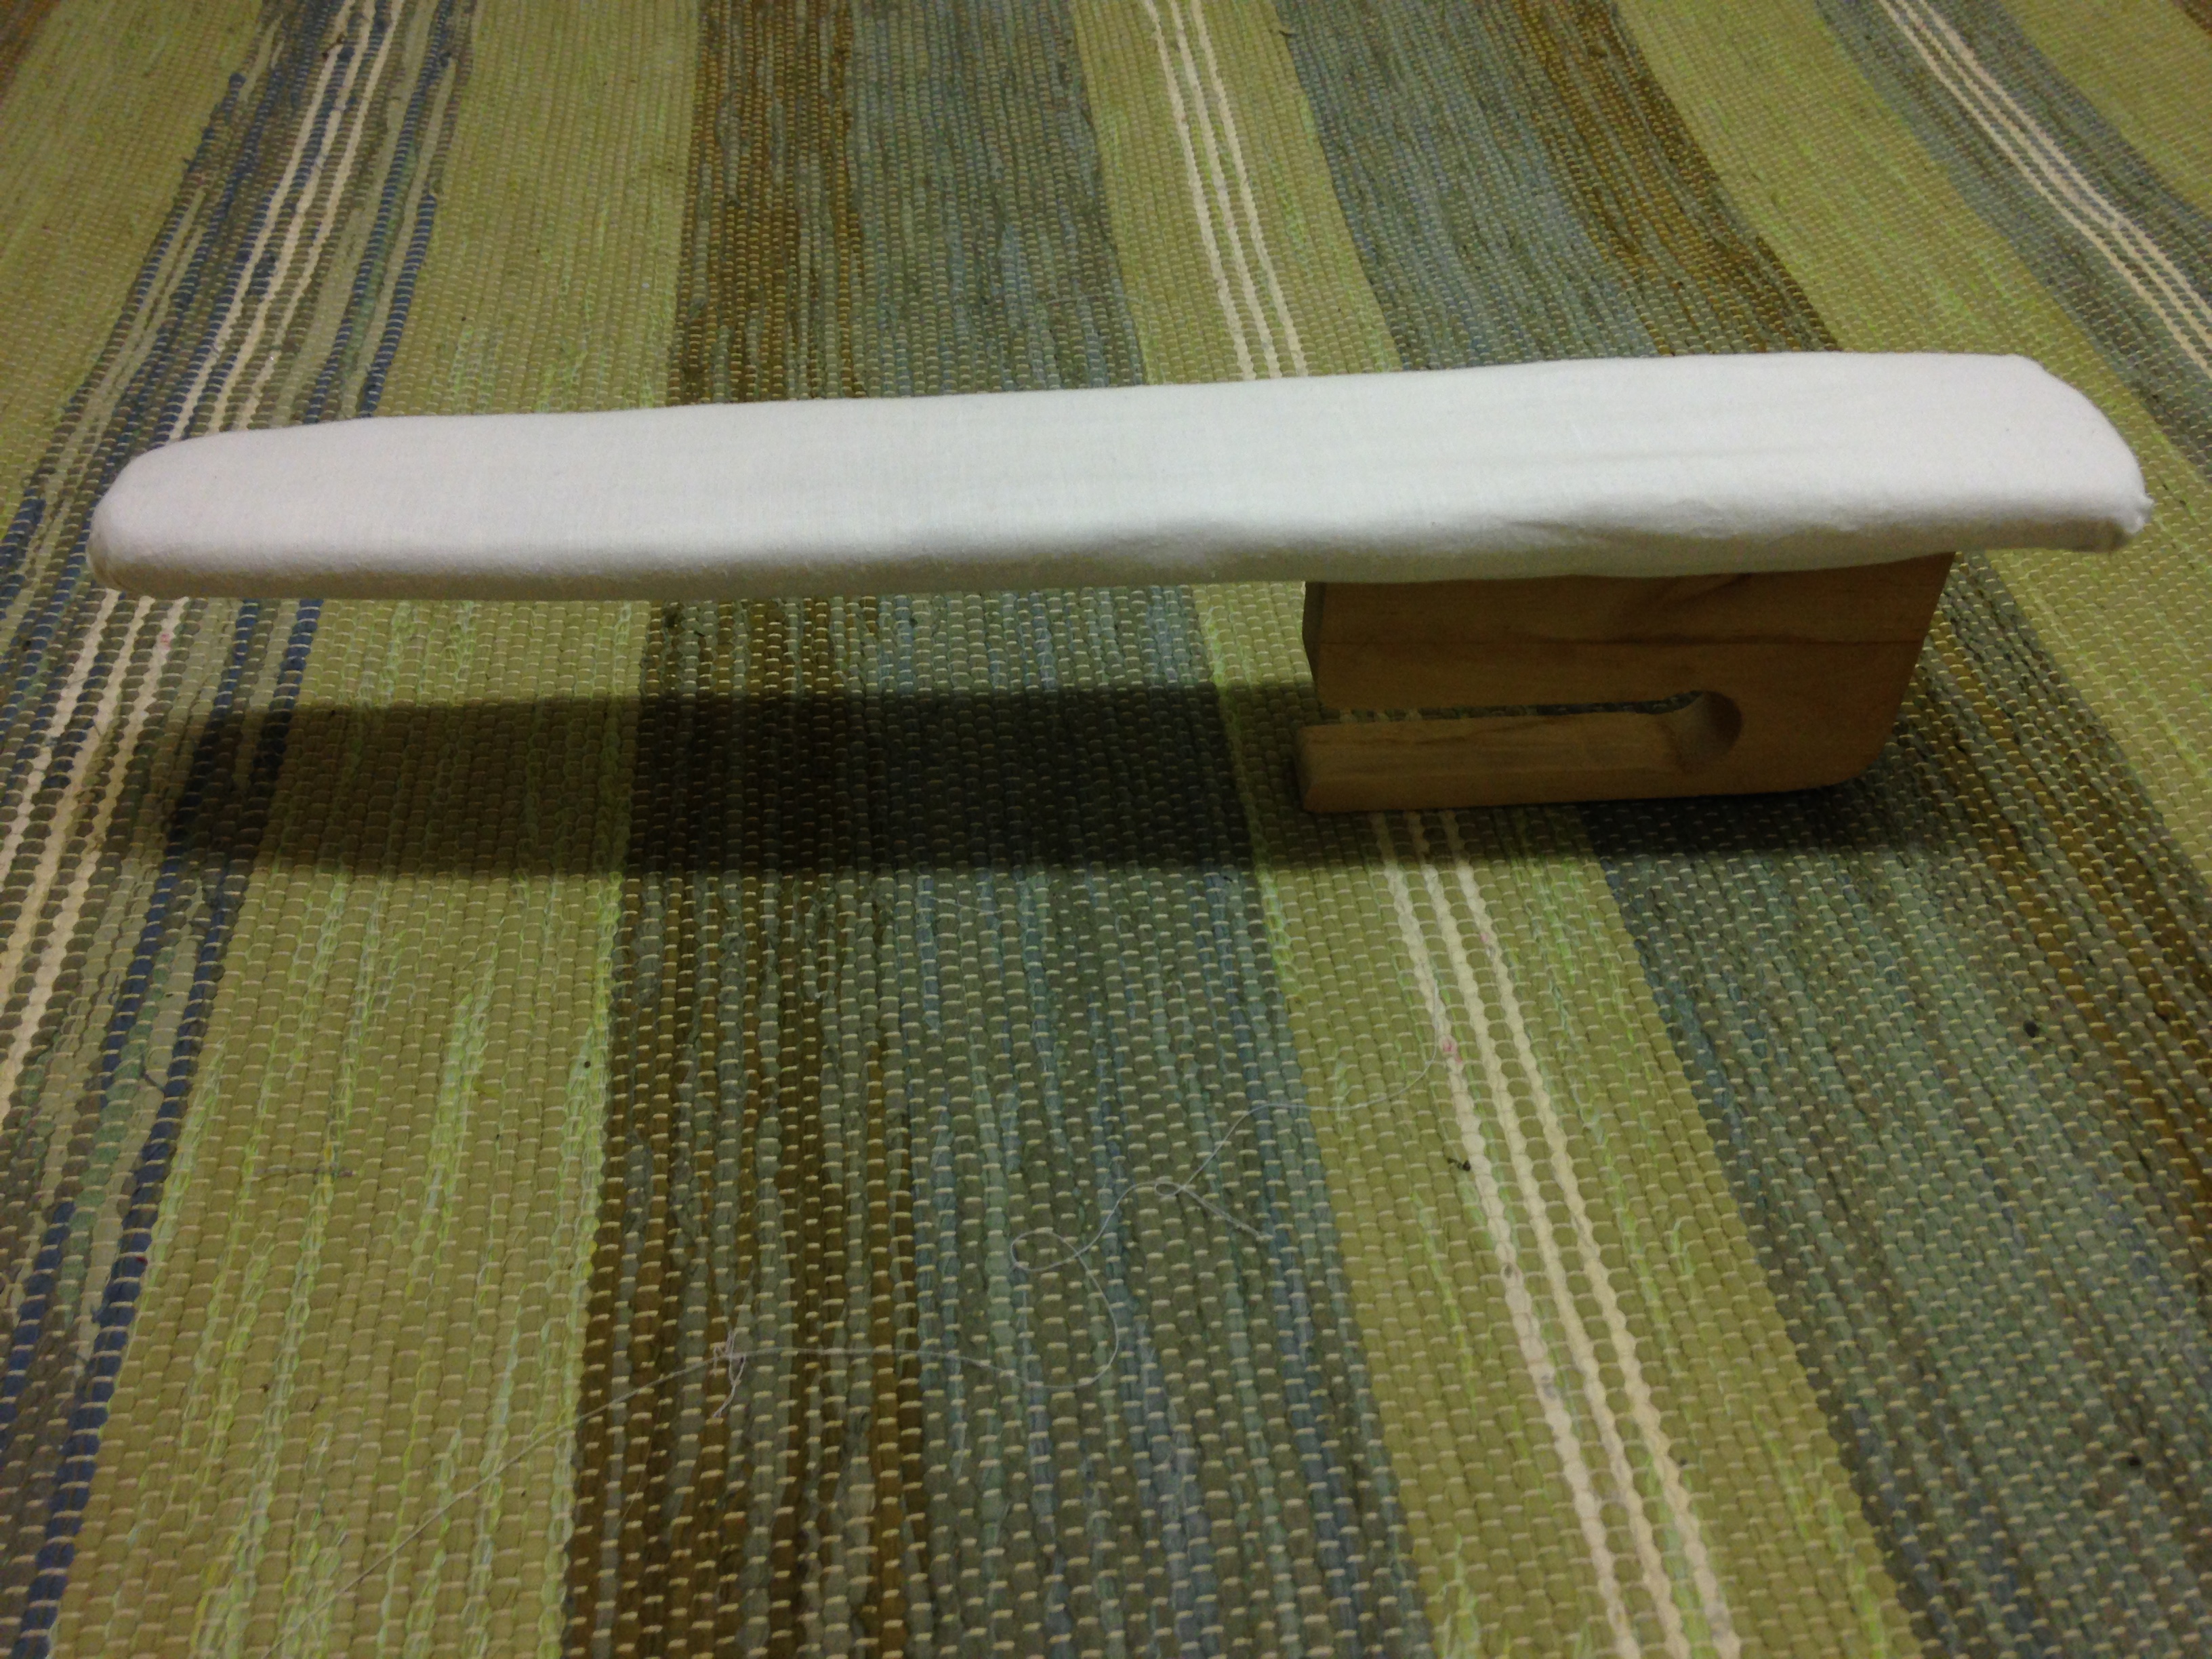
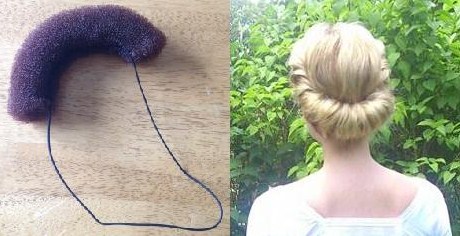
Små sömnadsprojekt
Liten väska till att matcha den edwardianska kjolen från försommaren. // Reticule-wanna-be, sewn in a haste to accompany my Edwardian skirt from last summer.Jag klädde om en ärmstrykbräda, som jag fått av mormor. . // I put new fabric on a ironing board for sleeves, which I got from my grandmother.Till edwardiansk håruppsättning – klipp itu en hår-donut, sy fast ett elastiskt snöre. Trä över huvudet och vik om håret runt, et voilá! // For an Edwardian hair – cut a ”hair doughnut”, fasten an elastic ribbon to it. Put over your head and twist your hair around it, et voilá!
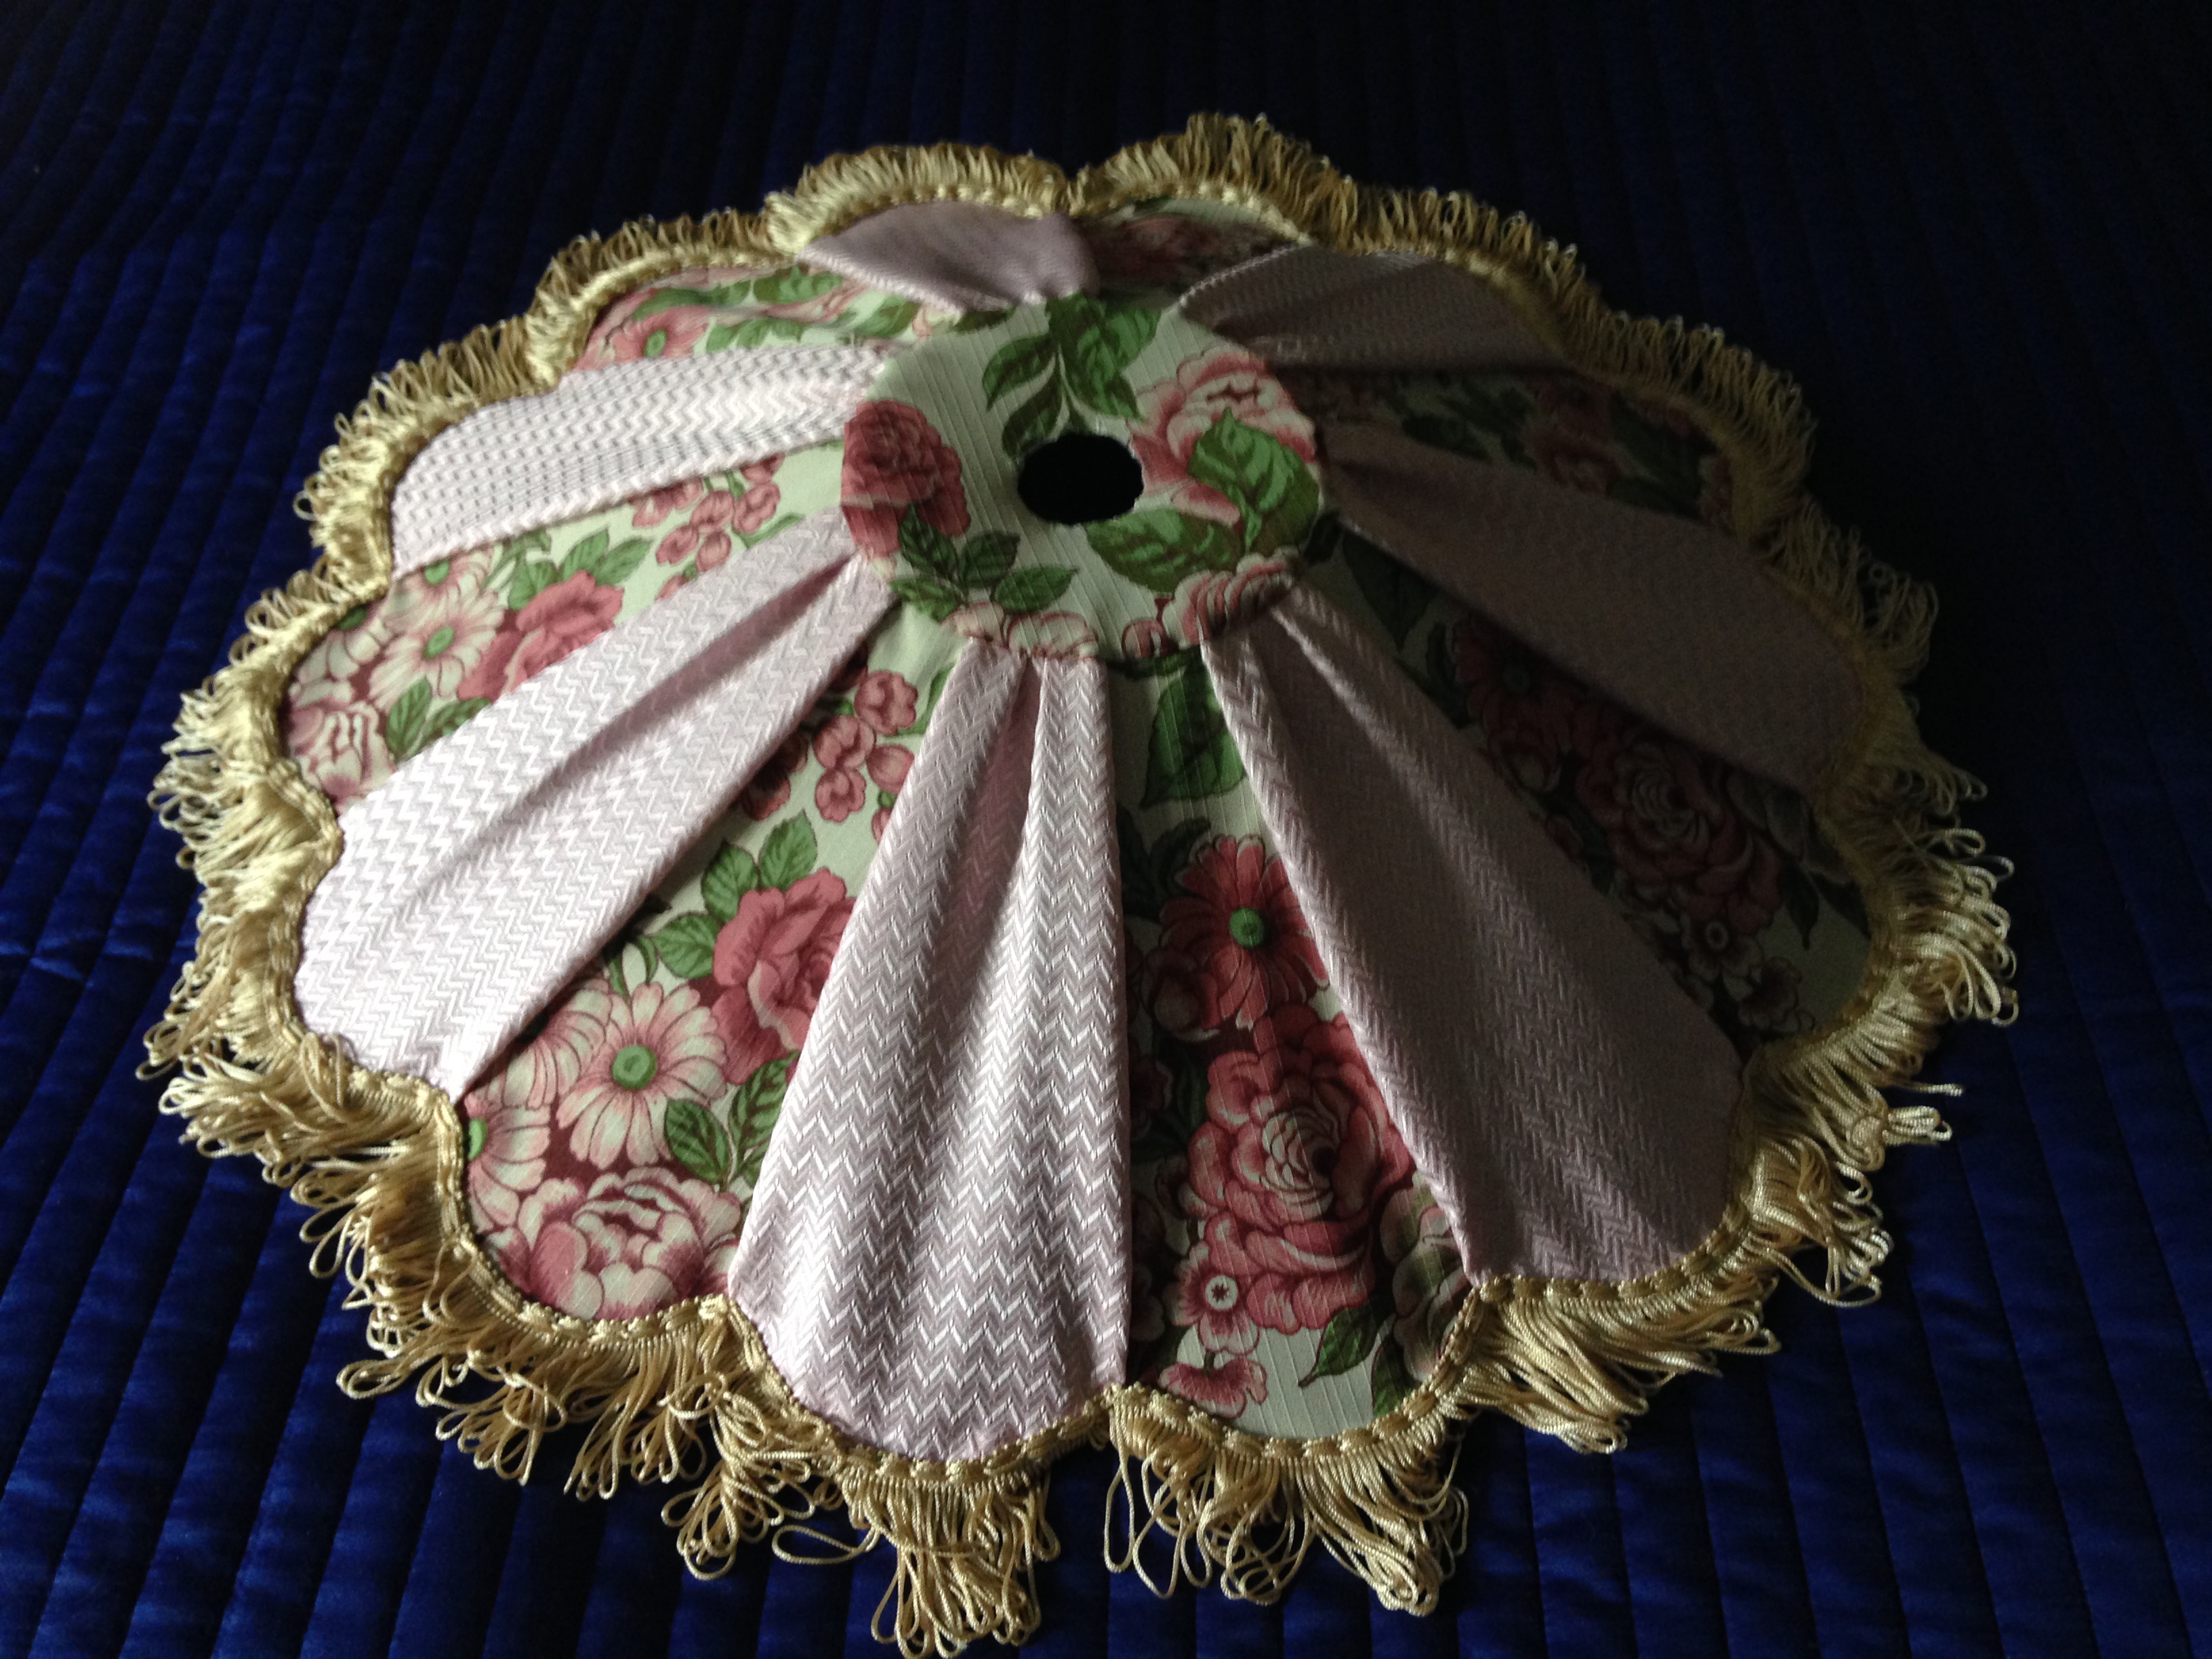
Reparera lampskärm
Jag klädde om en lampskärm, som tillhör en lampa som min gammelfarbror satte ihop i sin ungdom. Den hör förresten hemma i “Gamla Stugan”, där den numera beryktade Hilda växte upp. // I put new fabric on an old lampshade, belonging to a lamp that my great uncle made in his youth. The lamp itself belongs to ”The Old House”, where the now famous Hilda grew up.
Historisk trevnad
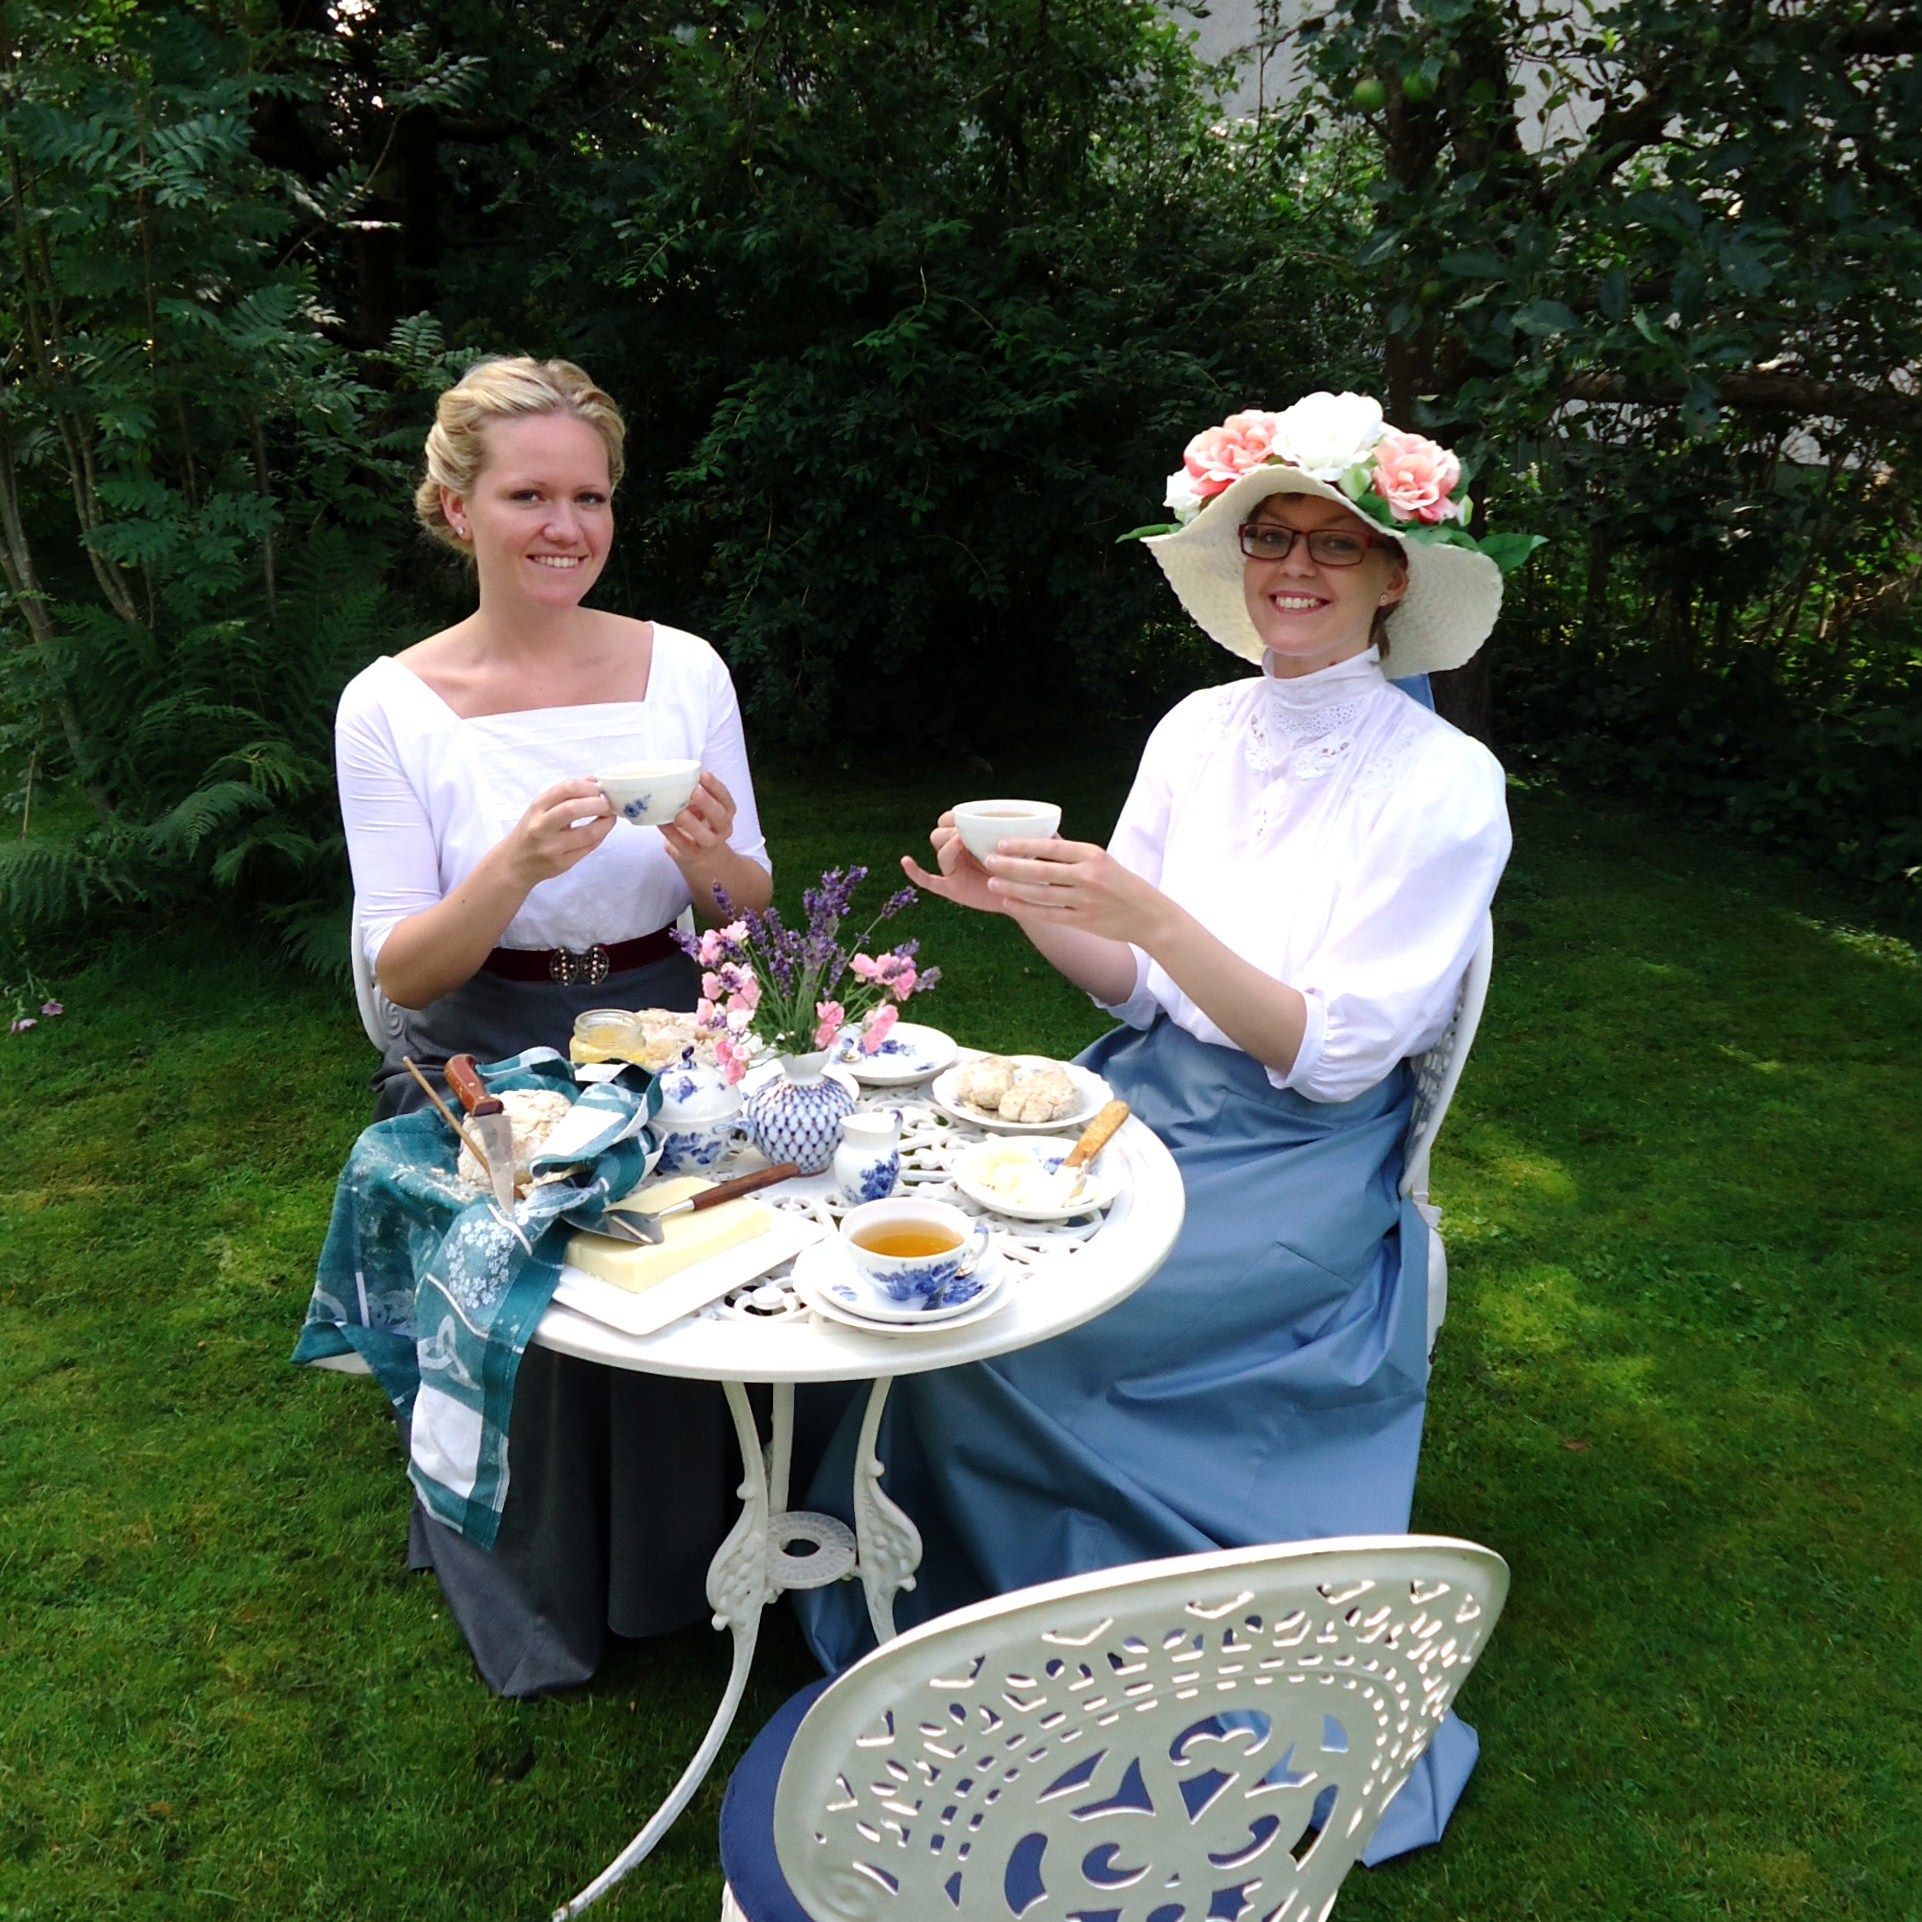
I sommar gick det upp för mig att jag inte är ensam i Vimmerby, om intresset för historiska dräkter. Mot slutet av lovet fick jag nöjet att hålla edwardiansk tebjudning för de kära systrarna, Hanna och Malin. Otroligt trevligt!
This summer, it became clear that I was not the only one in Vimmerby, who was interested in historical clothing. By the end of the holidays, I had the pleasure of having an Edwardian tea party for the dear sisters, Hanna and Malin. Delightful!
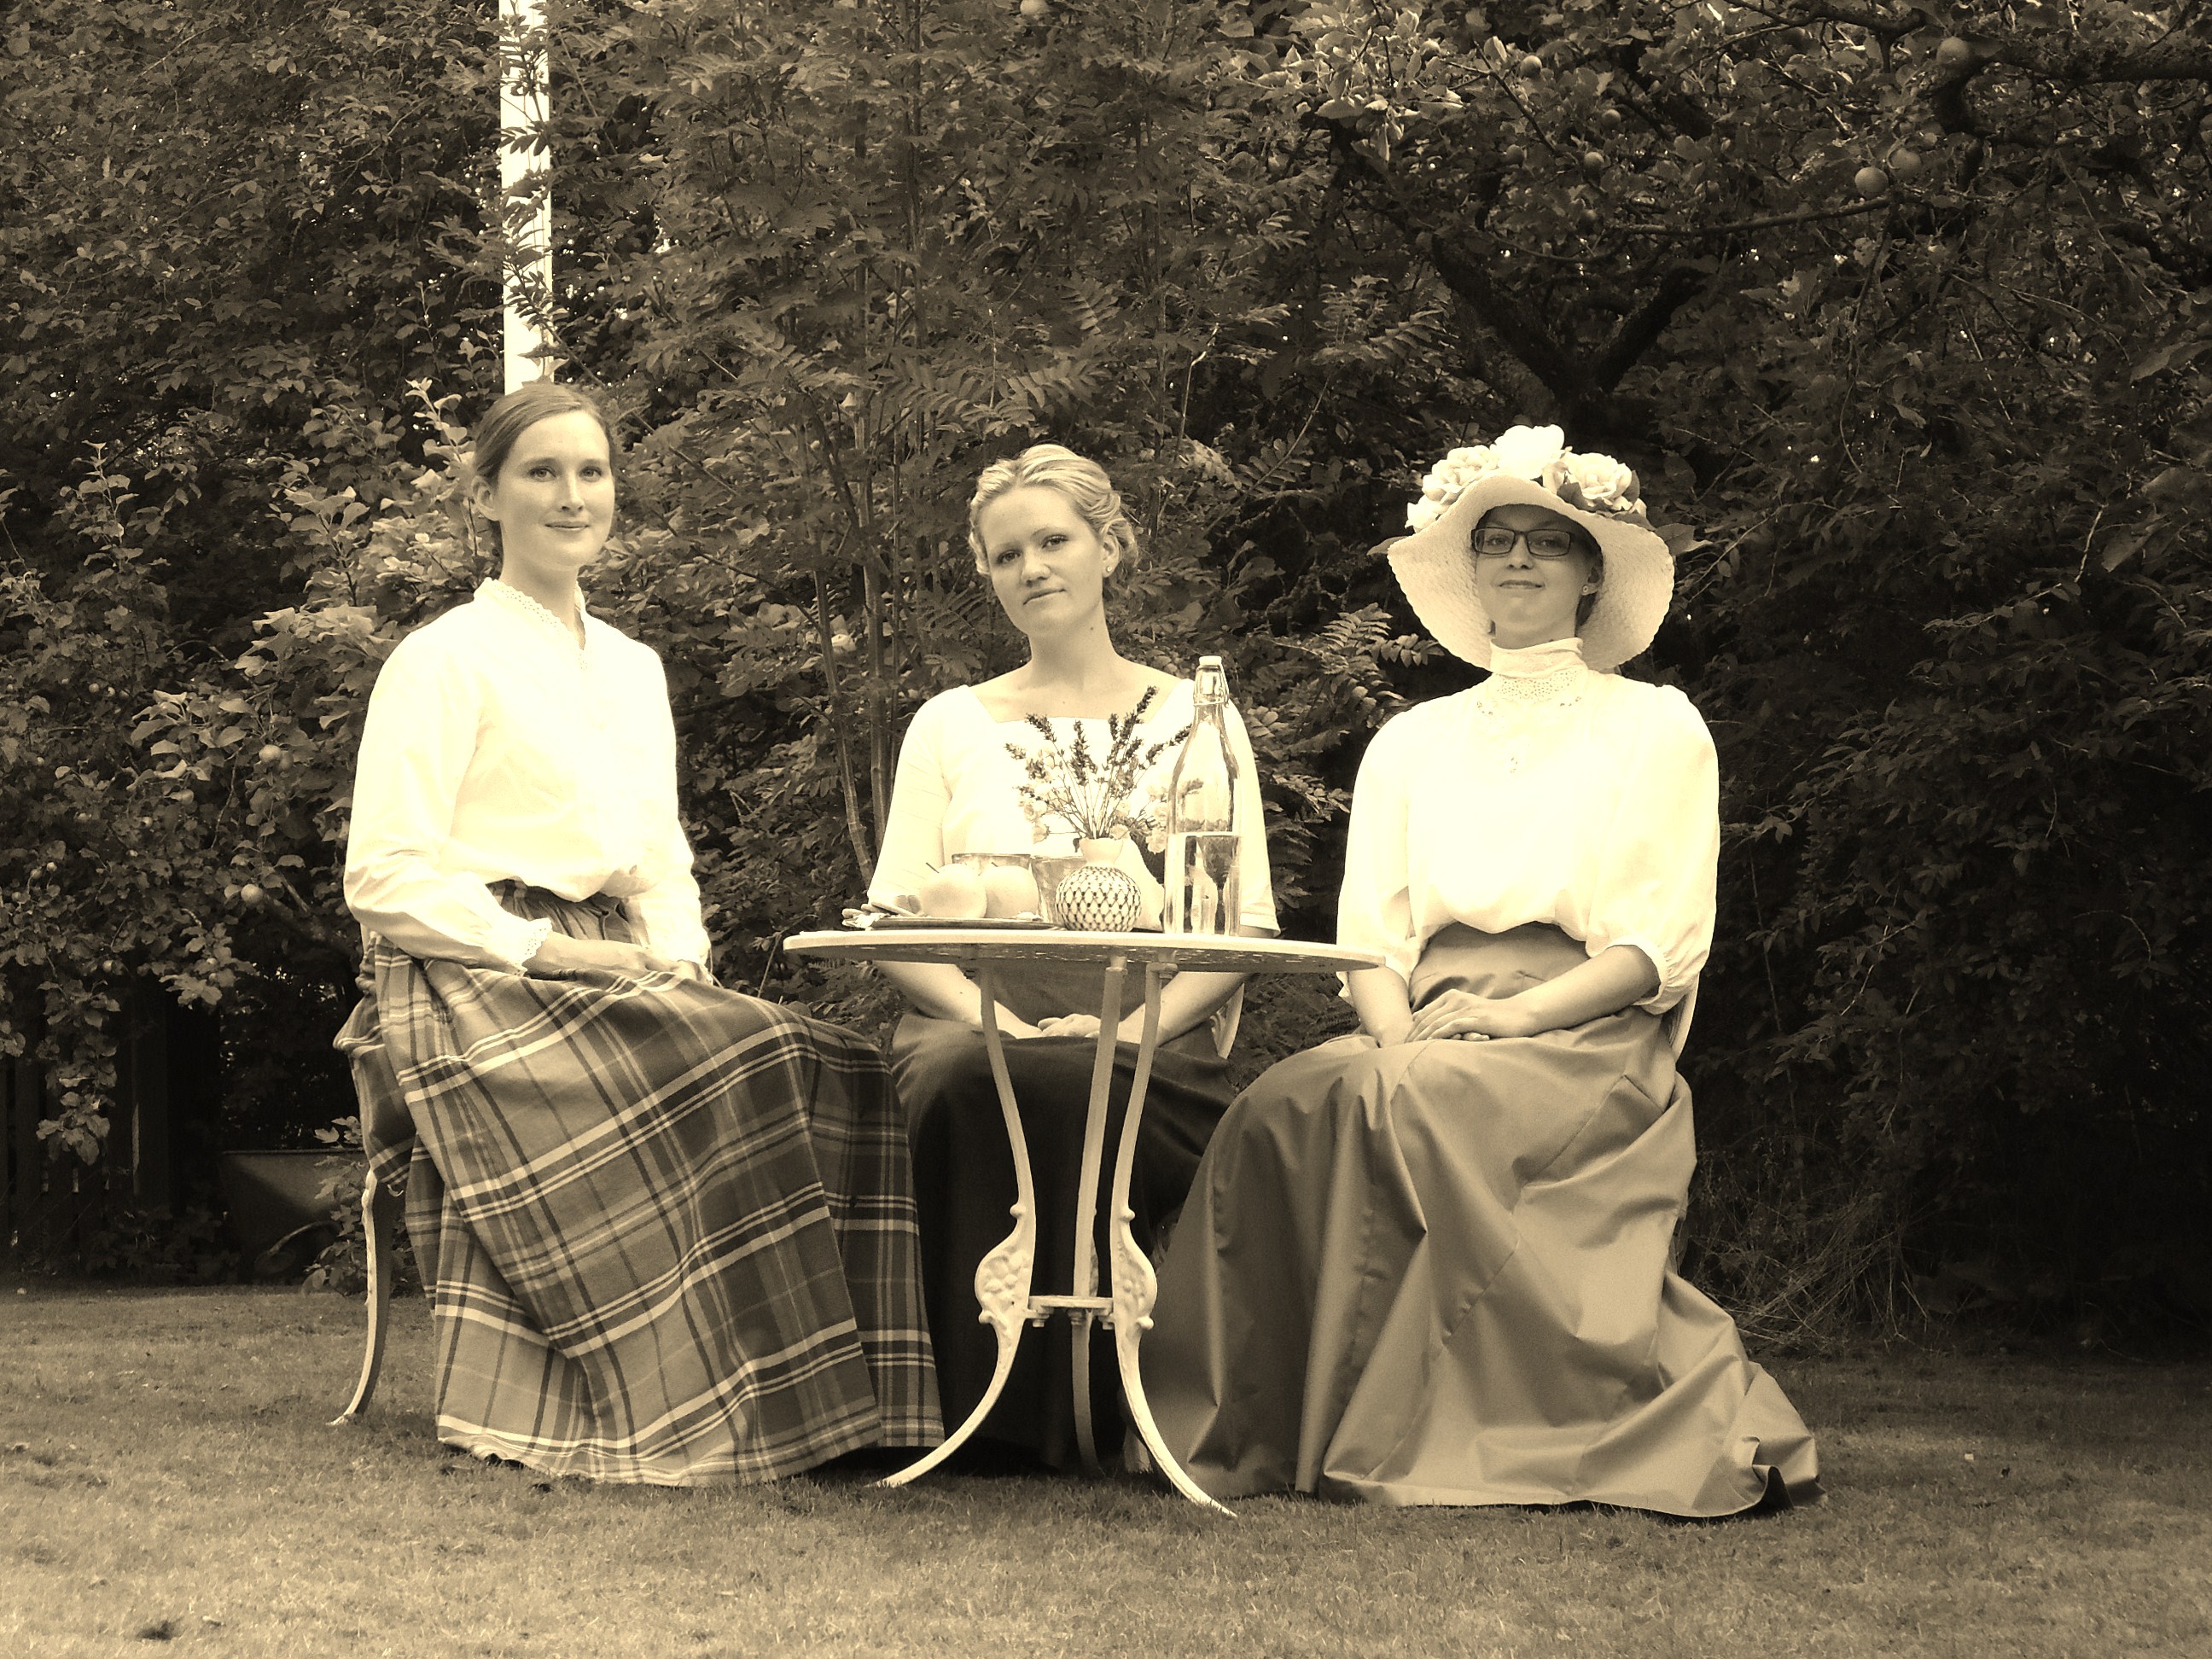
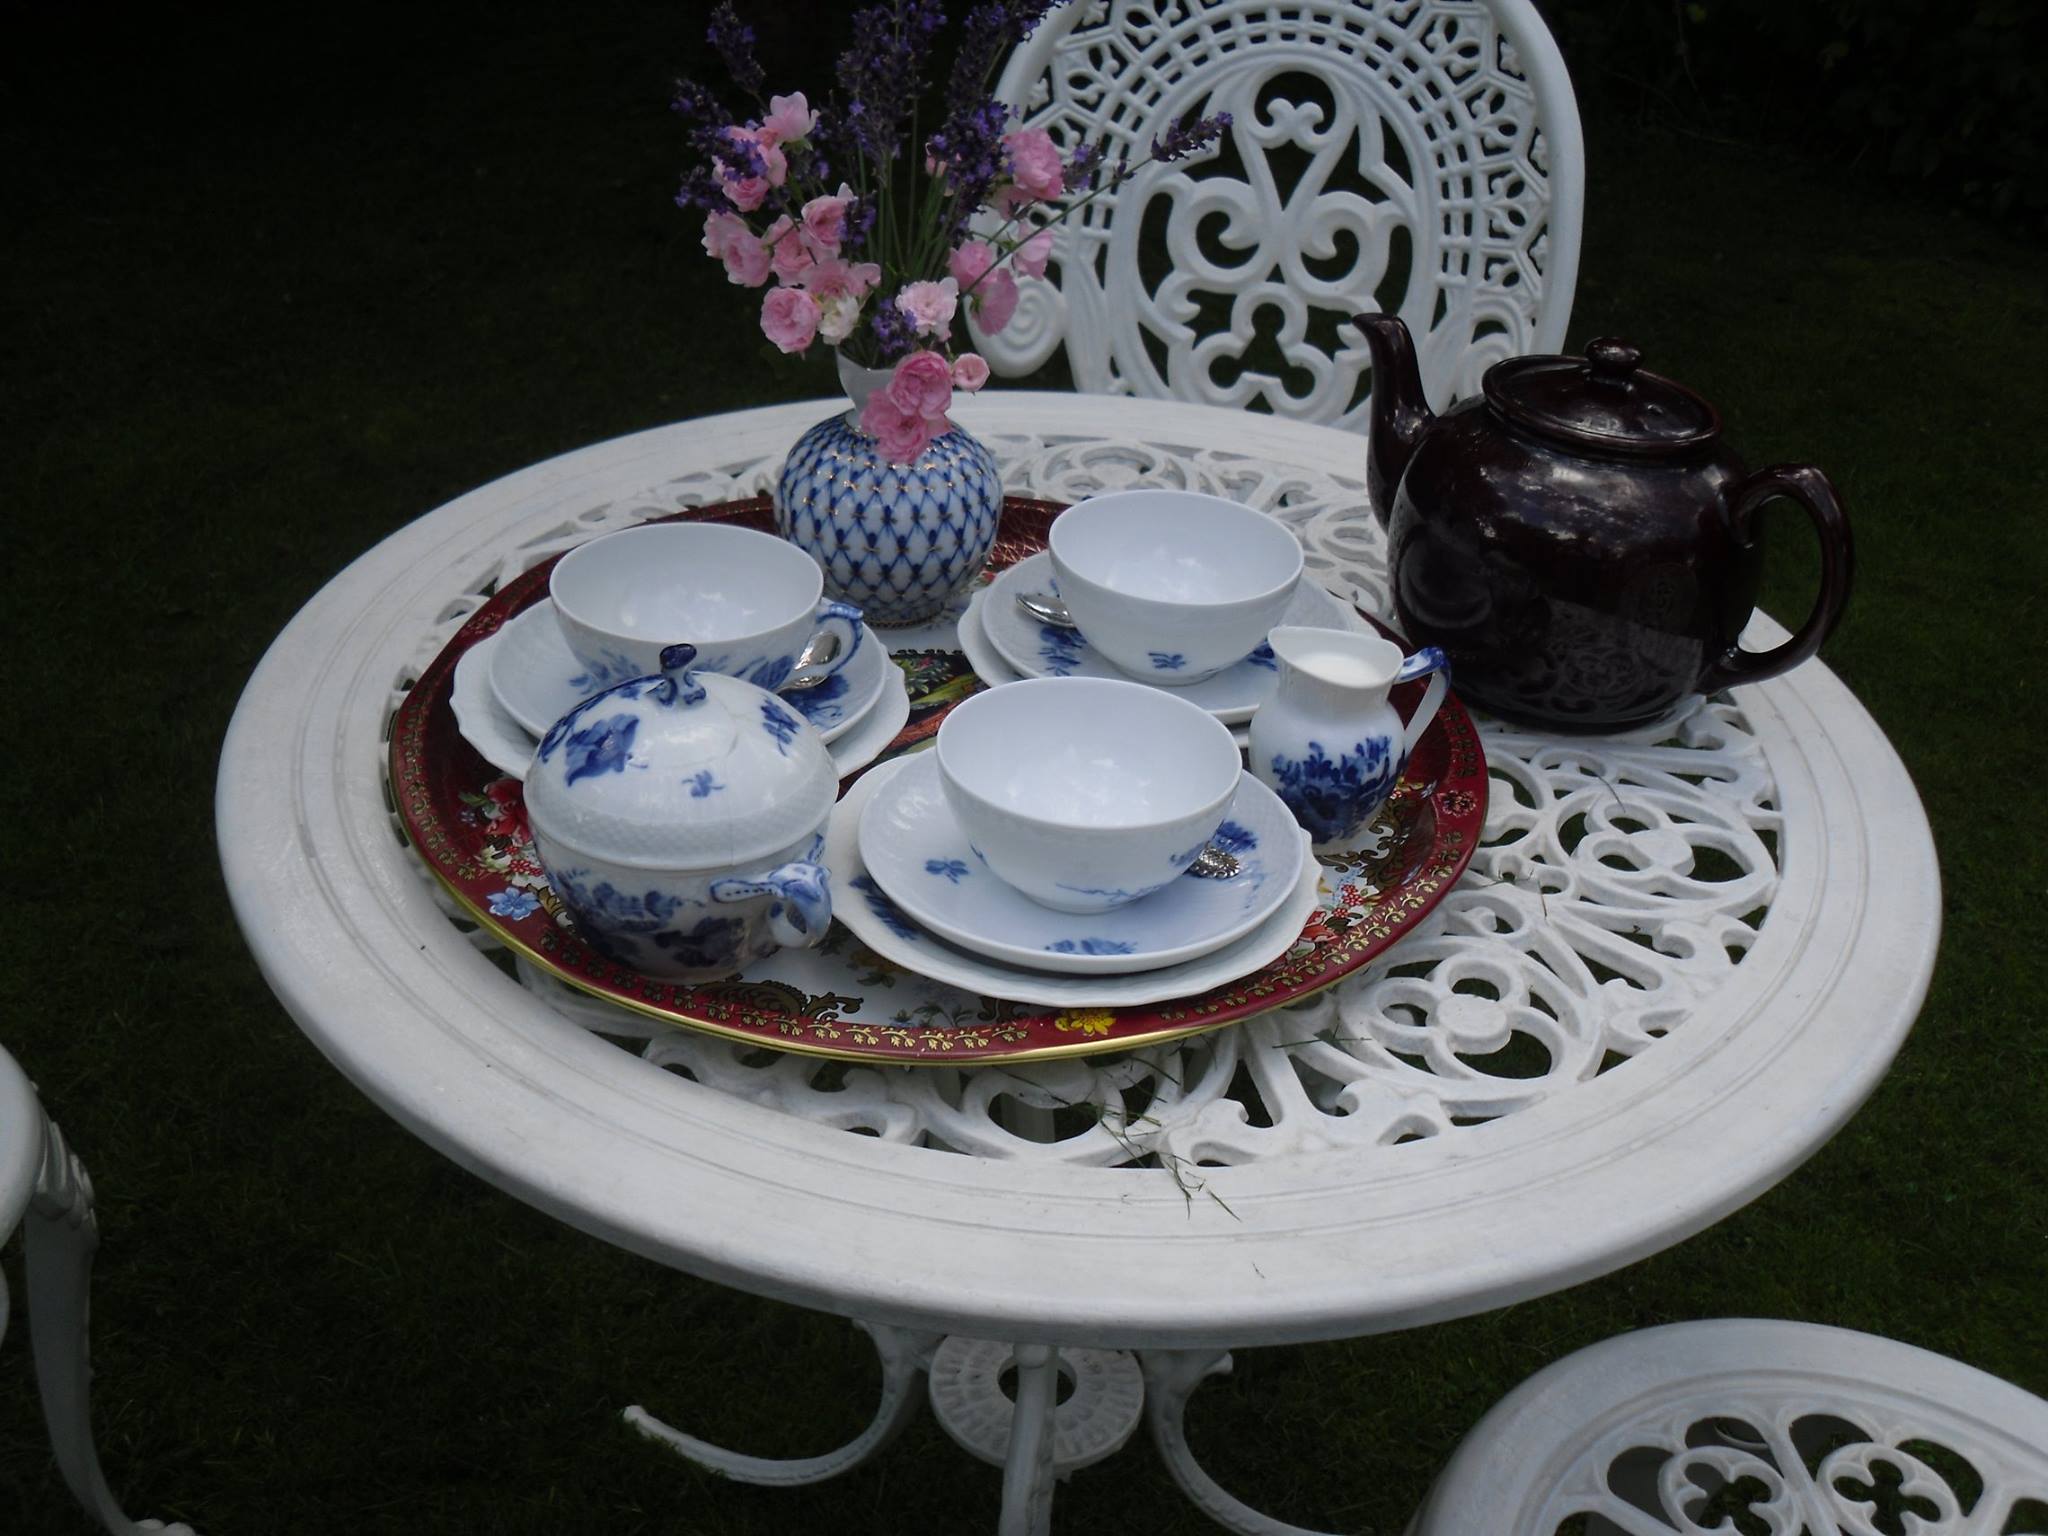
Till min lycka, upptäckte jag att dessa förtjusande systrar också gärna ville bära historiska kläder. Därmed klädde vi upp oss i mina olika kreationer och ordnade edwardiansk tebjudning. // To my great joy, I discovered that these delightful sisters also wanted to wear historical clothes. So we dressed up in my costumes and had an Edwardian tea party.Lika stelt som det ska vara vid lång exponeringstid. // Just as stiff as it should, when using the camera obscuraInnan de fasansfulla sconesen kom fram på bordet. // Before the horrible scones appeared.
Tack för en härlig sommar, alla ni som har förgyllt den med er närvaro!
Thank you for a lovely summer, all of you who have made it so by your existence.
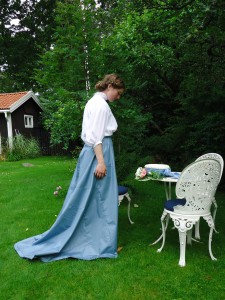
Dräkten, fotograferad efter att jag kört hem i upphettad bil. // The outfit, photographed after driving home in the heated car…
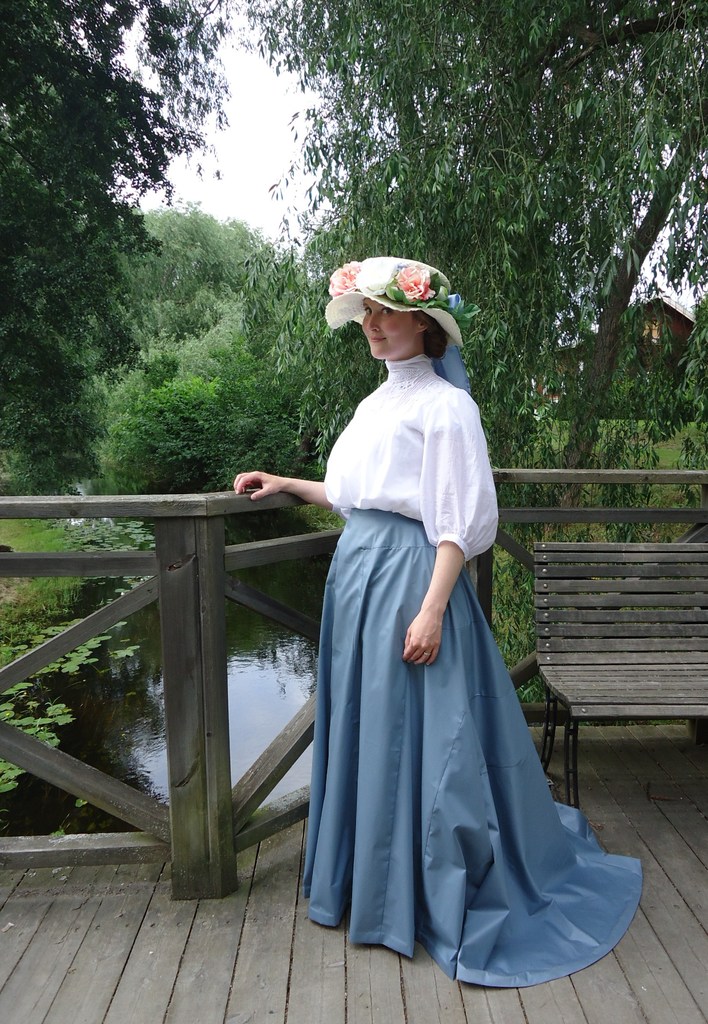
Ni som har läst förra inlägget, om hatten, vet att jag skulle sy en dräkt till 1800-talsdagen i Kisa, 19 juli. Jag ville ha en snoffsig dräkt för en dam från sekelskiftet. I “Patterns of Fashion” hade jag redan sett en del trevliga blus- och kjolmönster. Dessutom kikade jag runt på historiska kläder på Pinterest. Där hittade jag inspiration bland annat från denna dräkt:
Those who have read my last blog post, about my Rose Hat, know that I was about to sew a costume for the “19th century days” in Kisa, 19th of July. I wanted a swanky suit for a lady at the very start of the 20th century. In “Patterns of fashion 2” I had already spotted some nice skirt and shirtwaist patterns. I also roamed Pinterest’s vast plains of vintage garments. There I found inspiration in this shirtwaist.
Dräkt från Pinterest – ca 1904 – med stråveck och broderier. // Pinterest clothes – ca 1904 – with pin tucks and white work.
Kjolen
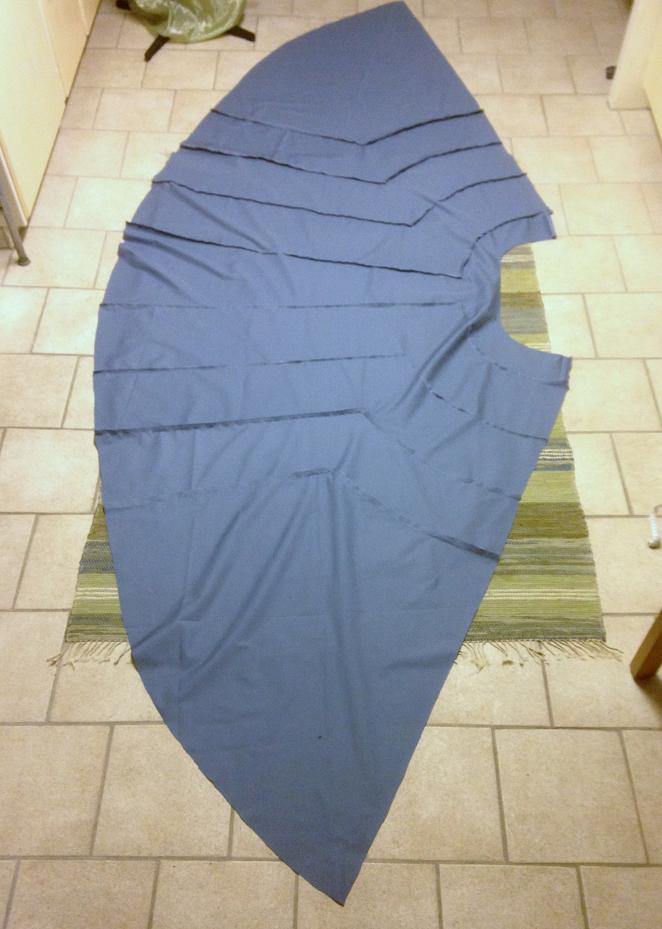
I två månader snokade jag runt på Erikshjälpen, i jakt på ett vettigt kjoltyg. Till slut, helgen innan eventet, hittade jag en blå gardin för 69 kr.
For two months I snooped around at the town’s second hand shop, in hopes to find an appropriate skirt fabric. Finally I found a blue curtain for 69 SEK.
Kjolen, på avigan, innan den sytts samman baktill. // The skirt, from the wrong side, before sewn together in the back.
Jag vet inte hur det är med rättigheterna för mönstret, så jag lägger inte ut bilden här, men ni får i alla fall se hur kjolen ser ut innan den är hopsydd baktill.
I don’t know how the copyright works for this skirt pattern, so I won’t show it here. Anyhow, this what the skirt looks like from the wrong side, before it’s sewn together.
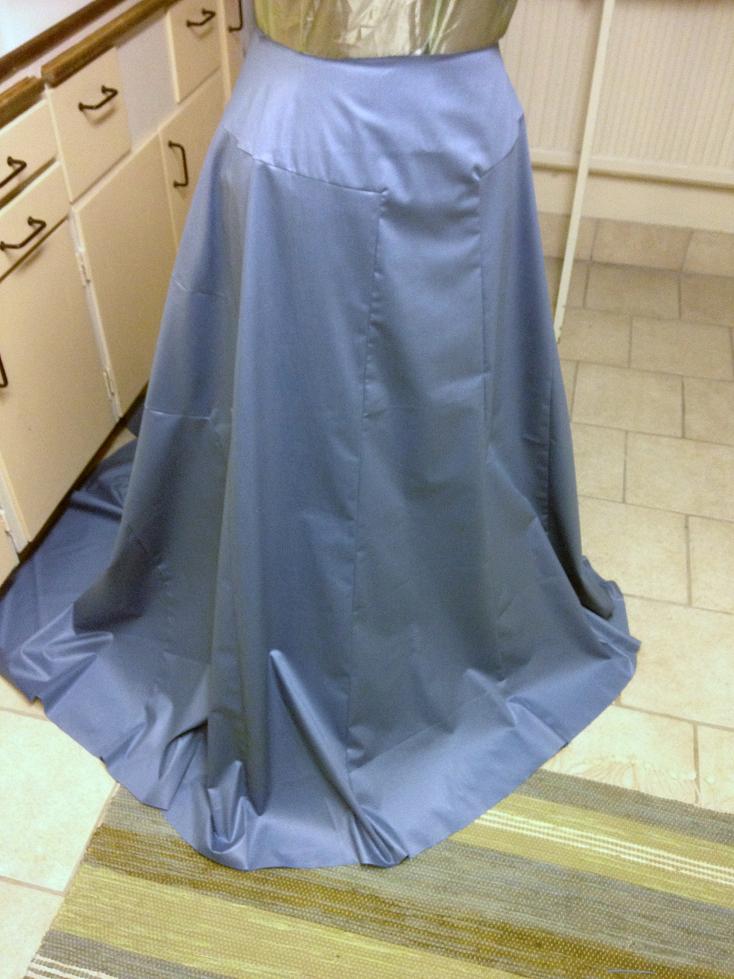
Kjolen innan den fållats och pressats. // The skirt before hemmed and ironed.
Kjolen knäpps baktill med hyskor och hakar. Den har fortfarande inte fått de dekorativa banden, som ska täcka sömmarna, men i väntan på att jag hittar lämpligt material, tycker jag att den ser helt ok ut som den är.
The skirt is closed with hooks and eyes in the back. It still hasn’t got the decorative ribbons, that should be on top of the seams. Until I find the optimal material for this, I think it looks alright though.
Blusen
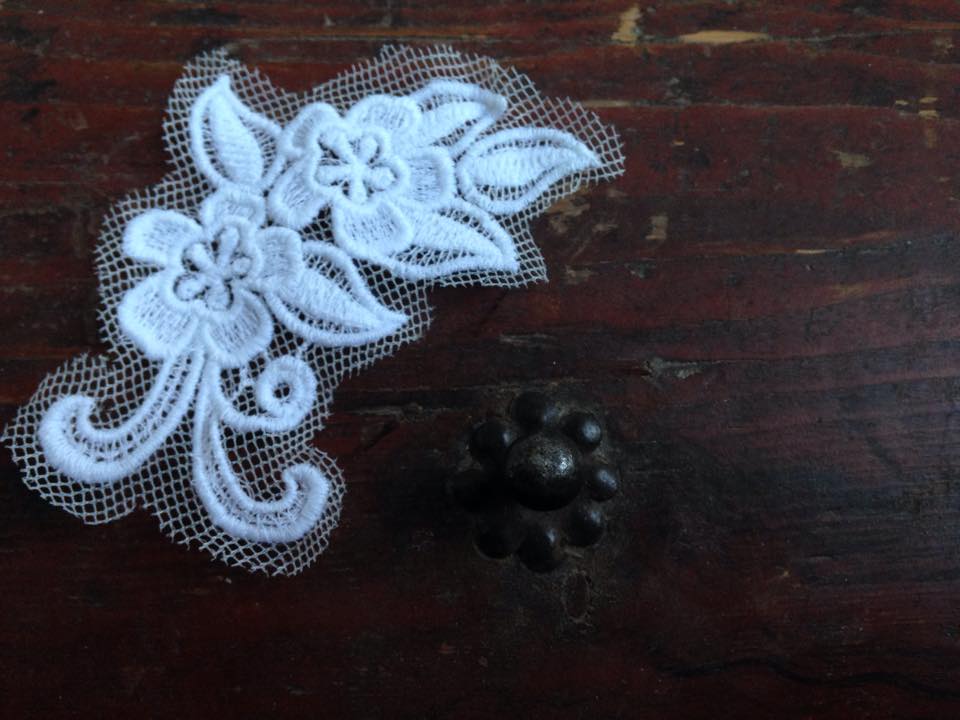
Jag var osedvanligt förberedd när jag anlände till Sverige i år. Förutom att redan ha letat reda på lämpliga mönster, hade jag även hittat fina broderifiler på internet, som jag köpt, en snäll bekant hjälpt att konvertera till rätt filtyp, och sedan hade jag maskinbroderat mönstren på tyll.
I was unusually well prepared when I arrived in Sweden this year. Except for having found patterns, I had also bought appropriate machine embroidery files, got help from my sewing machine guru to convert them to the right file type, and had even sewn the embroidery on tulle leftovers.
Maskinbrodyr på tyll. // Machine embroidery on tulle.
Dessutom hade jag köpt ett tunt bomullstyg, medan jag praktiserade i Viborg, så därmed hade jag alla ingredienser som jag behövde för min blus.
Furthermore, I had bought a lightweight cotton fabric, while making my internship in Viborg. Hence, I had all the necessary ingredients for th shirtwaist.
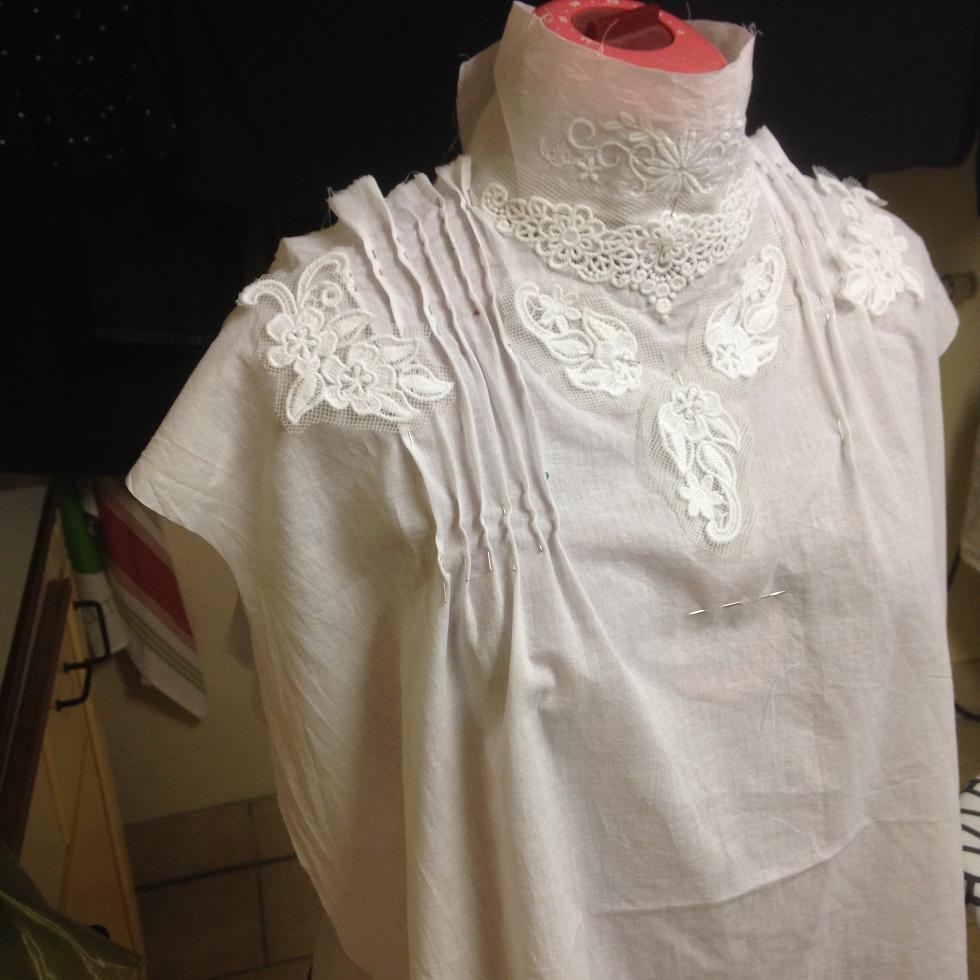
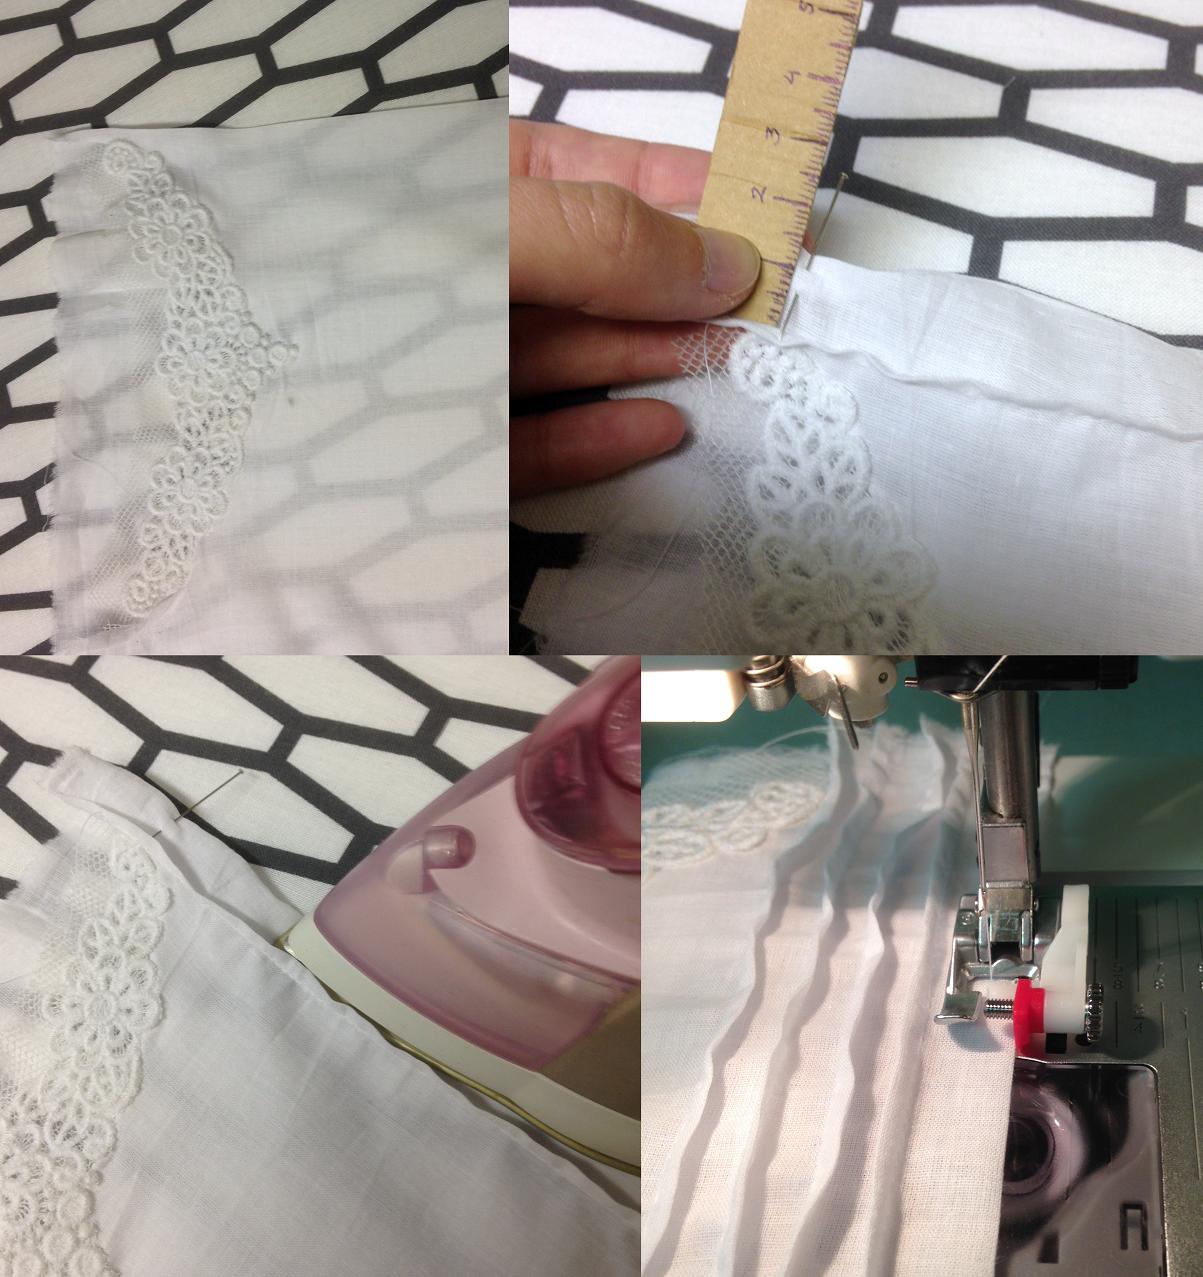
Stråveck och brodyr fastnålad. // Pin tucks and white work pinned to the shirtwaist.
Jag experimenterade med placering av veck och broderier på provdockan, innan jag började sy. Sedan började jag med stråvecken.
I experimented with the placement of the pin tucks and embroideries before I started sewing. Then I obviously made the pin tucks.
Stråveck: 1) Stryk vid första vecket och sy önskad vidd 2) Mät ut nästa veck + mått mellan vecken 3) Stryk vecket 4) Sy vecket… om och om igen. // Pin tucks: 1) Iron the first fold and sew at the wanted breadth of the pleat 2) Measure the distance to the next pleat + the breadth of the pleat 3) Iron the fold 4) Sew the fold as in the first step and repeat the process for as many times as you want.
När detta var klart var det dags för placering av övriga broderier. Dessa nålade jag noga fast, hela vägen runt. Sedan klippte jag upp tyget bakom och fållade samtidigt som jag sydde fast broderiet i blusen.
When this was done, it was time for placing the embroideries. These I pinned down carefully, the whole way around. Then I cut superfluous fabric away as I hemmed and fastened the embroidery to the shirtwaist, from the wrong side.
Placering av broderier, även över stråvecken. // Placement of the white work, partly on top of the pin tucks.
Därefter skulle ärmarna fästas i blusen. Eftersom det är sommar och det 1903 verkar ha varit populärt med armbågslånga ärmar, gjorde jag dem korta. Innan jag sydde fast dem i blusen, gjorde jag en raksöm upptill och nedtill, med långa stygn, så att jag enkelt kunde dra åt tråden och rynka vid ärmkullen och runt armbågen. När ärmarna var fastsydda, gjode jag ett kantband i samma tyg och sydde fast nedtill.
Then the turn had come to the arms. As it is summer and elbow length of the arms seem to have been popular in 1903, I decided to go for short arms. Before attaching them, I made a “long, loose machine seam” at the top and the bottom and then gathered the fabric at the shoulder and elbow. Then I attached the arms to the shirtwaist and covered the raw edges with binding in the same fabric.
Två ärmar, 2 dm längre än armbågslängd. Veckas vid ärmkullen och nedtill. // Two arms, two decimetres longer than shoulder-elbow length. Gather fabric at the top of the shoulder and at the elbow.
Sedan var det bara knäppningen kvar. Blusen är bara öppen halvvägs ner, så i nacken sydde jag fast dekorativa fuskpärlor med öglor i samma bomullstyg och nedanför knäppning med sydda hyskor och silverhakar.
Then there was nothing left but the closing in the back. It is sewn together at the bottom half. At the neck, I used pearl buttons and loops made from the same fabric. The rest was closed with silver hooks and eyes. This later proved to be a horrible solution, as the unusually big hairstyles use to get stuck in the hooks. Well, it looks great anyway.
Hals med pärlknäppning och nedanför knäppning med hyskor och hakar. // High neck closed with buttons and loops. The rest of the back closed with hooks and eyes.
Sedan var blusen faktiskt klar!
And suddenly, the costume was actually complete!
Färdig blus. Det enda som saknas nu är en kanal för midjebandet. // The finished shirtwaist, only lacking a channel and its waistband.Till bords med katten. // At the table with the cat.Dagens 1800-talssällskap, i Kisa. Foto: Elin Evaldsdotter // In Kisa with today’s participants from the 19th Century Society. Photo: Elin EvaldsdotterFotosession med Josefine (som också bär kläder sydda av mig) och Åsa, på 1800-talsdagen. Foto: Elin Evaldsdotter // Photo session together with Josephine (who also wear my clothes) and Åsa, at the 19th century day in Kisa. Photo: Elin Evaldsdotter.Med utsikt över Stångån. Foto: Josefine Antonsson // View over Stångån. Photo: Josefine Antonsson.
Ni som har följt mitt lärarinneprojekt, kanske gläds med mig, när ni får höra att jag kom tvåa i min kategori, i Your Wardrobe Unlockd’s dräkttävling. Det kryllade av häftiga bidrag, som ni kan se här. Det känns fantastiskt att folk med erfarenhet inom historisk sömnad valde att rösta på lilla mig! Kronan på verket var det fina personliga meddelandet jag fick från YWU (nedanför). Jag är jätteglad!
“Your entry, A Swedish Edwardian Teacher, was beautiful and very striking. Although simple in style, it was exquisitely made, and you really did look like you had just stepped out of an old sepia photograph. We loved the fact that you’d done the whole outfit from the underwear out – the care you took with the undergarments meant the finished outfit hung and fitted perfectly. We also thought your recykling of older fabric and garments, and combining that with new techniques, gave the whole outfit a fascinating back-story. This entry is a great credit to your craftsmanship and innovation. Well done!“
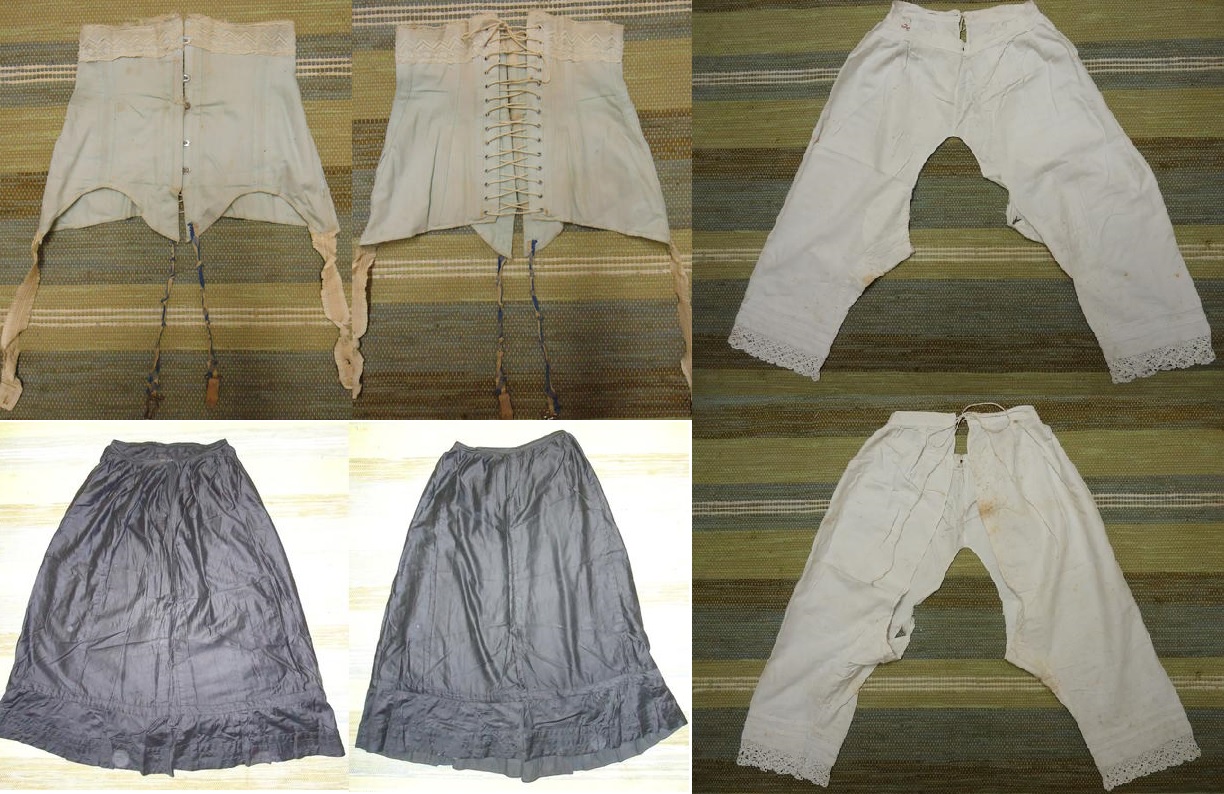
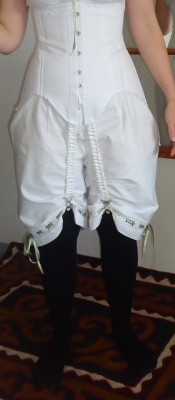
Last year, I received some vintage underpinnings that my parents had found in an old clothes chest, stored in the attic of the family farmhouse. Amongst these clothes, there were a corset, drawers and a petticoat. The same summer, I also got a vintage sewing machine, of the same age, but from my husbands family.
When the theme for this competition was announced, I decided to sew clothes matching my heirloom, on my vintage machine. I wanted to create something that might actually have been worn by my relative, who owned these clothes, if she would have had my taste and interests. Further, I wanted to find an occupation for this fictional Edwardian self, where my eagerness to learn could be matched with staying on the farm. After some research, I decided to go for a country teacher (I have teachers on both of my parents sides of the family), as this was the primary occupation for ambitious Swedish women of the time, who wanted to study and work. As education is the most powerful weapon against war, I consider this as my contribution against the Great War!
The original corset, that my parents found in a chest, which had been locked for at least sixty years. Dated to about 1908.
I had already sewn a Victorian chemise and drawers, so now I wanted to make something else and decided upon a combination of chemise and drawers (1913). I translated the lovely, expensive versions I had seen at museum pages, into something affordable for a farmer’s daughter. Except for the green ribbon, I solely used inherited materials, from bed sheet and laces removed from pillow cases, down to the thread and buttons.
Combination of chemise and drawers – closes with buttons, otherwise open up to the back.
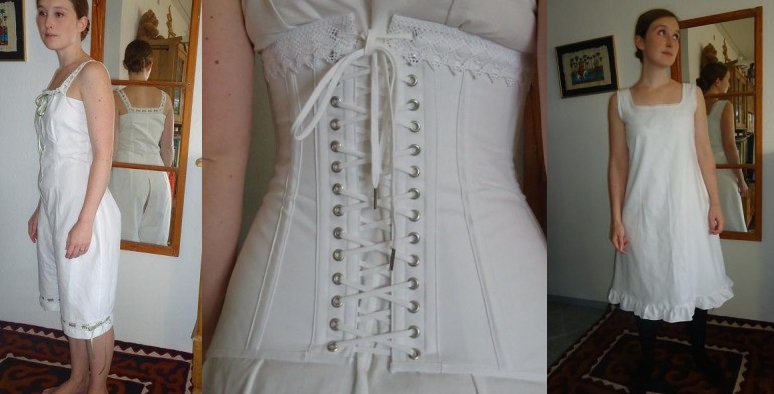
When I reconstructed the corset, I used coutil and other material from VenaCavaDesign. The lace reminds of the lace on my vintage drawers. The suspender end grips was a gift from a friend.
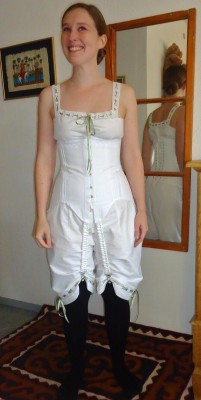
After having finished the corset and combination, I had no inspiration left for the corset cover and petticoat. Therefore, I made a simple combined corset cover and chemise (1910-12). In the picture, I wear the corset cover under my inherited petticoat.
Combination of corset cover and chemise. To the right, worn together with my vintage petticoat, from the same clothes chest.
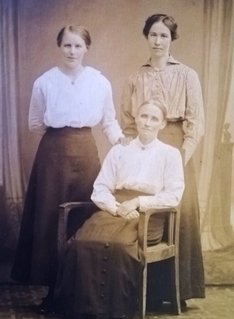
Hilda, the owner of the under-pinnings, was born in 1894. At this photo, from 1915, she stands at the left, together with her older sister and mother Matilda.
The income of country teachers was modest. Swedish literature from this time praises the woman who knows how to dress beautifully without following the fashion too anxiously, and who knows how to keep her clothes in a fine condition. Thus, I can confidently argue for combining the differently dated parts of the costume with each other.
Unfortunately, I was not able to move the sewing machine to my Danish home, so intsead of historically accurate techniques, I used my modern machine and all its advantages. My first project was to recreate the corset, which is supposedly dated to 1908. I ordered the materials needed from England, but forgot the suspender end grips. Last week I received this from a friend, who had inherited them from an old relative.
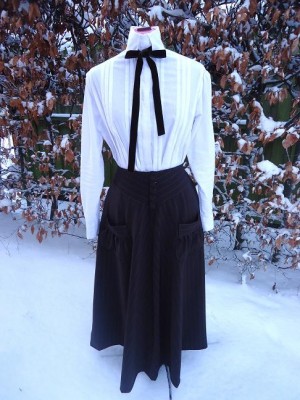
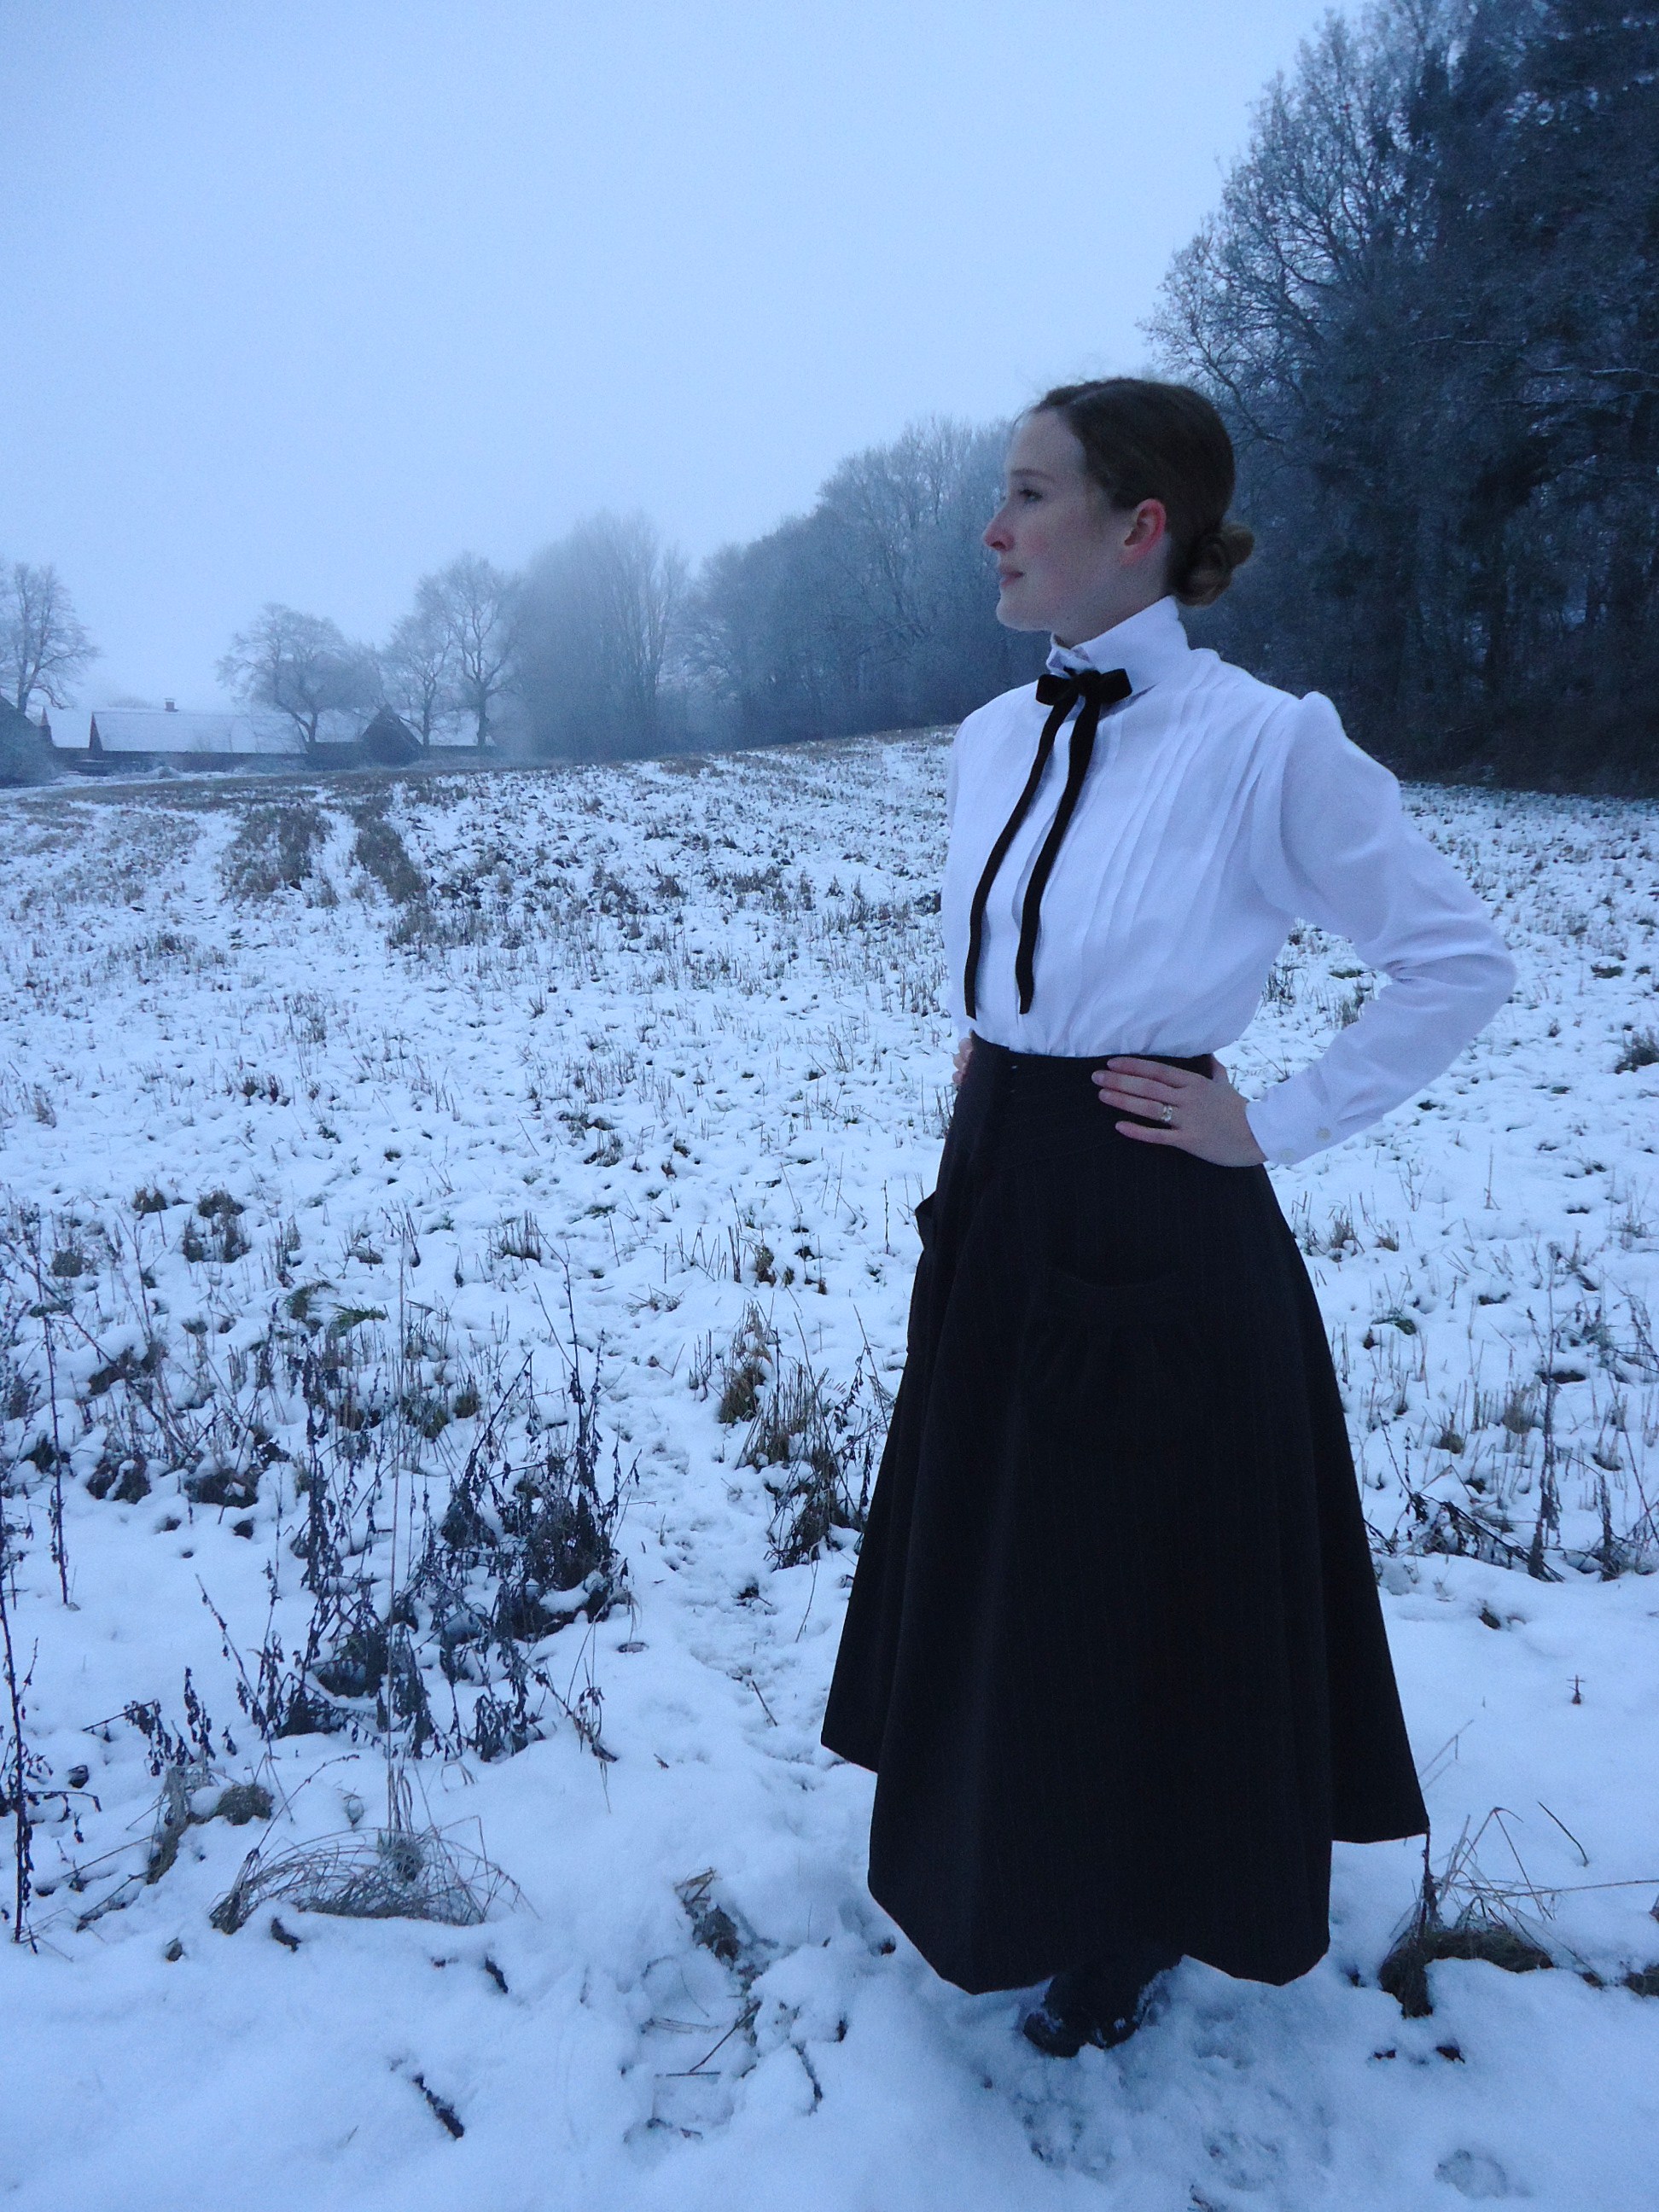
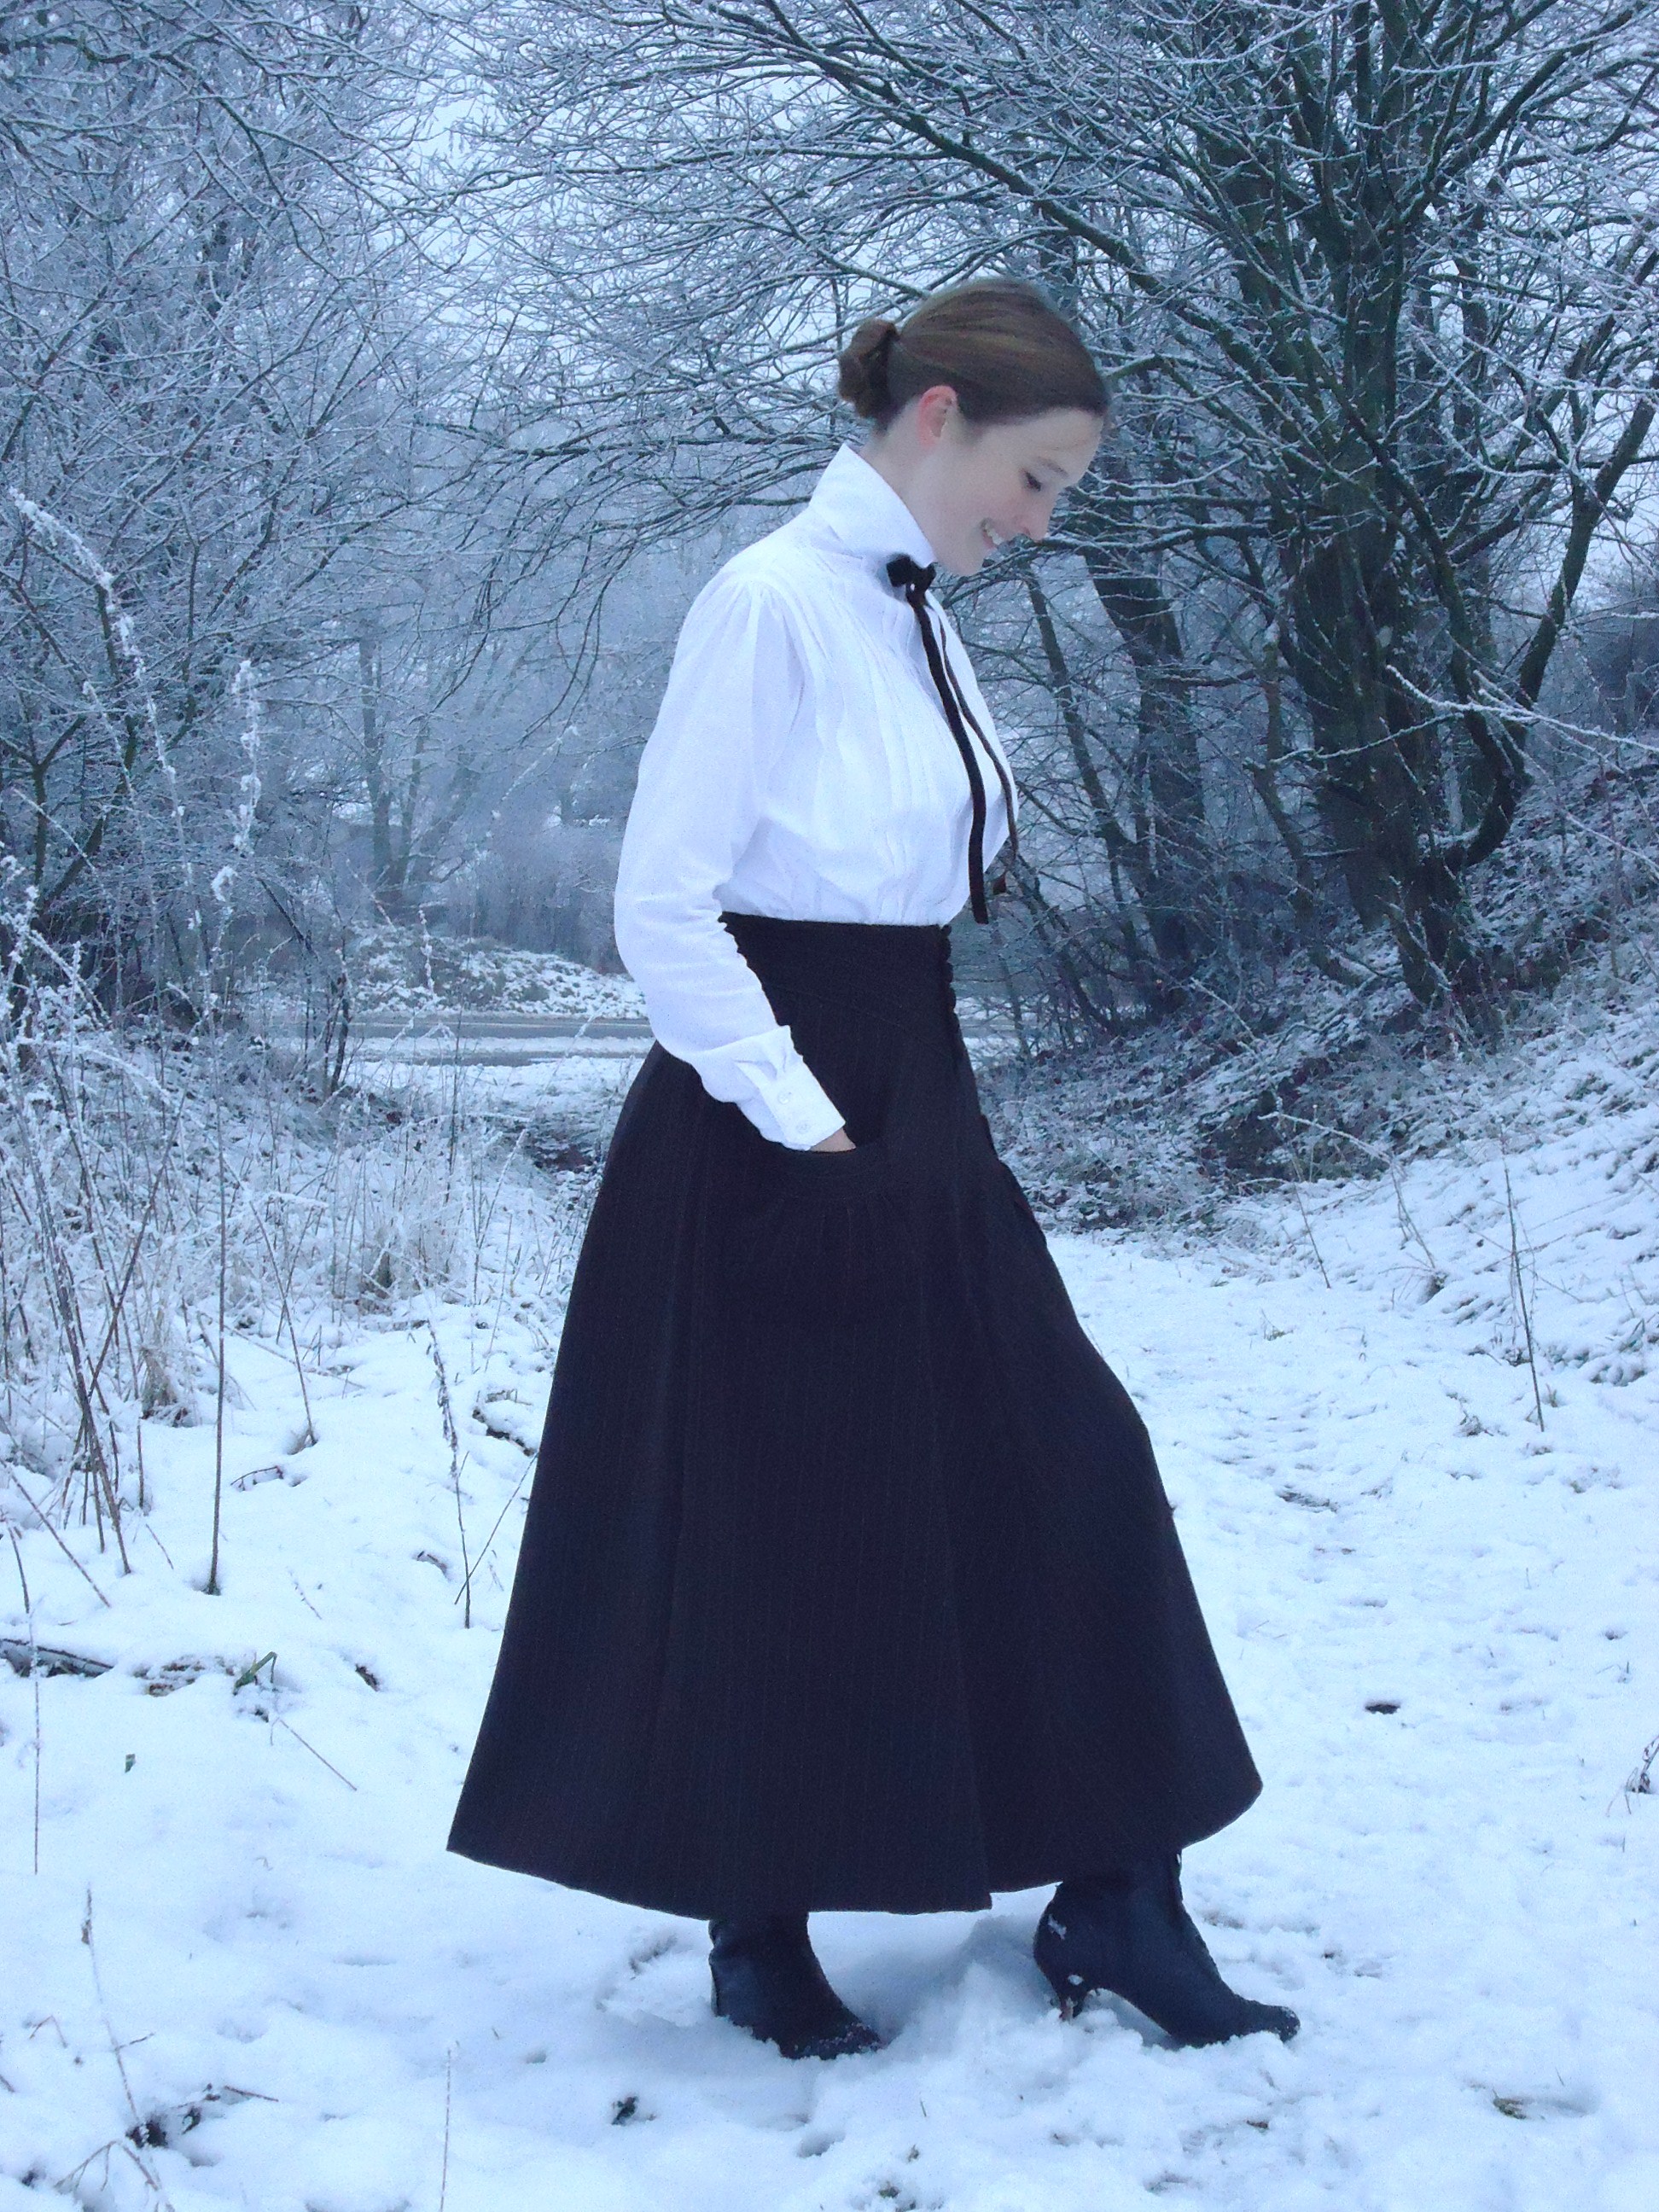
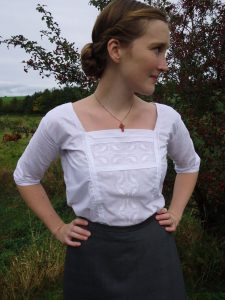
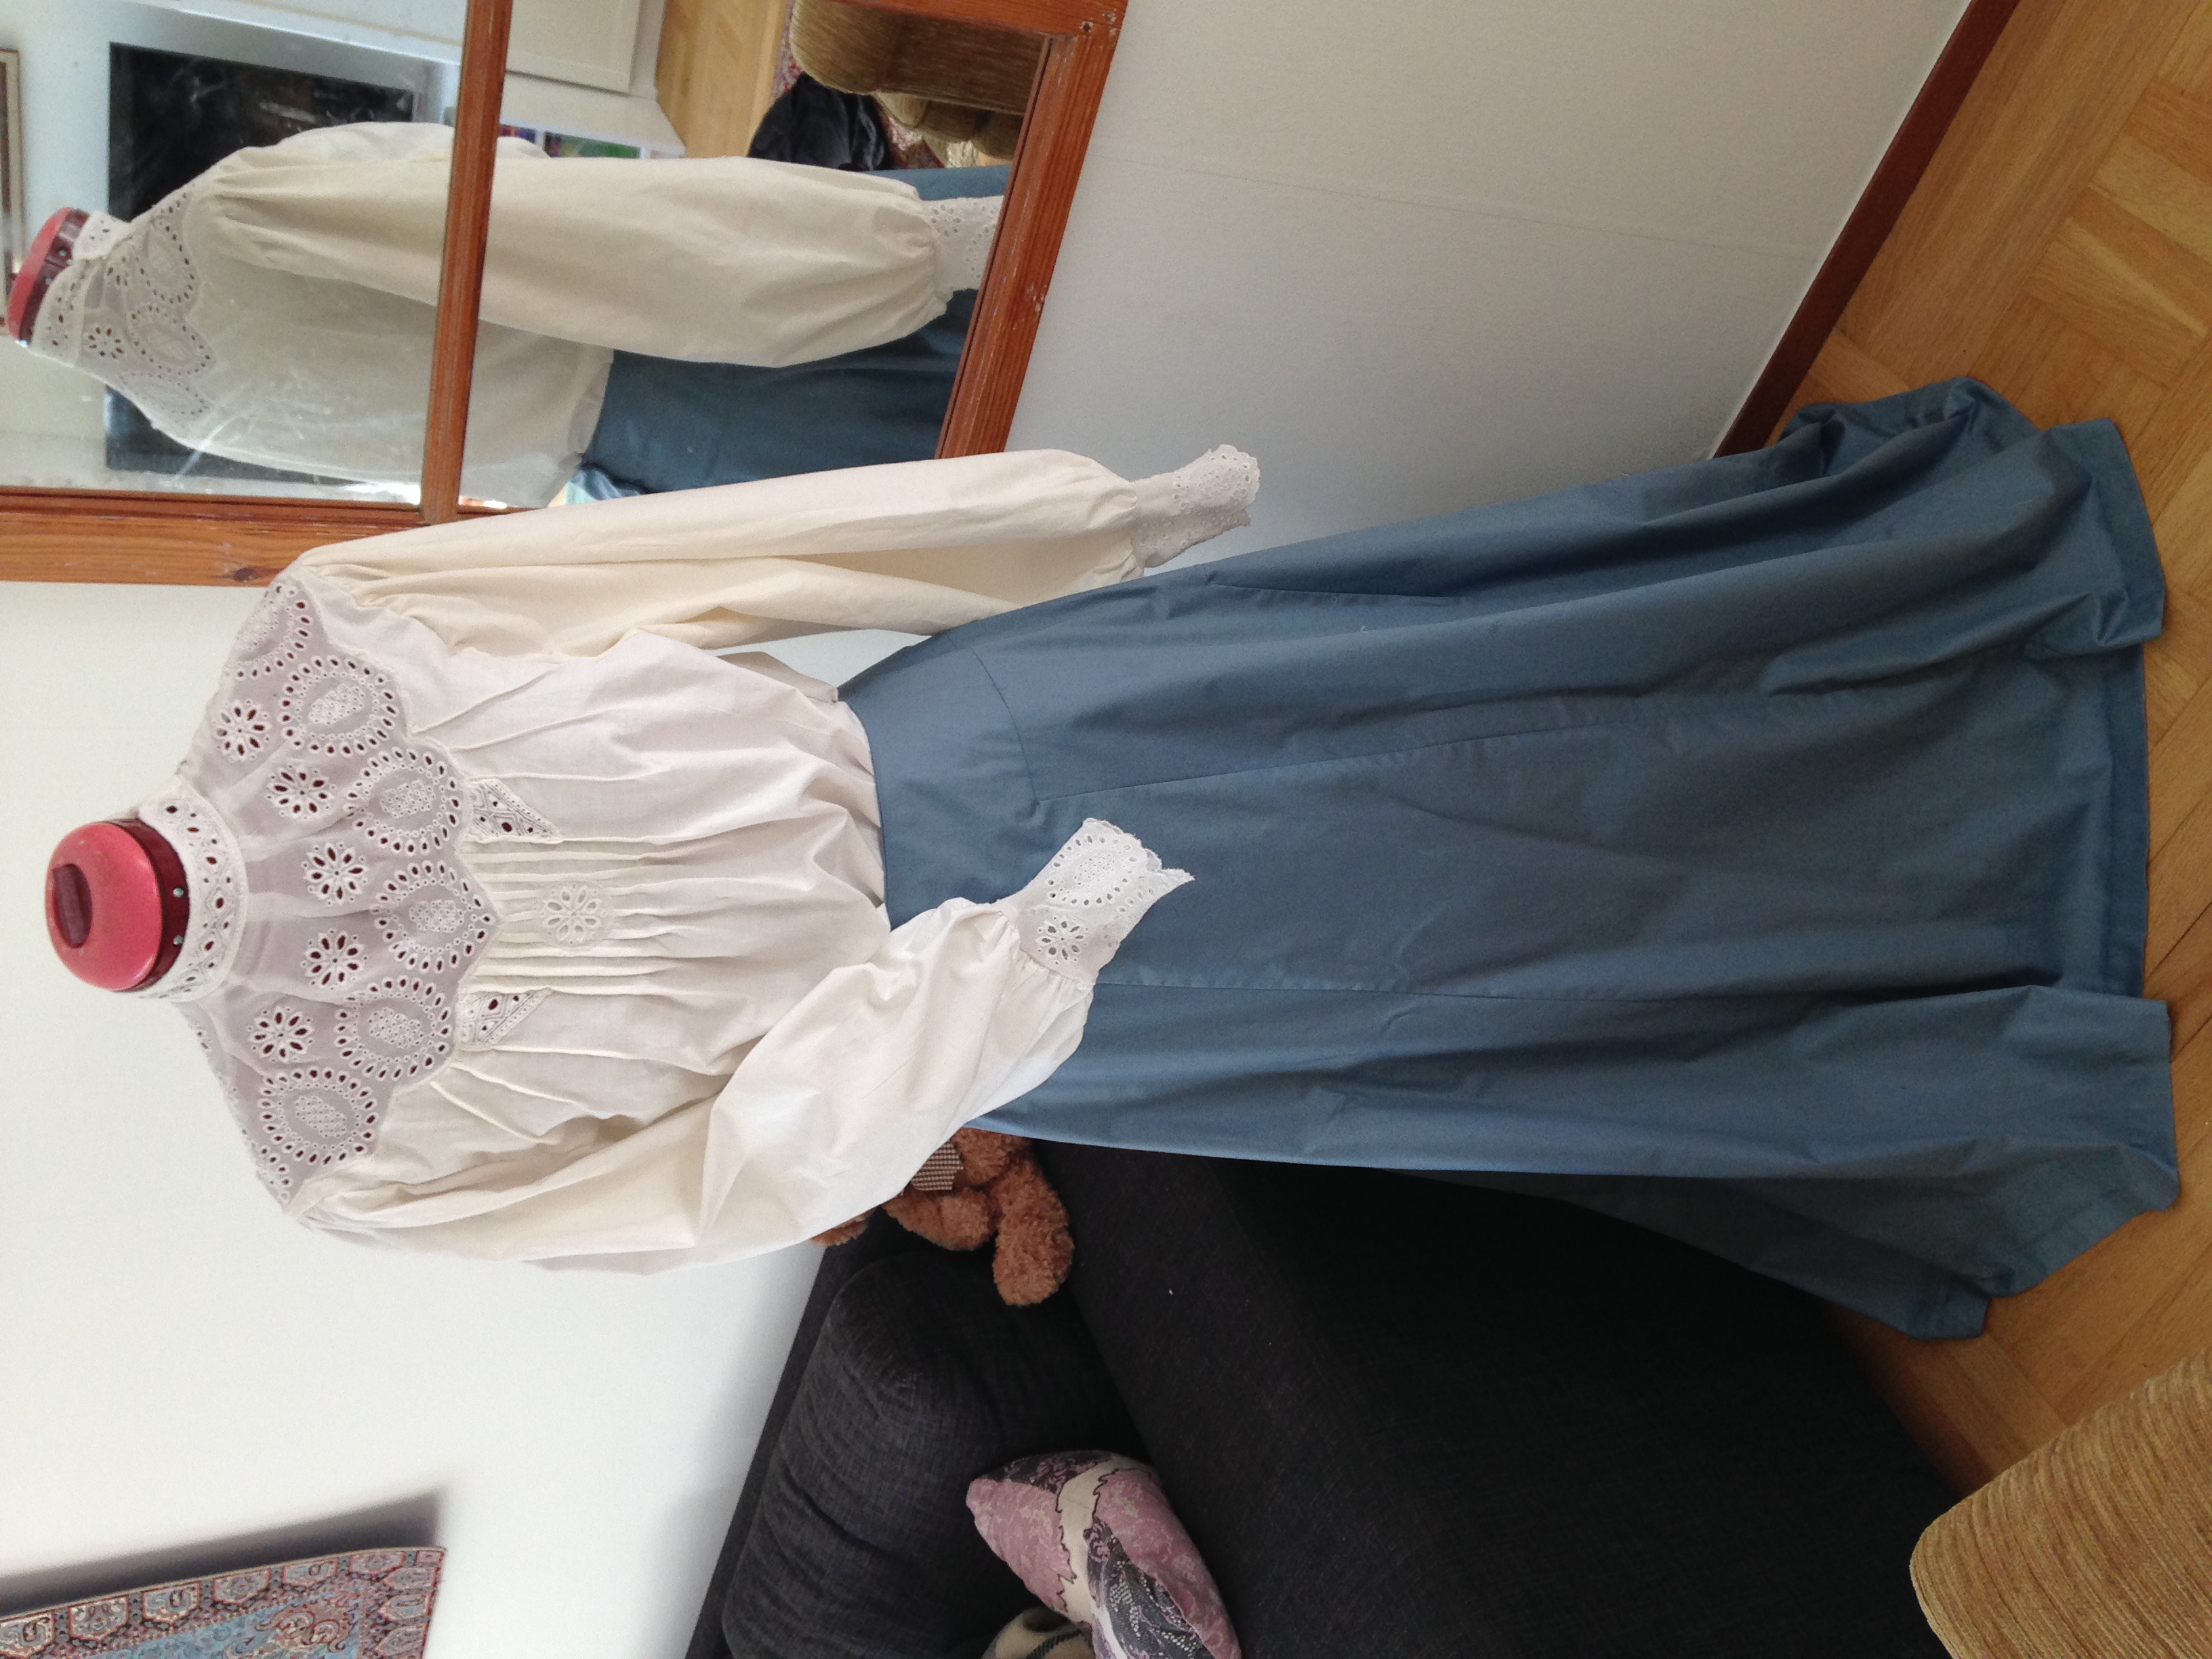
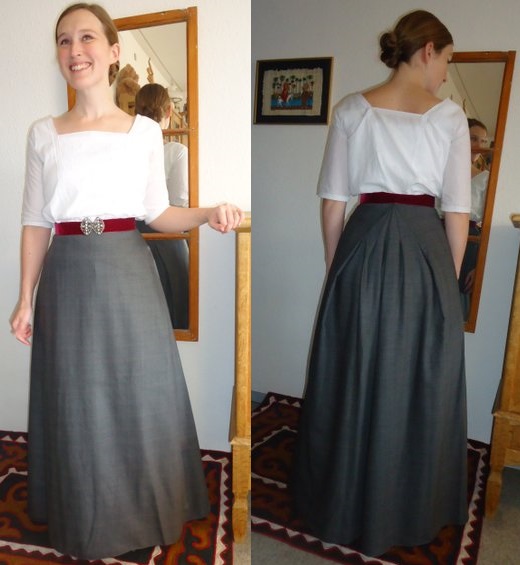
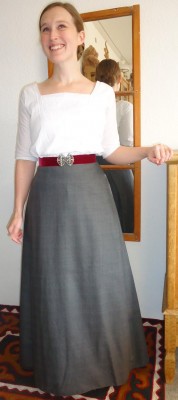
For Sunday wear, my fictional self would wear my previously sewn woollen skirt and machine embroidered cotton blouse (about 1910).
This costume (1910) I sew two years ago, but now it was finally complete, with all the right underwear and the beautiful belt, which clasps I also got from a friend.
The blouse is made of cotton, with machine embroideries. In the back, the skirt closes with hooks and sewn eyes.
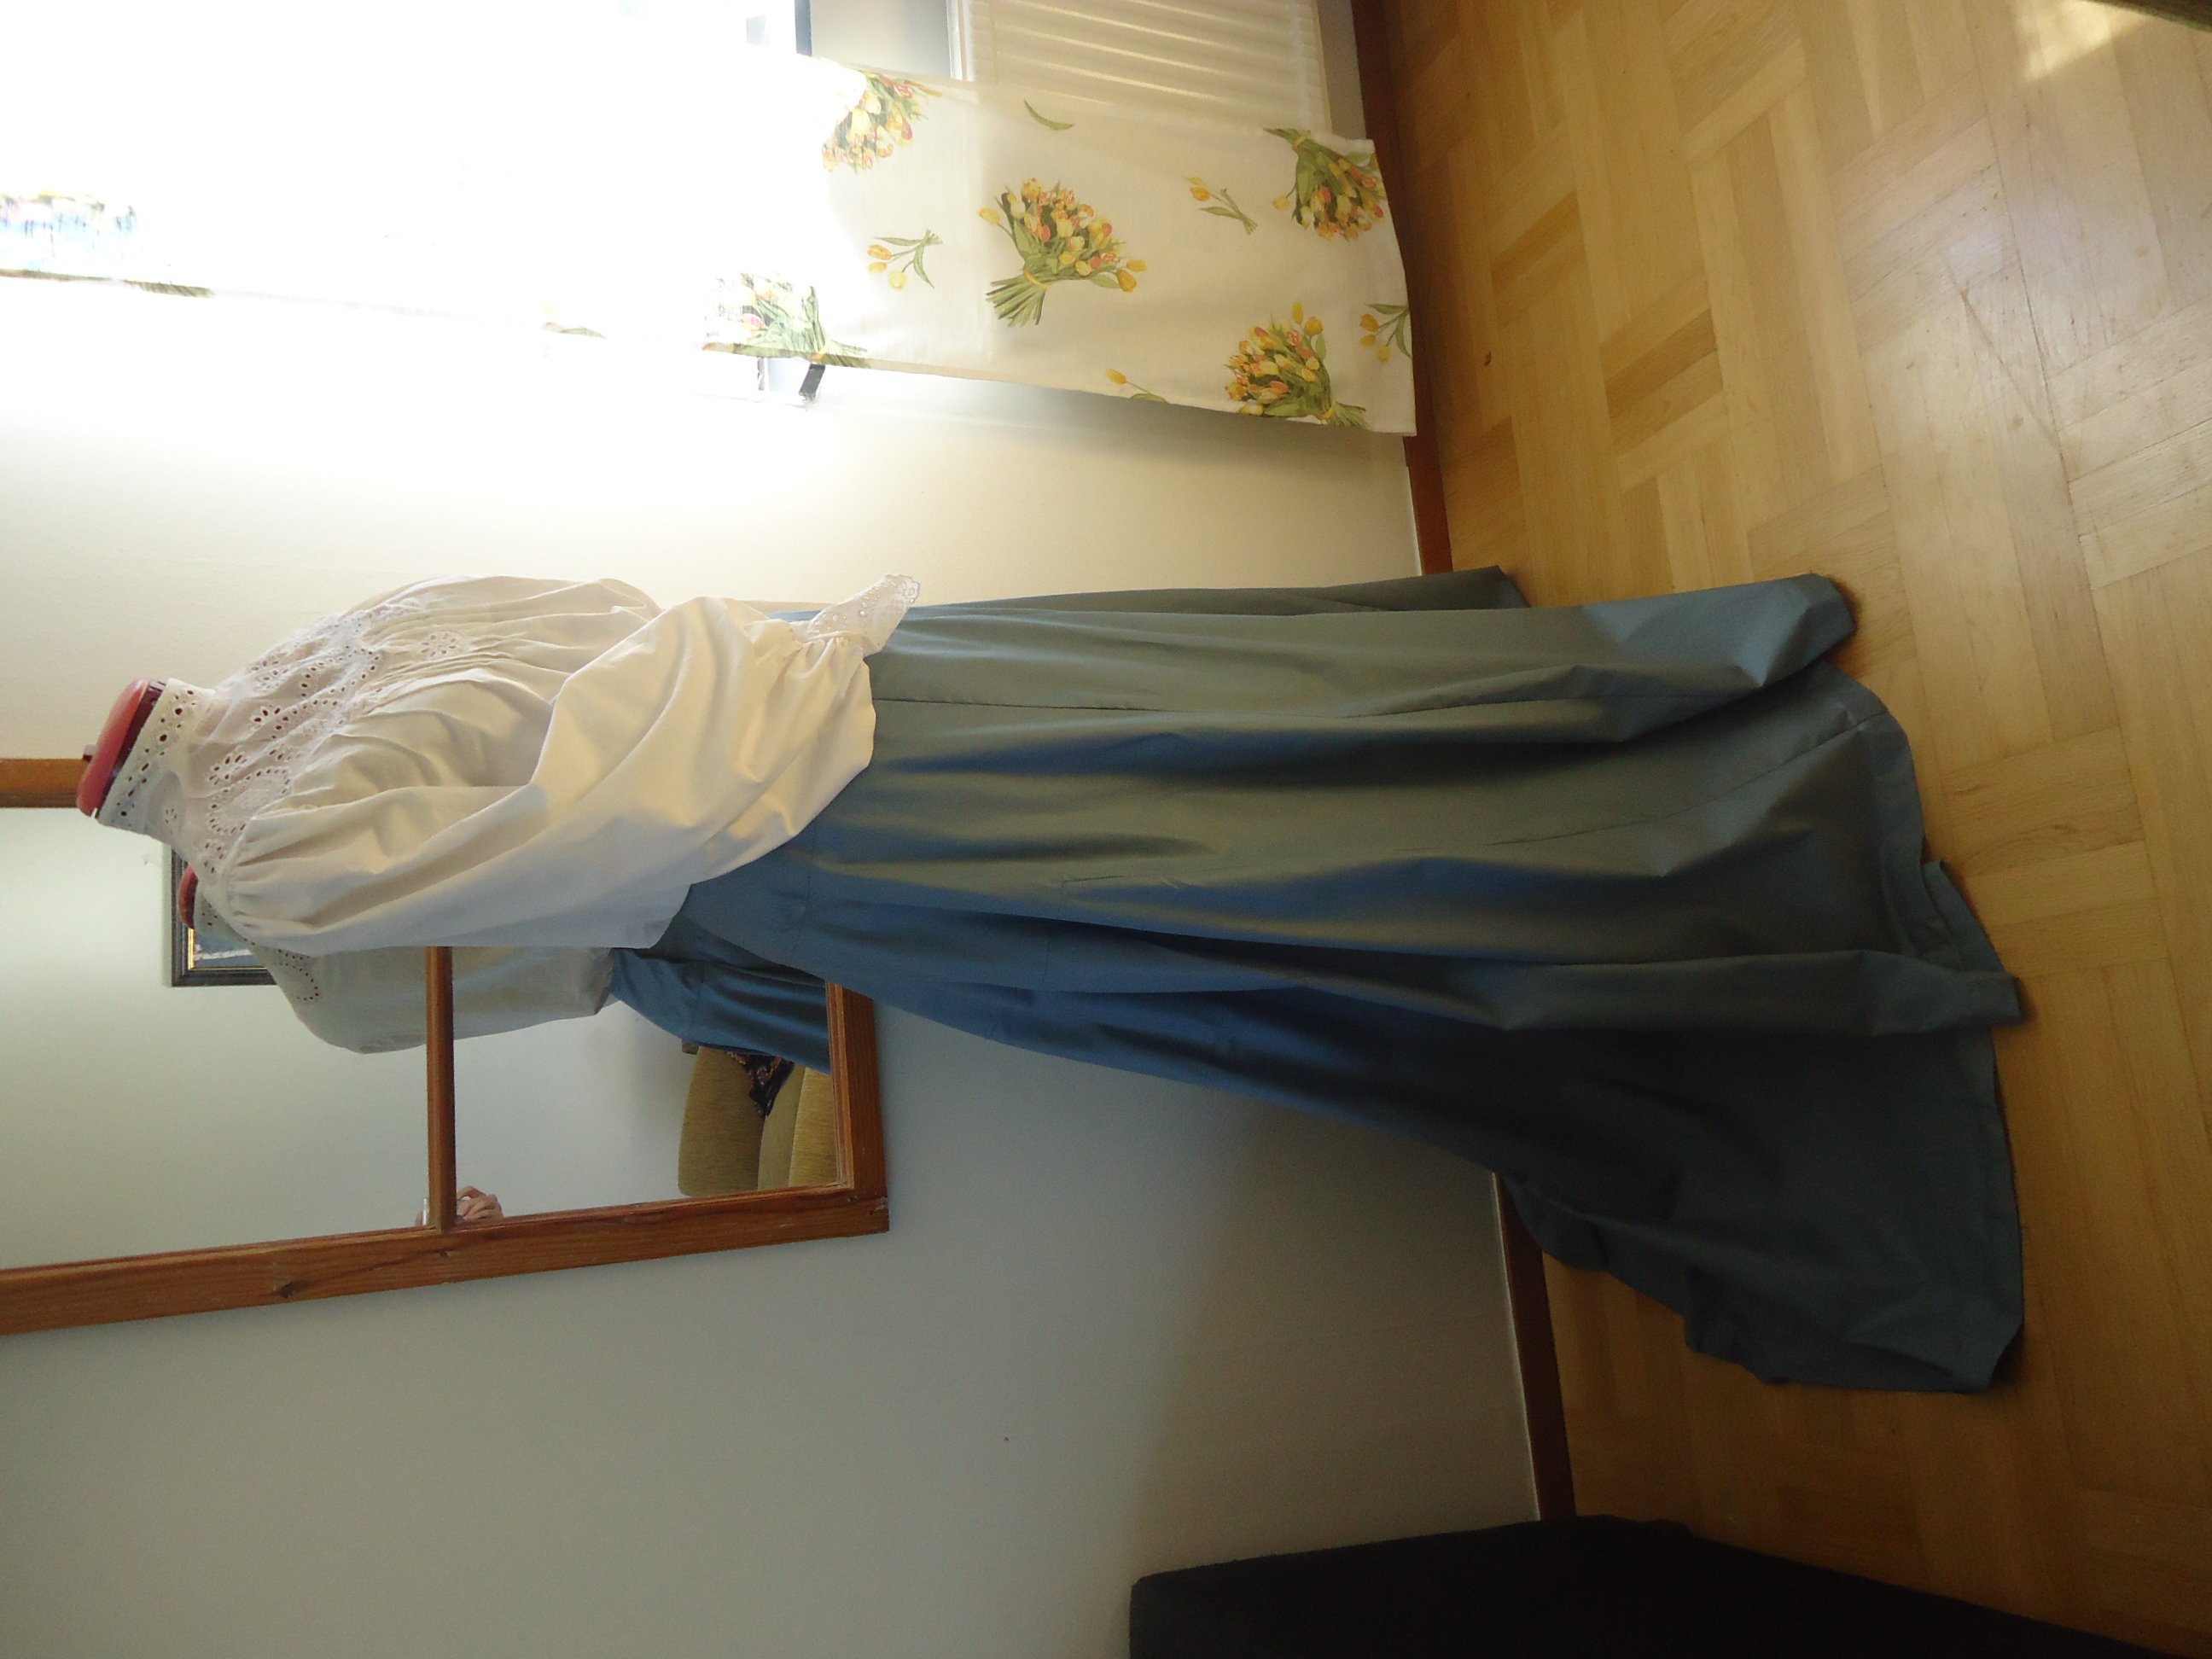
The fun part was creating the clothes that the teacher would wear for work. She should look neat and respectable, at the same time as the clothes should be practical and at least a bit modern. After some research, I decided to sew a shirtwaist with pin tucks (about 1910) to combine with a modern skirt (1914). Three days ago, I was worried that I had failed completely, as my husband looked sceptically at my half finished costume, but when the costume was finally finished, both he and I were pleased to see it was all I had planned for my costume to be.
Det händer då och då att jag får fantastiska gåvor, från de mest oväntade håll. Förra hösten kunde jag fullborda min kappa, tack vare en snäll medresenär som skänkte mig en vacker pälskrage. Förra sommaren fick jag flera kassar med tyger av en bekant och för någon månad sedan fick jag, förutom en ny favoritfilm, tillskickat vackra spännen för att dekorera min edwardianska dräkt. De passar inte till lärarinnekjolen, men väldigt bra till min tidigare dräkt! Tack, Ulrika!
Förra veckan lät en vän mig gå amok i hennes sybord, som hon ärvt efter sin mormorsmor. Dessa skatter fick jag med mig hem!
From time to time it happens that I receive fantastic gifts, out of the blue. Last autumn I was able to complete my winter coat, thanks to a lovely travel companion who thought that I had better use of her old fur collar than her. Last summer I received several bags with fabrics, which have resulted in two dresses yet. About a month ago a dear acquaintance sent a movie (which has already become a new favourite) and a pair of beautiful belt buckles for my Edwardian outfit. They don’t match the new skirt, but go very well together with my other Edwardian outfit. Thank you, Ulrika!
Last week, another dear friend of mine let me harvest what treasures I could find in her great grandmother’s sewing table.
Till höger ligger, vad jag tror har varit, strumpebandshållare, men utan knappdelen. Den vita spetsen har hon själv virkat!
To the left is what I believe have been used in garters, but it lacks its buttons. The white lace, the great grandmother has knitted herself!
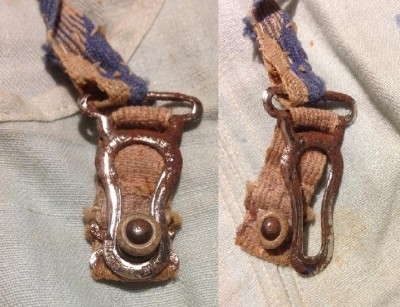
Jag kunde ju inte fullborda min edwardianska korsett i höstas, eftersom jag saknade strumpebandshållare. Vid fotosessionen promenerade jag utan denna elementära del och fick genast inspiration att använda gåvan från väninnan. Originalkorsettens strumpebandshållare ser ut så här.
I wasn’t able to fully complete my teacher’s outfit last autumn, because I couldn’t get hold of appropriate garters. When I walked around without this elementary piece during our photo session, the stockings went down again and again I got inspiration for using what I had found in that sewing table. The garters of my vintage corset look like this.
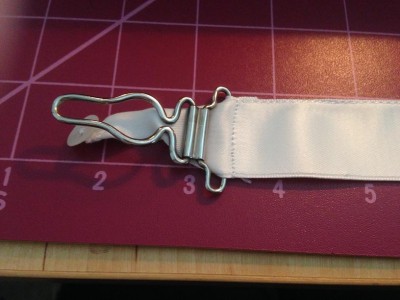
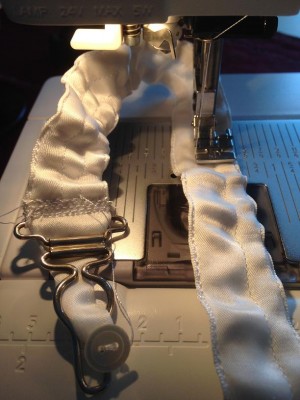
Strumpebandshållare – konstruktion
Dessa delar använde jag: strumpebandshållare, sidenband, resårband och pärlemorsknappar.
For making the garters, I used: “garter clasps”, broad ribbon, elastics and mother of pearl buttons.
Jag sydde fast bandet (dubbelt) för hand och lät den främre delen gå ned som fäste för knappen.
I handstitched two layers of the ribbon together and left one layer longer than the other, for fastening of the button that hooks in the clasp.
Sedan fäste jag två resårband nederst och sydde in dem i kanaler.
Then I fastened two elastics in that part of the ribbons sewed channels for them.
En stund senare var de redo att fästas i korsetten.
A little while later they were ready for being fastened to the corset.
De fungerade utmärkt!
They work perfectly!
Originalunderklädernas ägarinna
Mina omtänksamma släktingar, på andra sidan Atlanten, har nu skickat några bilder och information om Hilda, som bland annat bar korsetten som jag har återskapat.
My thoughtful relatives on the other side of the Atlantic Sea have recently sent pictures and information about Hilda, the owner of the vintage clothes in the treasure chest.
Hilda var syster till min farmors far, Gottfrid. Hon föddes 1894. På denna bild står hon till vänster, med sin storasyster till höger och sin mor sittande framför sig. Bilden är tagen 1915, året efter vad jag försökte återskapa ur fantasin!
Hilda was the sister of my grandmothers father, Gottfrid. She was born in 1894. In this picture she is the girl on the left, with her sister on the right and their mother sitting in front of them. The picture is from 1915, only one year after what I was trying to recreate clothes for!
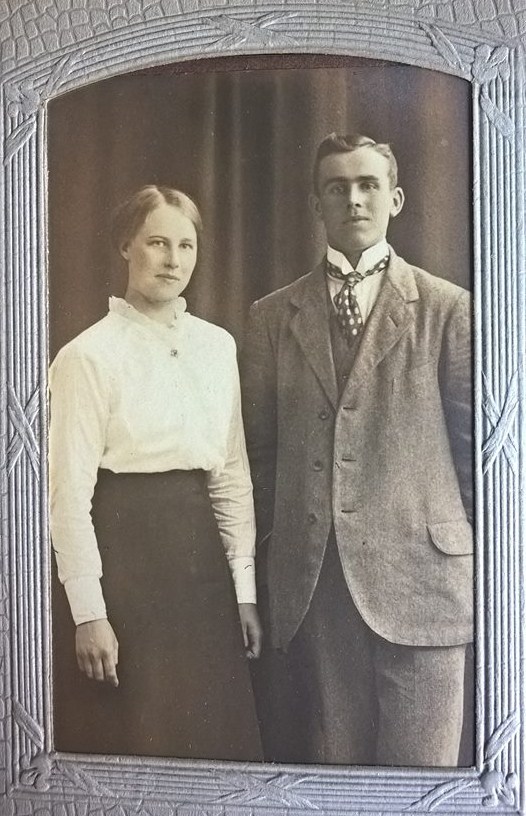
Här är Hilda tillsammans med sin bror Gottfrid. Mina släktingar tycker att vi är hiskeligt lika varandra och jag håller nog med om att vi verkar dela både ansiktsform och klädsmak. Hon var tydligen också en duktig sömmerska.
Here Hilda is seen together with her brother Gottfrid. My relatives think that we remind terribly much of each other. I can agree with that we share the shape of our faces and taste in clothes. She was also known for being a good seamstress.
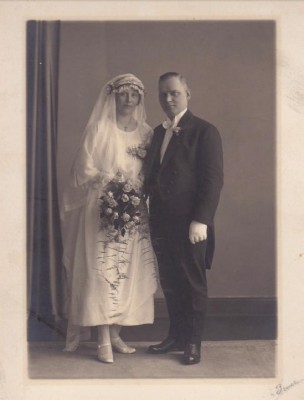
1923 gifte hons sig med göteborgaren Georg. Hon sydde sin bröllopsklänning.
In 1923 she married Georg, from Gothenburg. Of course she made her own dress.
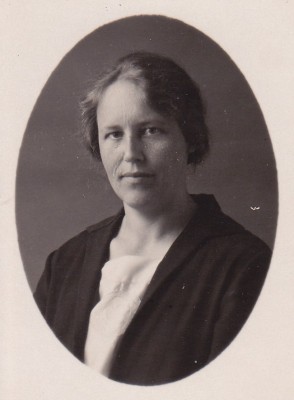
Bilden ovan är ett passfoto från 1927, antagligen taget inför flytten till USA.
This picture usher passport photo from 1927, probably before moving to the states.
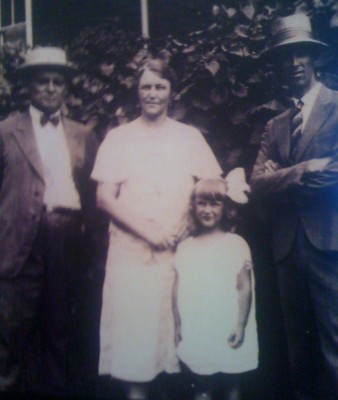
Detta foto är taget runt 1930. Hilda står tillsammans med en av min farmors bästa vänner, kusinen Brita.
This photo is from about 1930. Hilda stands together with one of my grandmother’s best friends, cousin Brita.
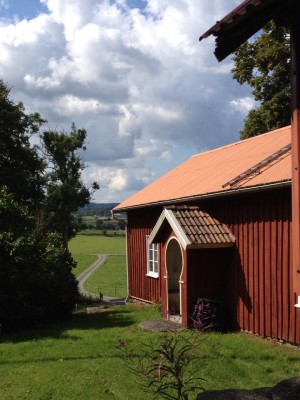
Hilda bodde i det här trevliga huset, som byggdes under 1700-talet.
Hilda grew up in this nice house that was built in the 18th century.
Denna härliga utsikt har man uppifrån vindsrummet, där min farmor har berättat att hon brukade sova om somrarna. I samma rum står den åtråvärda skattkistan.
This is the view from the attic, where my grandmother has told they used to sleep during the summers. The desirable travel chest stands in the same room.
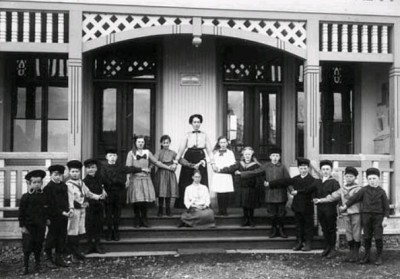
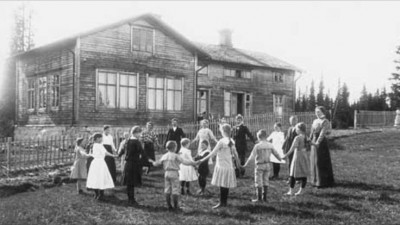
Jag avslutar inlägget med en bild från Jämtland, 1914. Denna pittoreska bild visar en lärarinna tillsammans med hennes elever. Det påminner om min egen romantiska bild av den tidens lärarinnor, tack vare Astrid Lindgren…
Åter igen vill jag tacka alla er snälla människor, som har bidragit till mitt projekt med material och inspiration! Tack!
I end this blog post with a photo from the north of Sweden, 1914.
This picturesque photo shows a teacher with her young students. It reminds of my romantic idea of the teachers of that era, and Astrid Lindgren is the one to blame. ?
Once again, I want to say thanks to all you wonderful people, who have contributed to my project with material and inspiration!
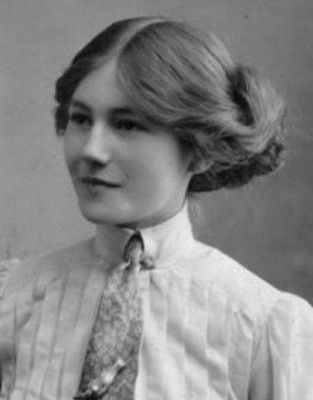
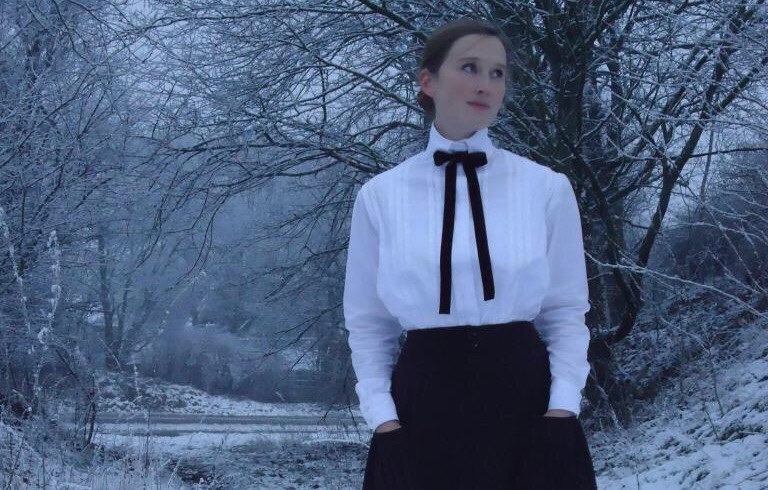
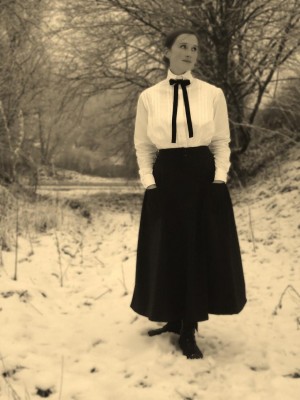
Bilden intill ska föreställa en lärarinna, fotograferad 1914. Detta bekräftade vad jag hade hoppats på, att en proper lärarinna under första världskriget kunde fortsätta ha sina höghalsade blusar från starten av 1910-talet, trots att det verkar ha varit modernt med lägre kragar under 1914-1915.
The young lady in the picture, from 1914, is a teacher. This proved my thesis, that a decent teacher during the First World War could continue wearing her high necked shirtwaists, even though lower necklines had come into fashion in 1914-1915.
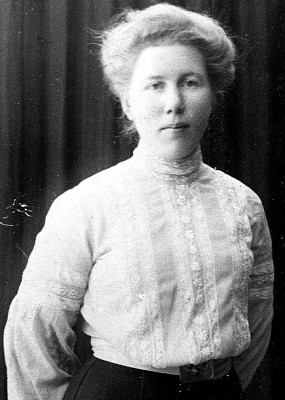
Ytterligare ett exempel, som gav mig vatten på min kvarn, fick jag nu sänt till mig från en annan som är lika tokig i historiska kläder. Fotografiet är från 1916 och lärarinnans dräkt är faktiskt ganska lik den jag har sytt:
Yet another example that kept my hopes of a high necked shirtwaist up, was sent to me by another dear historic fashion nerd. The photo is from 1916 and the teacher actually wears clothes quite similar to those in my sketch.
Denna unga dam är också fotograferad 1914. Jag försökte fixa den moderiktiga frisyren igår, men mitt egensinnigt raka hår vägrade.
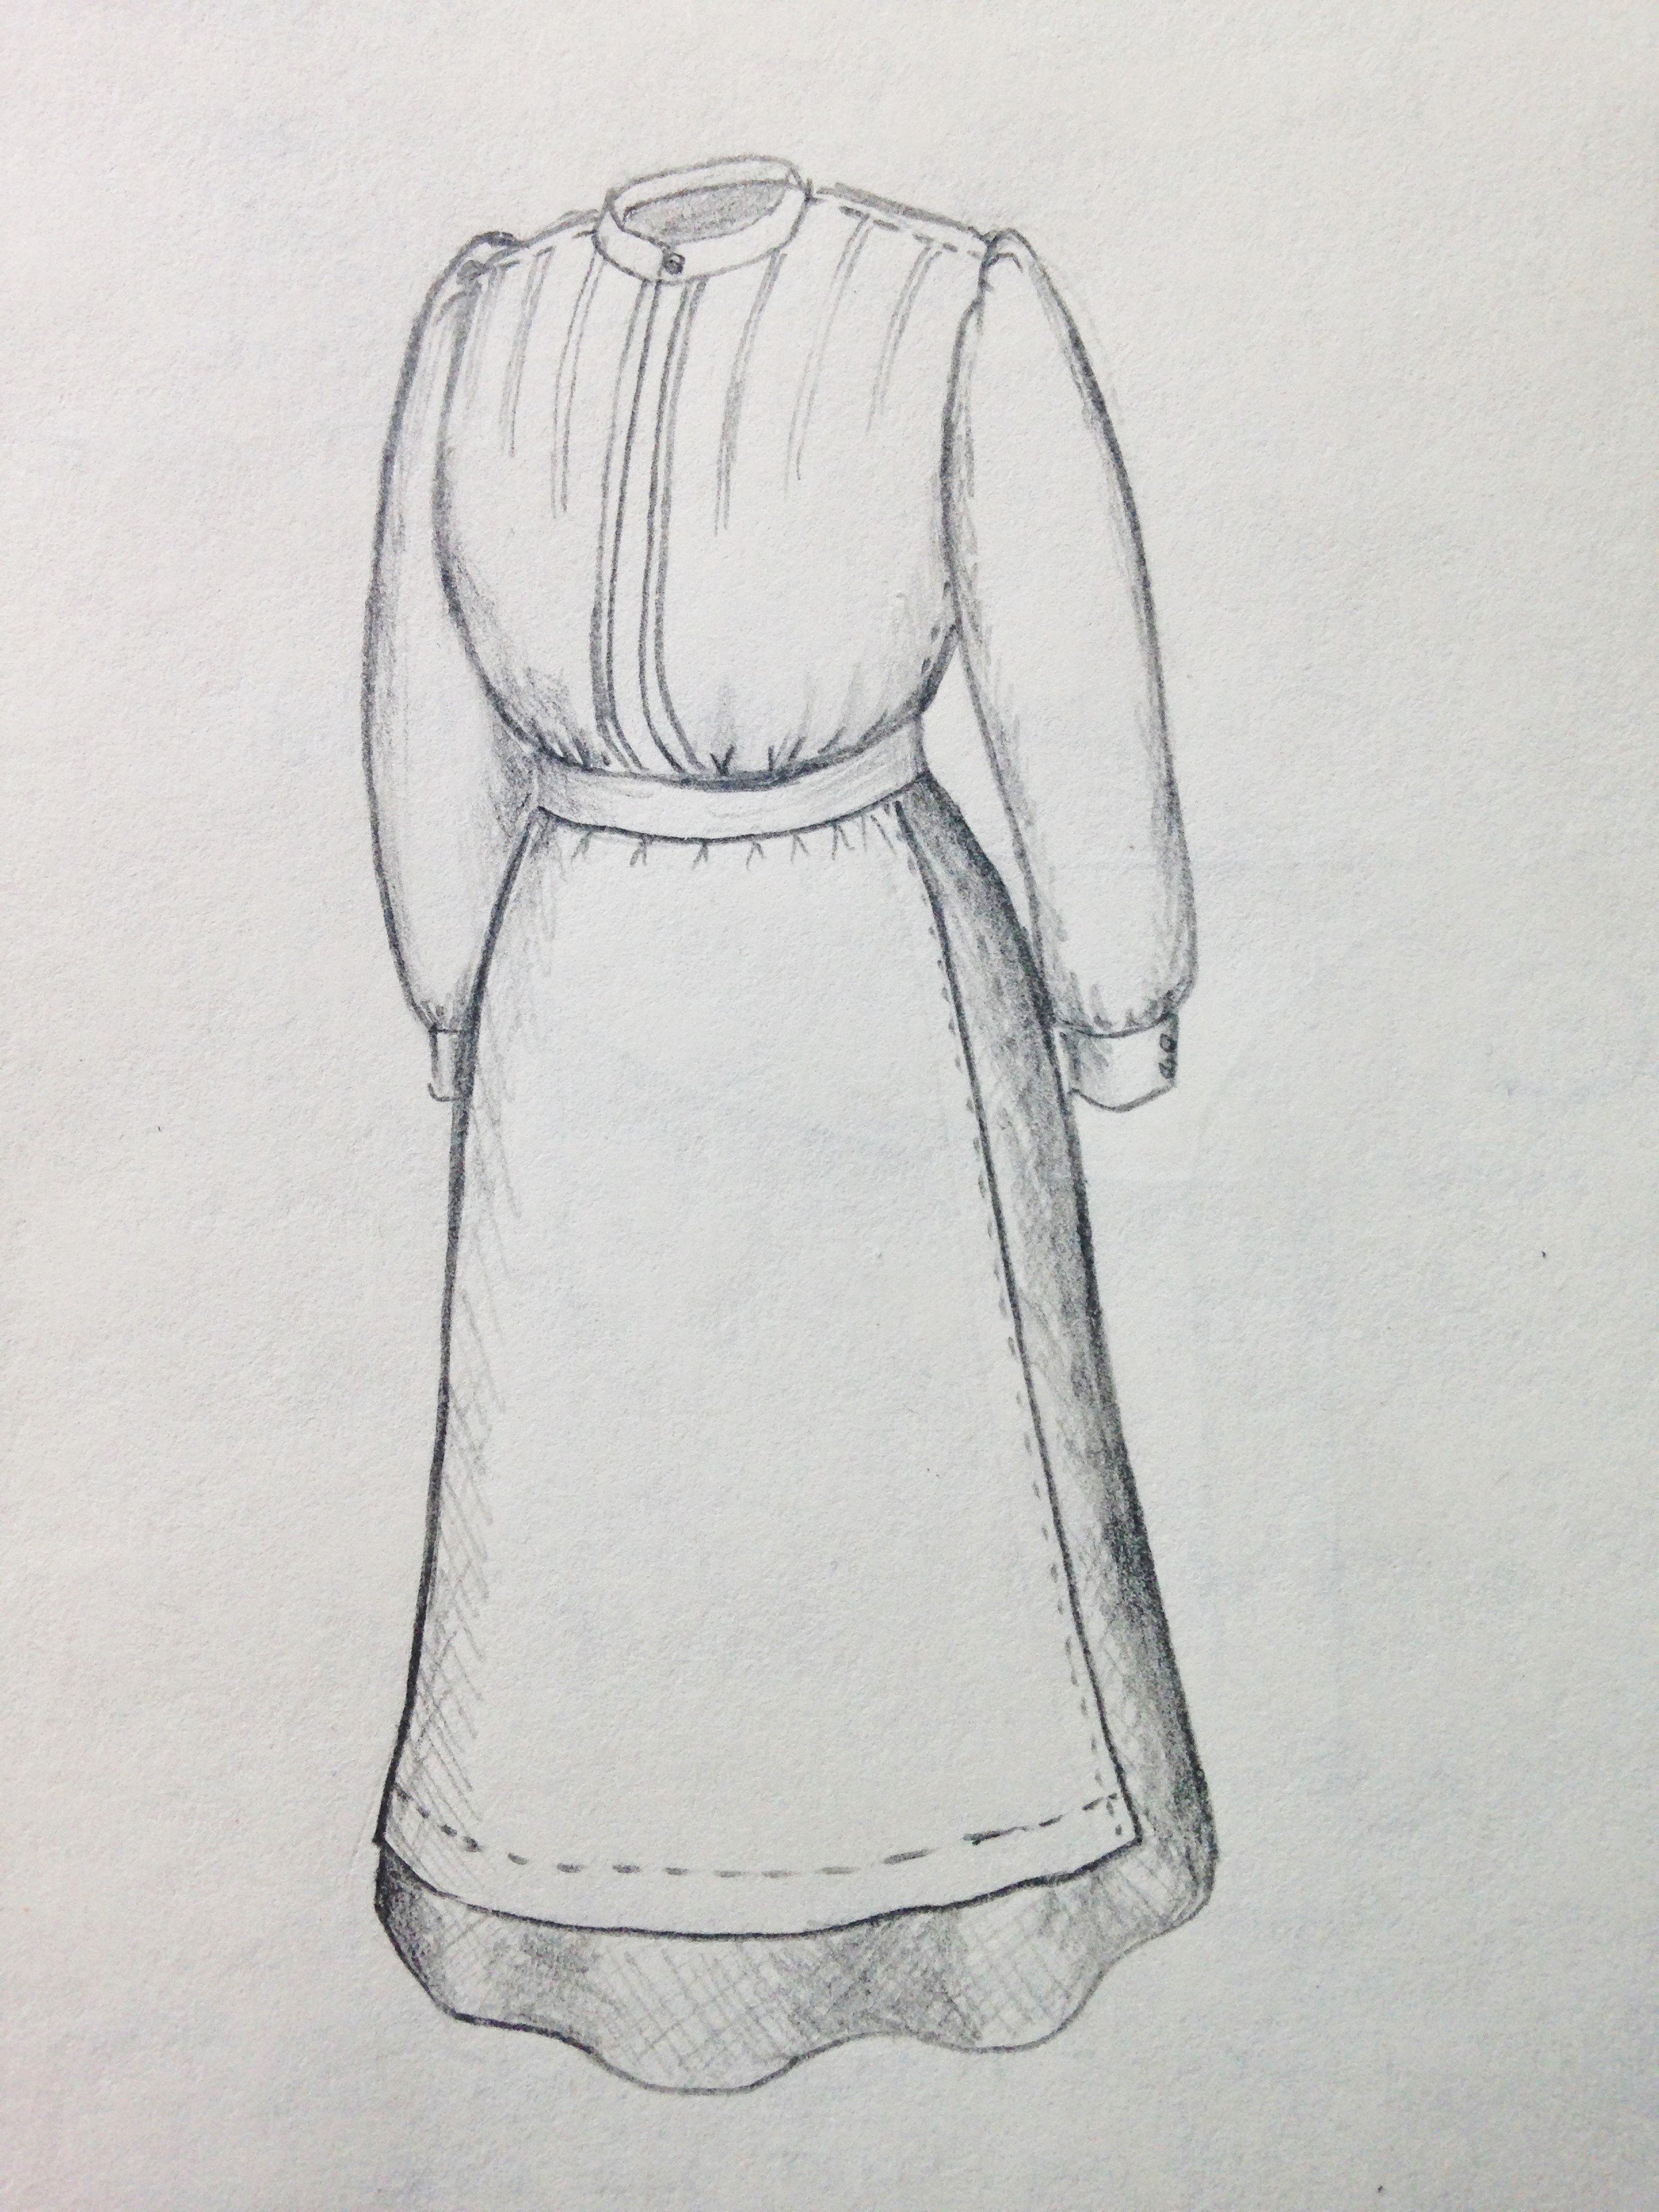
Som ni förstår, var jag väldigt sugen på att sy just en höghalsad blus, i stil med vad de väna lärarinnorna har i Astrid Lindgren-filmerna. Jag lyckades inte hitta något mönstrat tyg i rätt stil, så jag köpte ett tunt vitt bomullstyg och bestämde mig för att dekorera plagget med stråveck (se skissen i förra inlägget). Jag studerade olika varianter och fann inspiration från följande bilder.
As you are probably well aware, I was very into the idea of making a high necked shirtwaist, in the same style as the lovely teachers in the Astrid Lindgren movies. I wasn’t able to find any cotton with the right type of print, so I ended with buying a white cotton and decided to decorate it with pin tucks (see the sketch in the last blog post). I studied different options and was inspired by the following pictures:
Den här modebilden är från 1912. Visst ser dräkten lite lärarinneaktig ut?
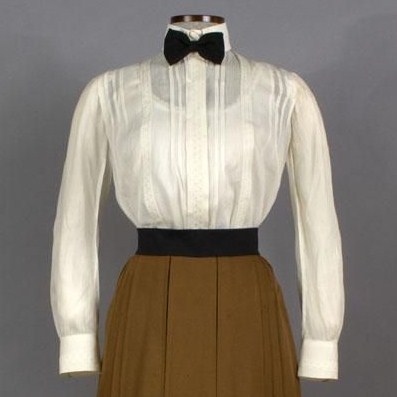
Denna blus (från starten av 1910-talet) vann slutligen mitt hjärta! Jag tycker om hur stråvecken är grupperade och lämnar mer genomskinliga ytor.
This shirtwaist (from the early teens) finally won my heart! I like how the pin tucks are grouped and leave some areas more transparent.
Konstruktionen
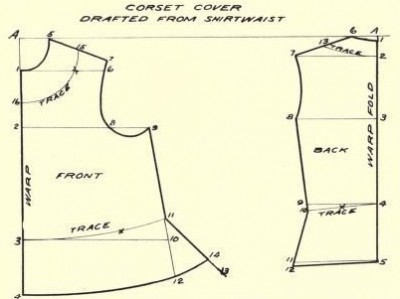
Detta mönster är till corset cover, men i boken beskrivs hur man anpassar det för blus.Ärmkonstruktionen är helt densamma som på bilden.
Med mycket dåligt samvete, valde jag att inte följa bokens instruktioner för hur man ritar det perfekt anpassade mönstret, med hjälp av måttband, linjal och penna. Istället tog jag den snabba vägen och hängde upp tyget på provdockan och klippte ut rätt form och justerade tills det motsvarade befintliga mönster.
My conscience was very heavy indeed when I chose not to follow the book’s instructions for making the perfectly fitted pattern with the help of measuring tape, ruler and pencil. Instead I took a shortcut, hanging the mockup fabric on the mannequin and cutting the appropriate form and adjusting until it looked like the book’s pattern.
Baktill klippte jag fram passande form på ena halvdelen och kopierade denna till andra halvdelen.
In the back I cut an appropriate form at one side and then copied this to the other side.
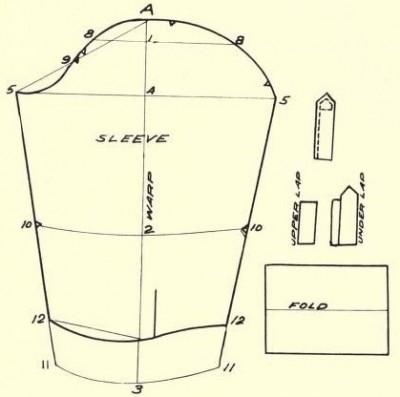
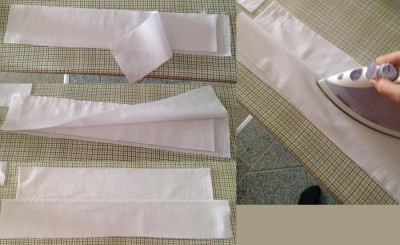
Så här såg alla mönsterdelar ut. Den knubbiga rektangeln (manschett) ska klippas ut gånger 2 och den långsmala (krage) gånger 4.
The pattern pieces looked like this. There shall be cut two shubby rectangles (cuff) and four long ones (collar).
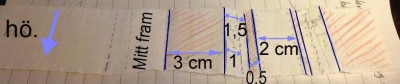
Problemen började när jag skulle klippa ut blusens framsida. Först klippte den sömnlösa enligt mönstret, men detta är inte anpassat till stråveckens extra tygåtgång. Sedan räknade jag stråvecken på favoritblusen och kom fram till att det var 9 st på var sida och att de var ungefär 1 cm breda. Därmed la jag till 18 cm över vardera axeln (9*2). Senare insåg jag att inspirationskällans stråveck måste vara smalare, för med 1 cm breda veck fick det inte plats 9 st över mina medelbreda skuldror. Därmed sprättade jag upp dessa yttre veck. Alltså tror jag att man gott kan nöja sig med att lägga till 14-16 cm över skuldrorna. Dessutom skulle jag ha lagt till ytterligare en decimeter mitt fram, på höger framsida, till dekorationen som döljer knäppningen.
The problems came when I started cutting the from of the shirtwaist. First, the sleepless seamstress cut just like the pattern, although this wasn’t adjusted to the extra amount of fabric for the pin tucks. Then I counted the pin tucks on my favourite Pinterest shirtwaist and got nine at each side, about one cm wide. Thus I added 18 cm at the shoulders (9*2). After cutting the fabric, I realised that the pleats of the inspiration source must have been thinner, because the with my one cm wide pleats, the whole width was now too wide for my regular broad shoulders. So I unpicked the peripheral pin tucks. I believe that 14-16 cm extra over the shoulders would suffice. Yet another misstep, was that I should have added one dm at the right part’s front, for the decorative “button hiding place”.
Så här vek jag tyget över knäppningen. Knapphålen sitter i det undre lagret.
This is how I folded the fabric that covers the buttons in the front. The button holes are placed in the lowest layer.
Utecklad, ser viknings-dekorationen, över knäppningen, ut så här. “2 cm-delen” är alltså den del som ligger längst fram. Bredden blir totalt 14 cm från “mitt fram”.
Folded out, the decoration looks like this. The “2 cm part” is the one that is the top layer. The width adds up to 14 cm.
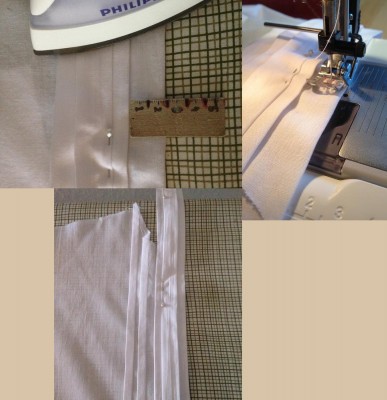
Här syr och stryker jag dekorationen som döljer knäppningen.
Here, I sew and iron the decorative button hiding place.
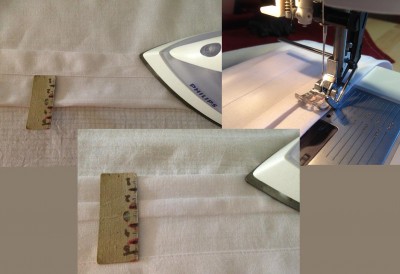
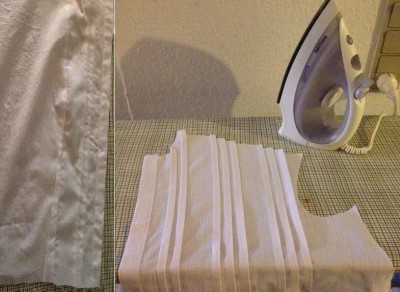
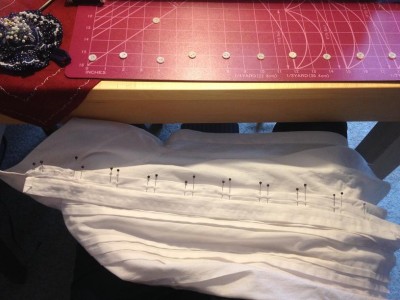
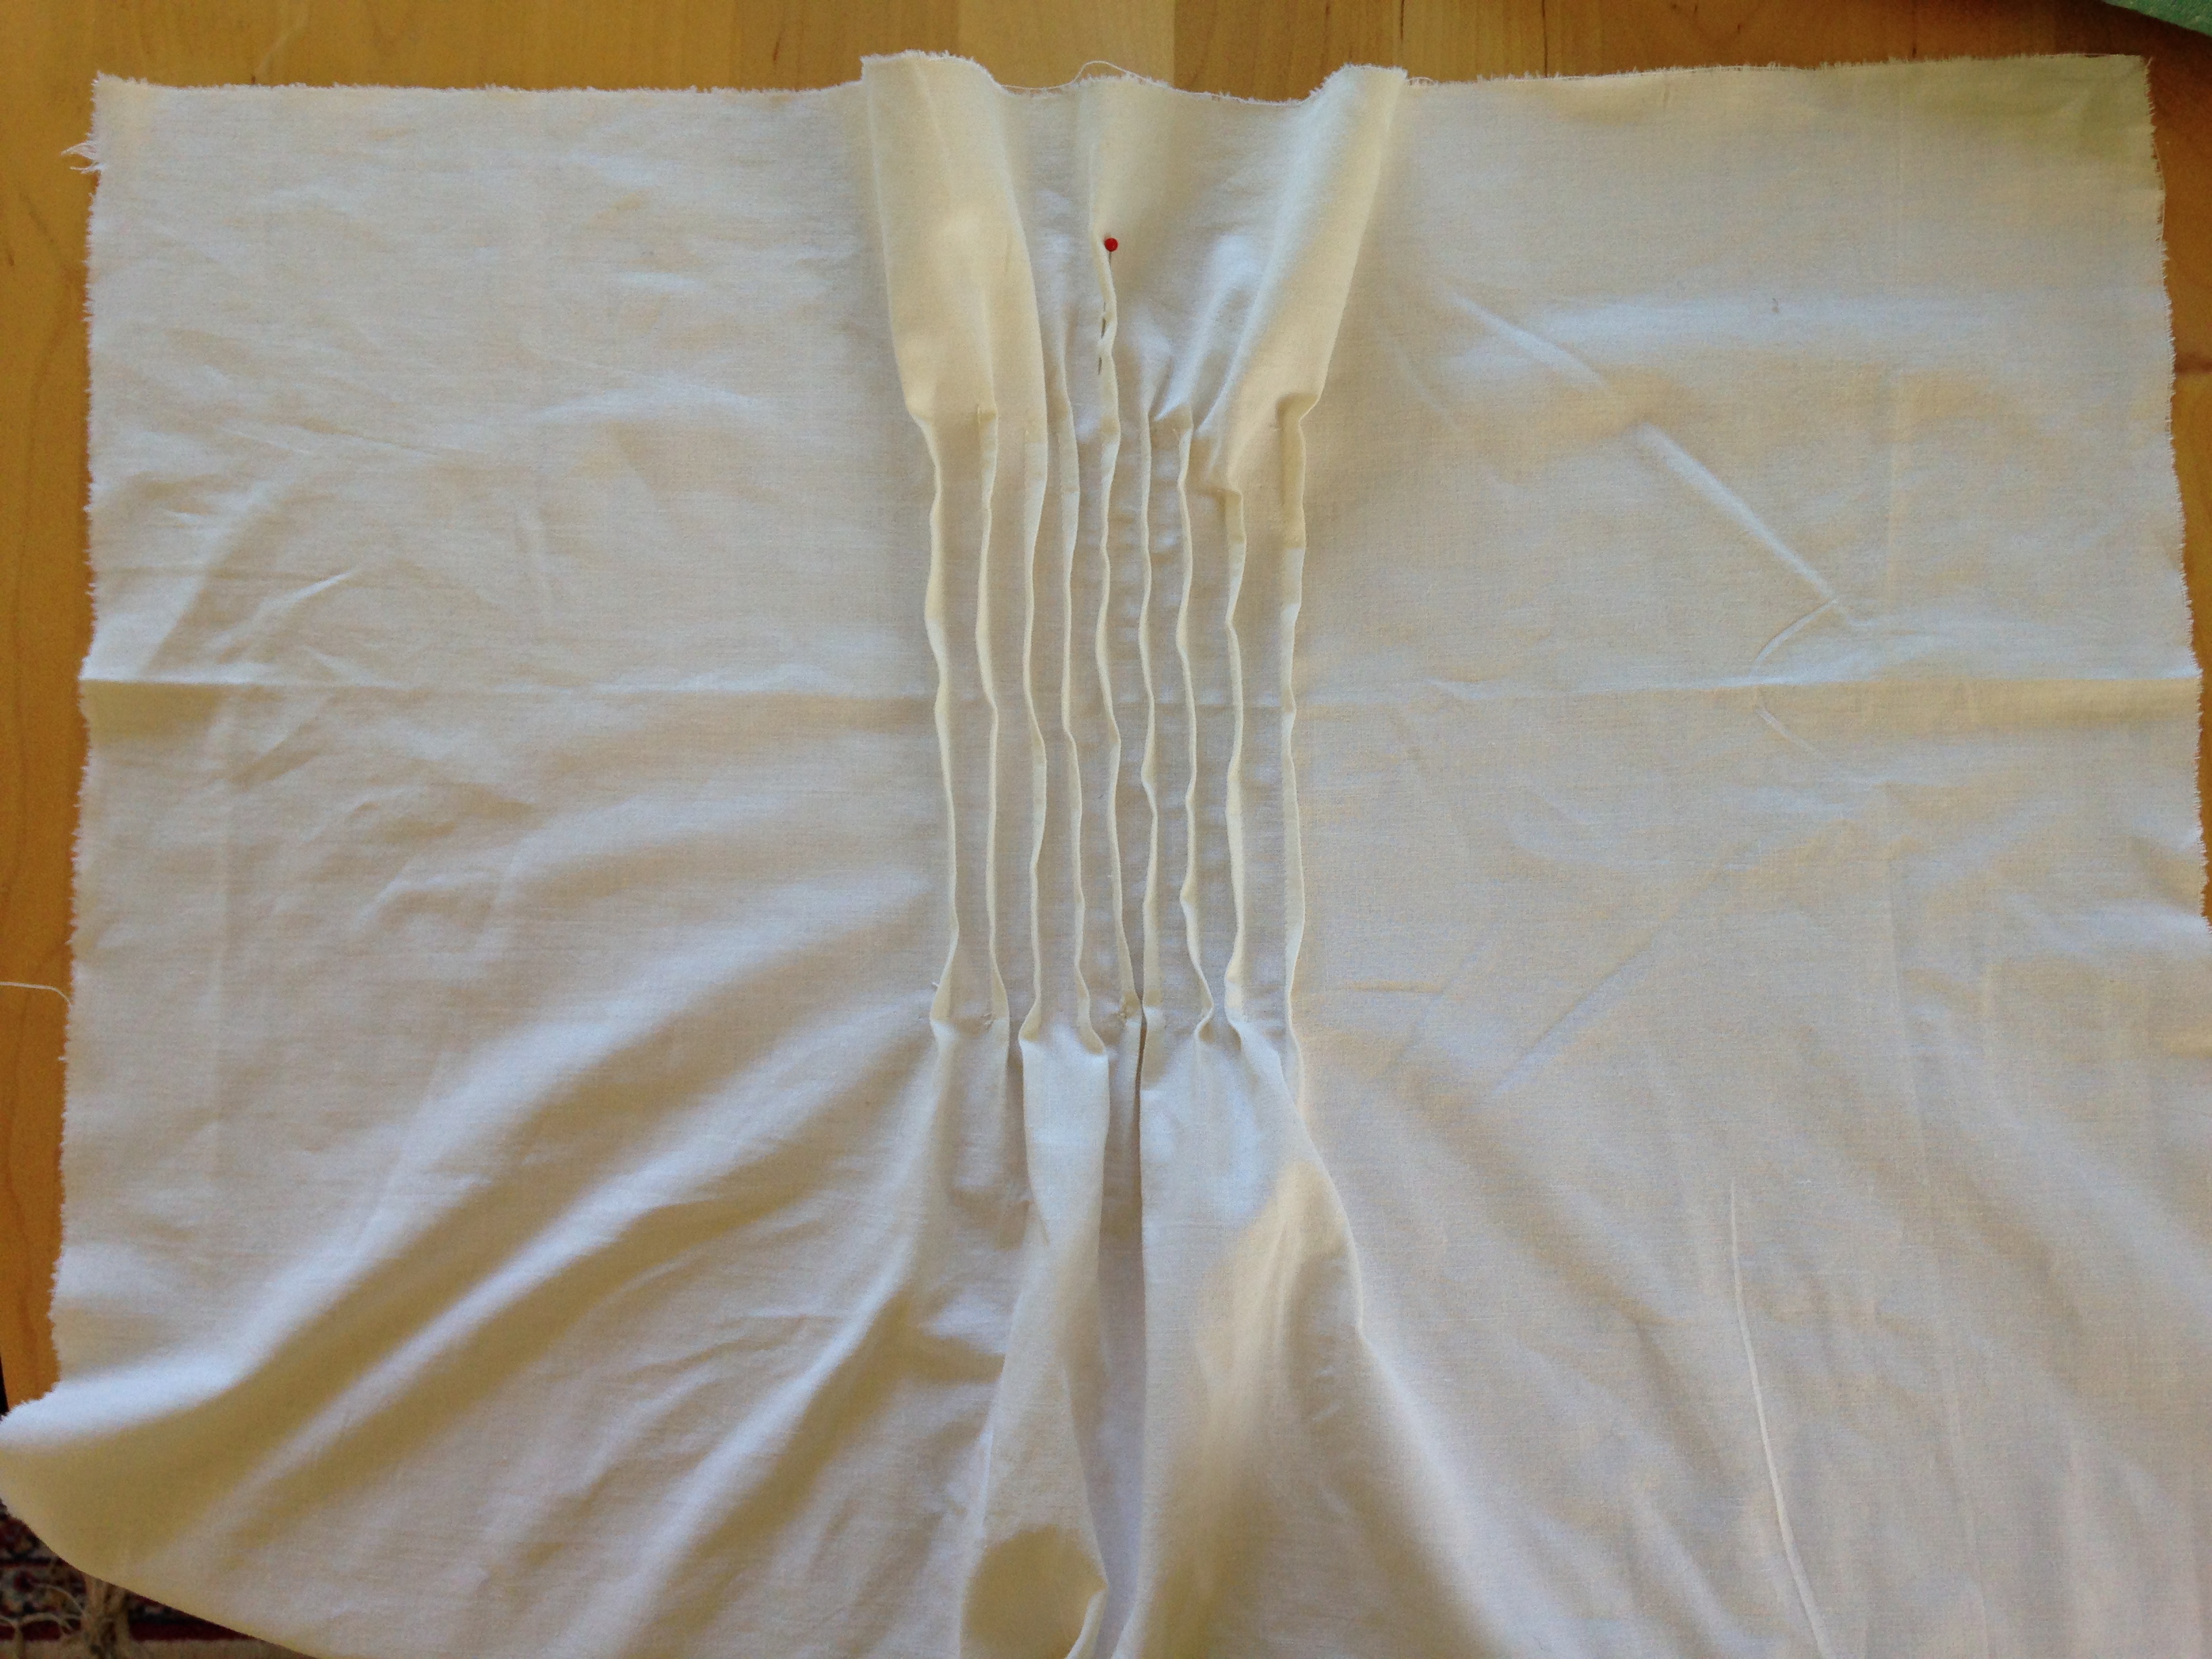
Här stryker och syr jag stråvecken. Jag tyckte att det var fint att ha 0,5 cm mellanrum mellan de grupperade stråvecken, så avståndet från befintligt veck till nästa vikning är alltså 1,5 cm. Detta stryks och sedan sys med vanlig raksöm 1 cm från den vikta kanten.
Here, I iron and sew the pin tucks. I thought it looked nice with 1/2 cm space between the pleats, so from one pin tuck to the next fold, there is 1,5 cm. This fold is ironed and then stitched with a regular straight seam 1 cm from the fold.
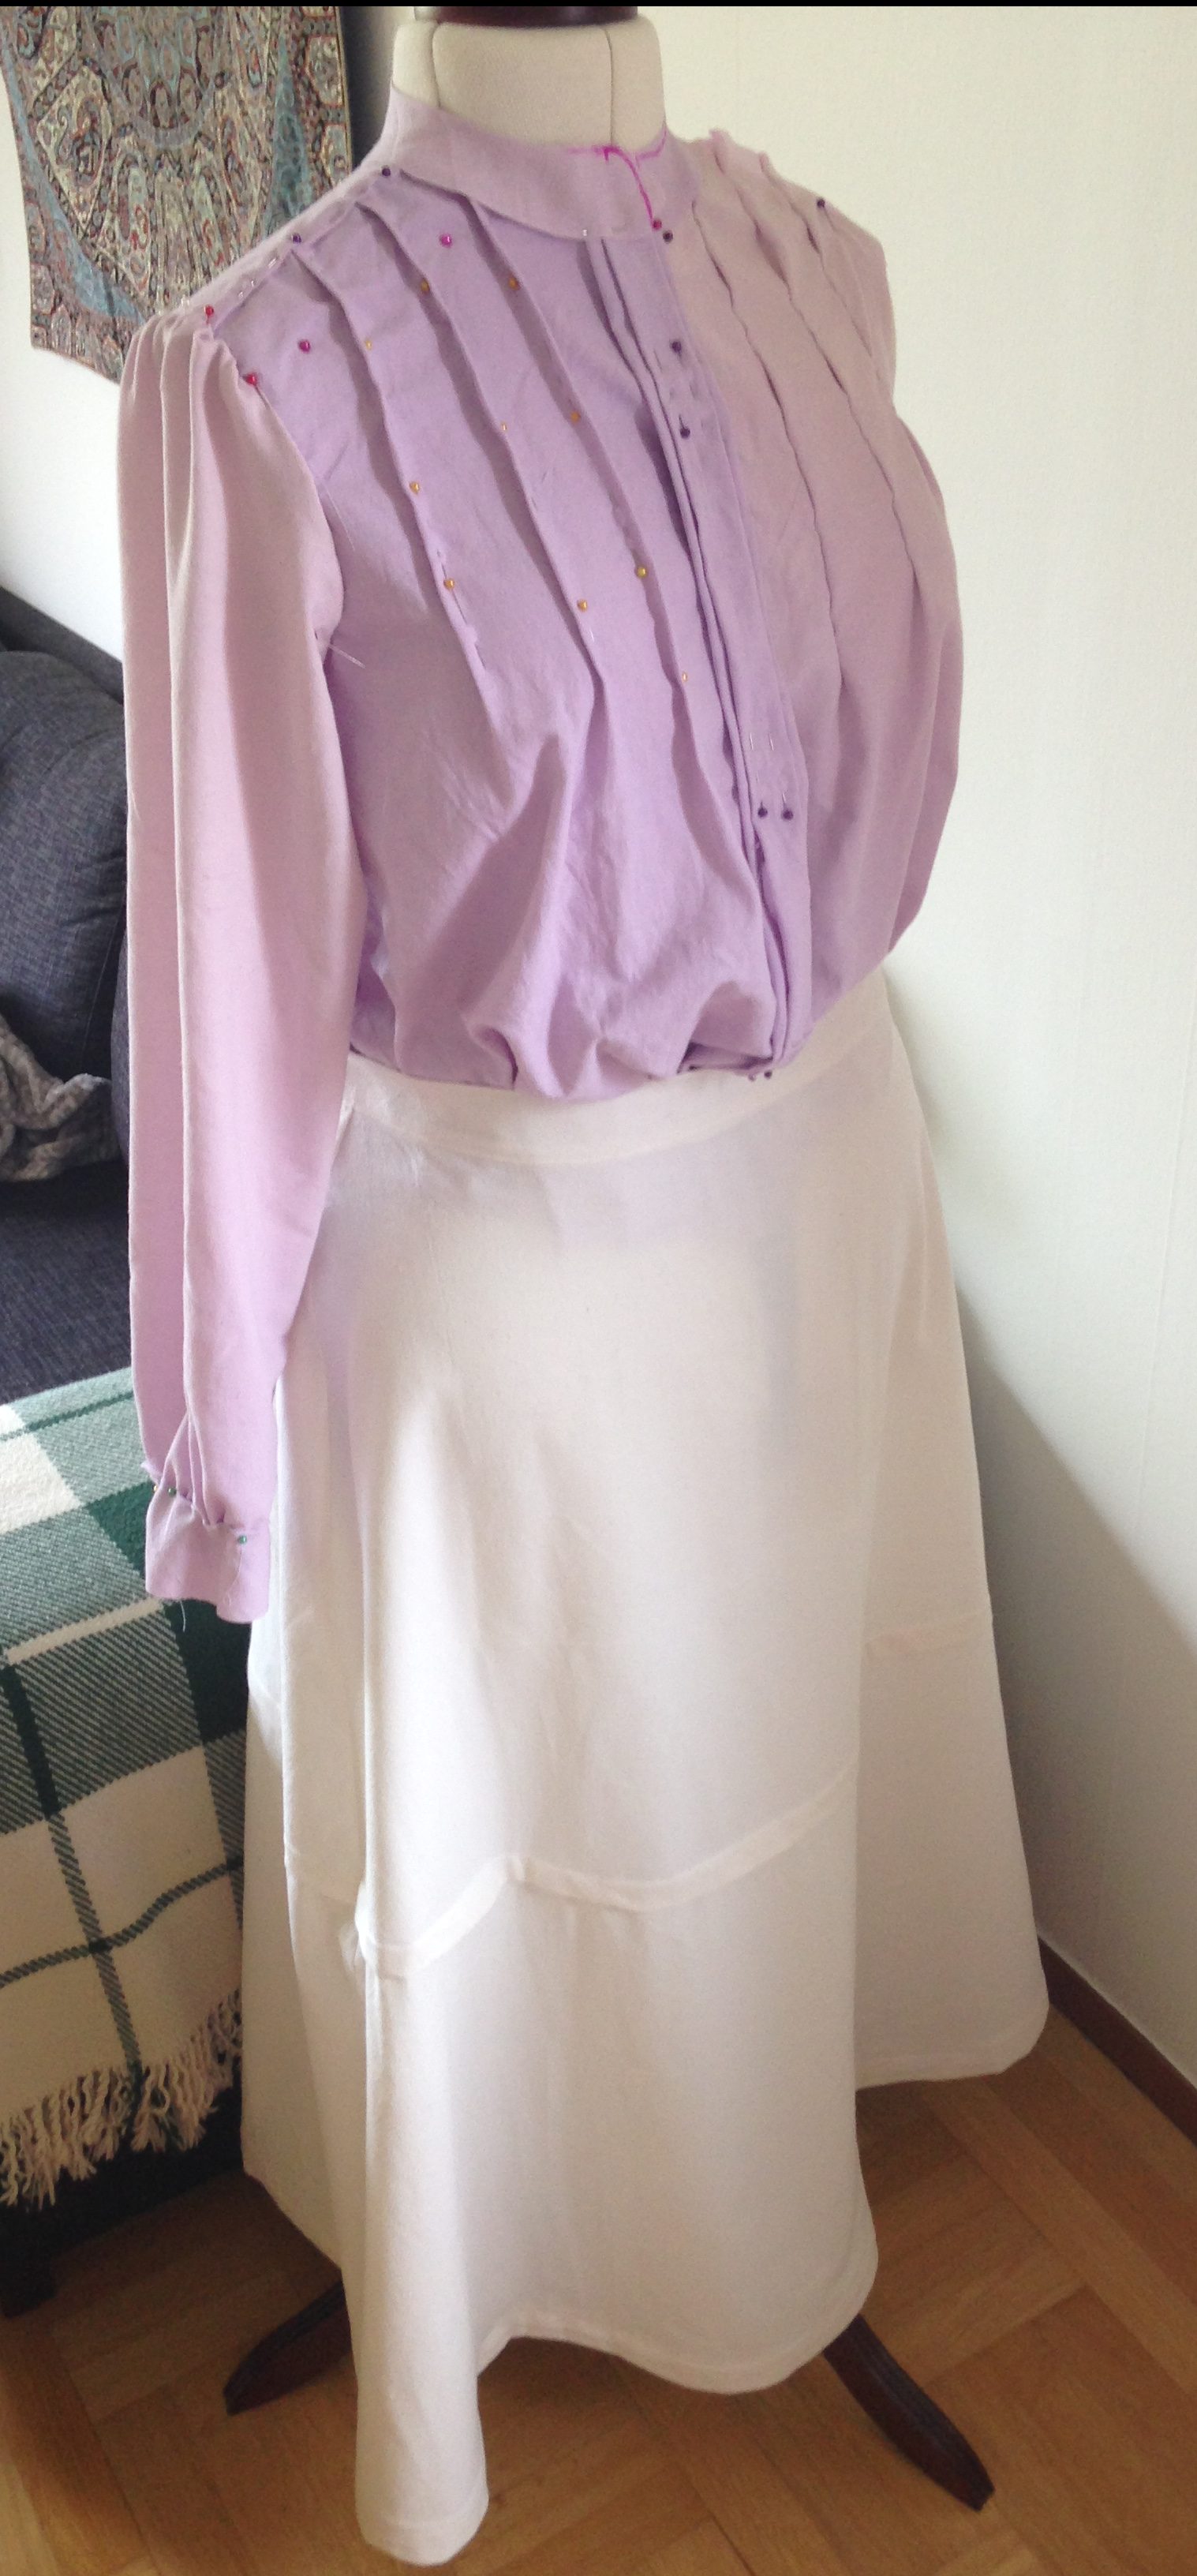
För att blusen inte skulle bli helt oformlig, satte jag in en inpassning, från bysten till botten, ca 2 cm djupt. Till höger ser du vänster framsida innan den sätts ihop med de andra delarna. Vecket längst till höger sprättades upp senare och det överflödiga tyget klipptes bort.
In order to prevent the shirtwaist from becoming totally shapeless, I made a dart from the bust to the bottom, about 2 cm deep. To the right, you see the left front part, before it is put together with the other parts. The pleat at the very right was later unpicked and the superfluous fabric was cut away.
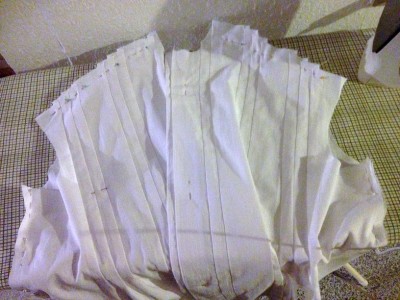
Så här såg det ut när fram- och baksida nålades samman.
This is what it looked like when I had pinned the front panels to the back panel.
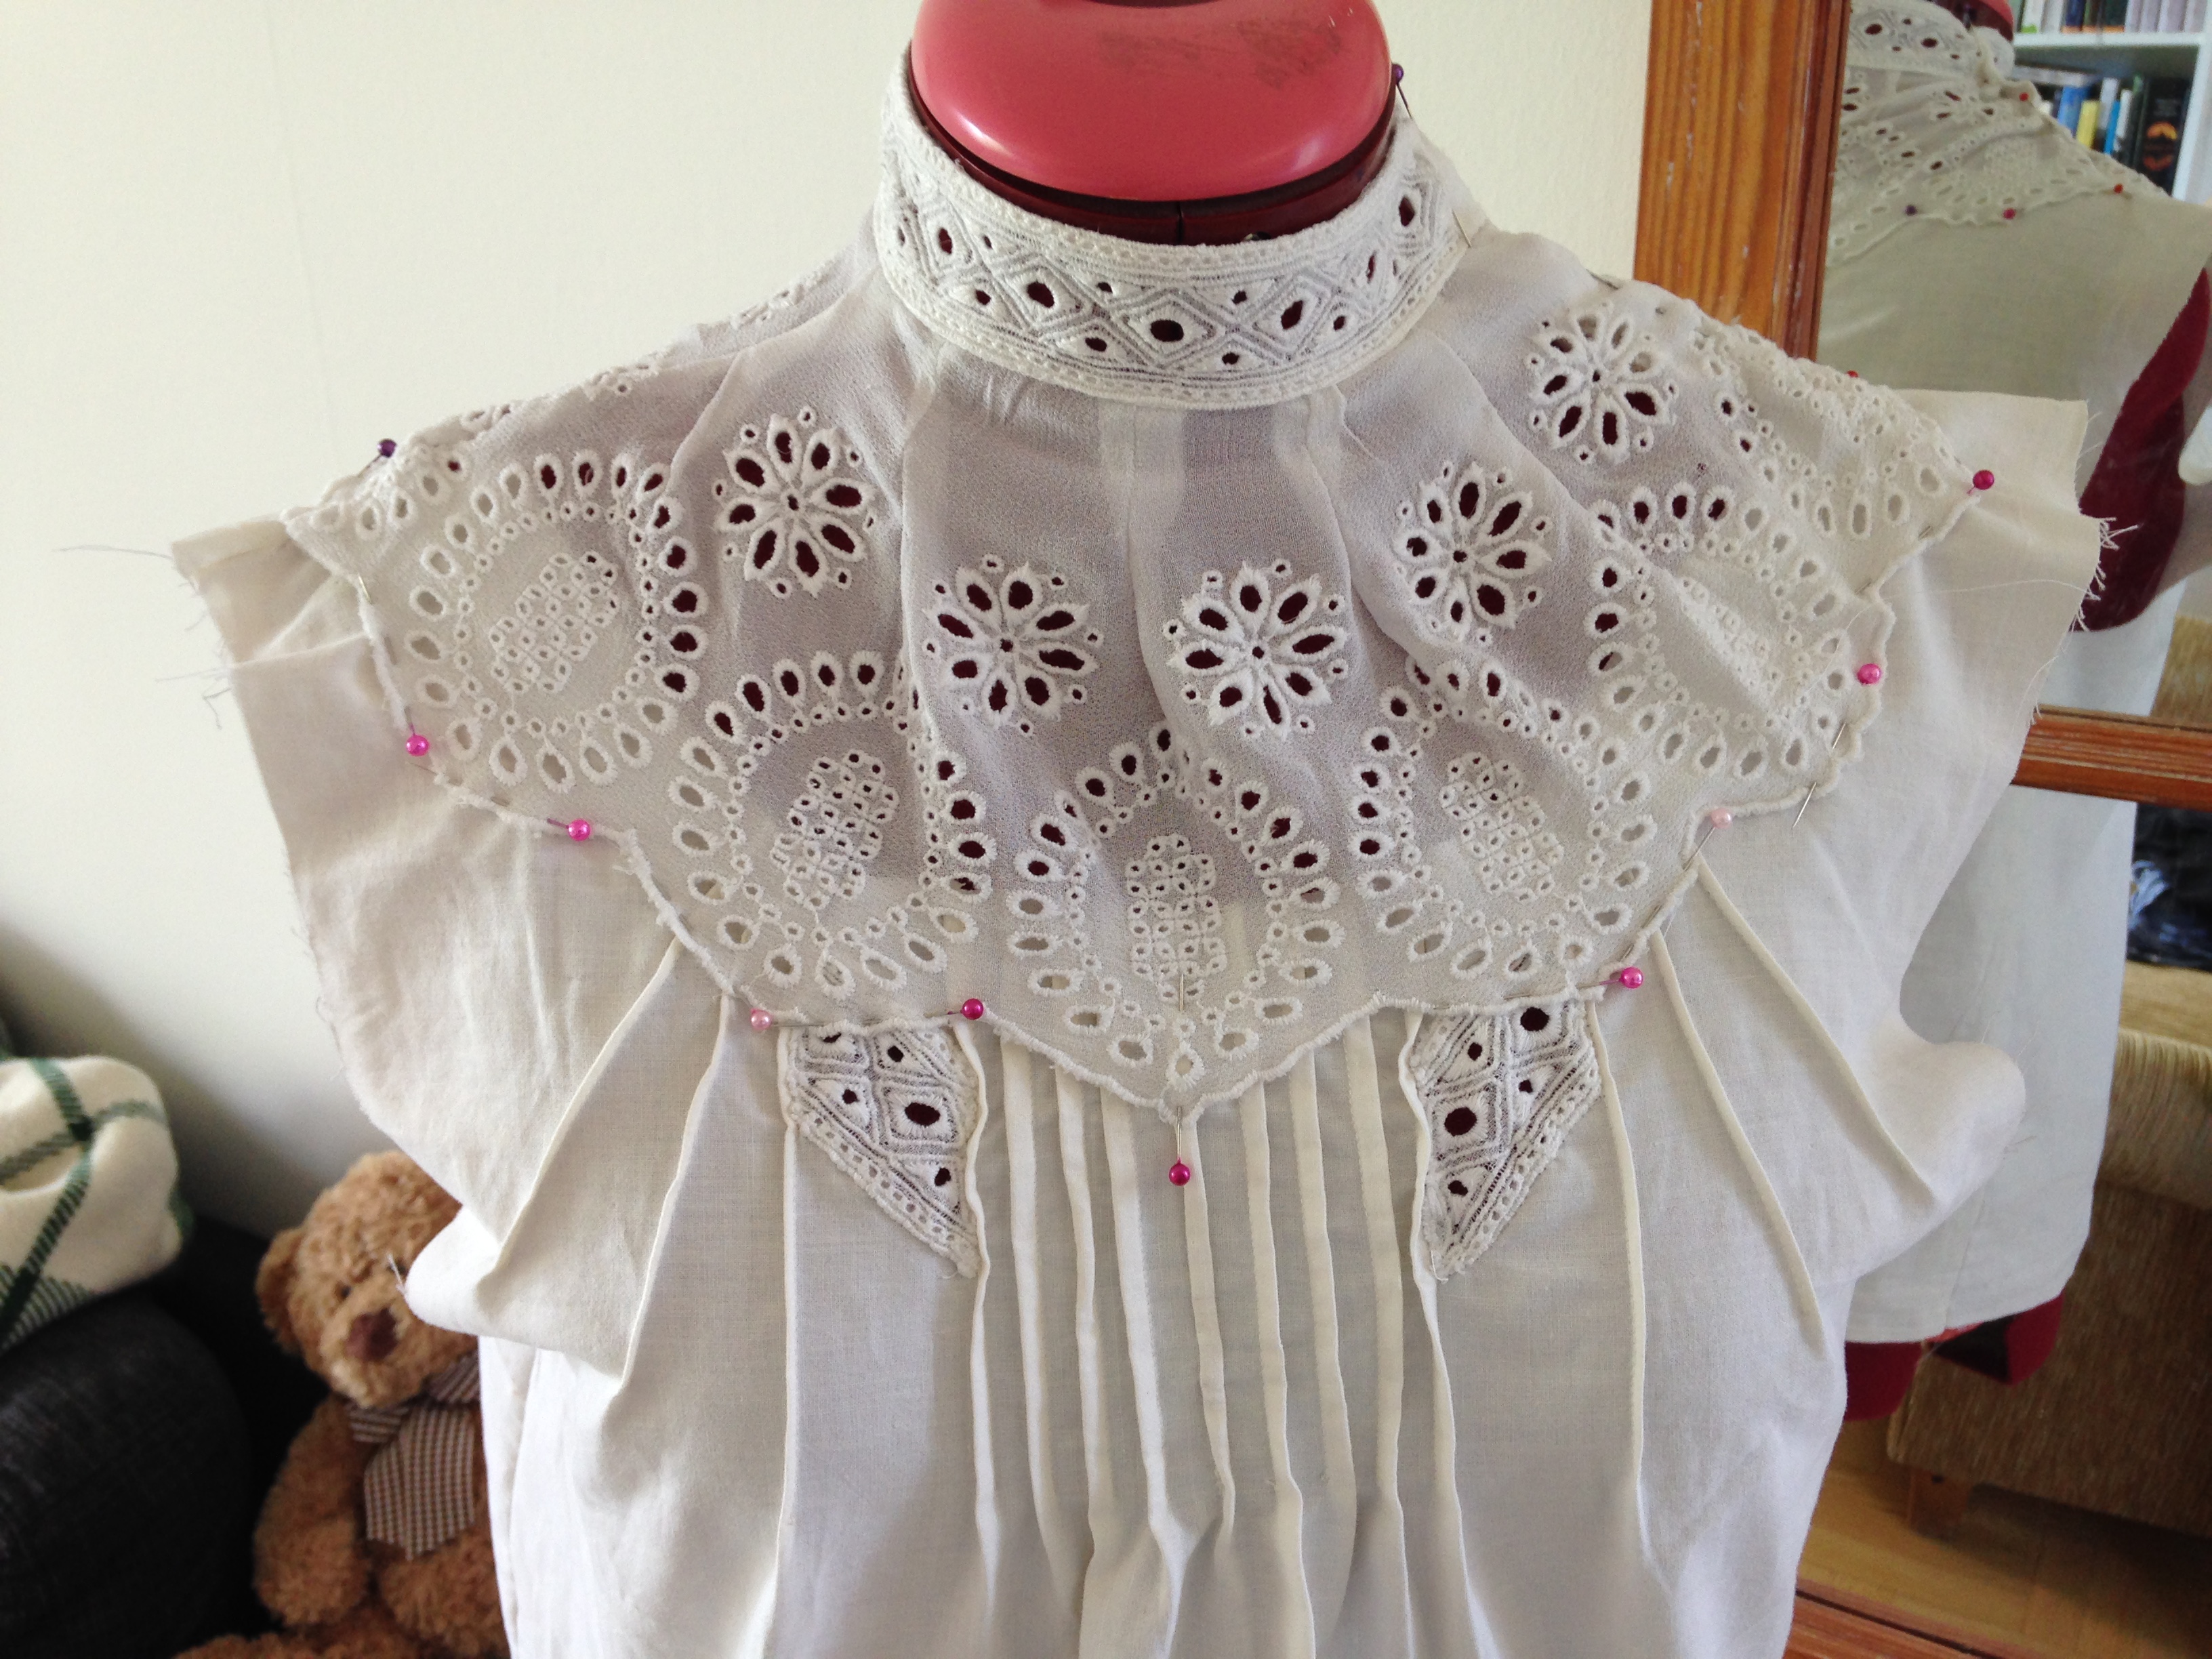
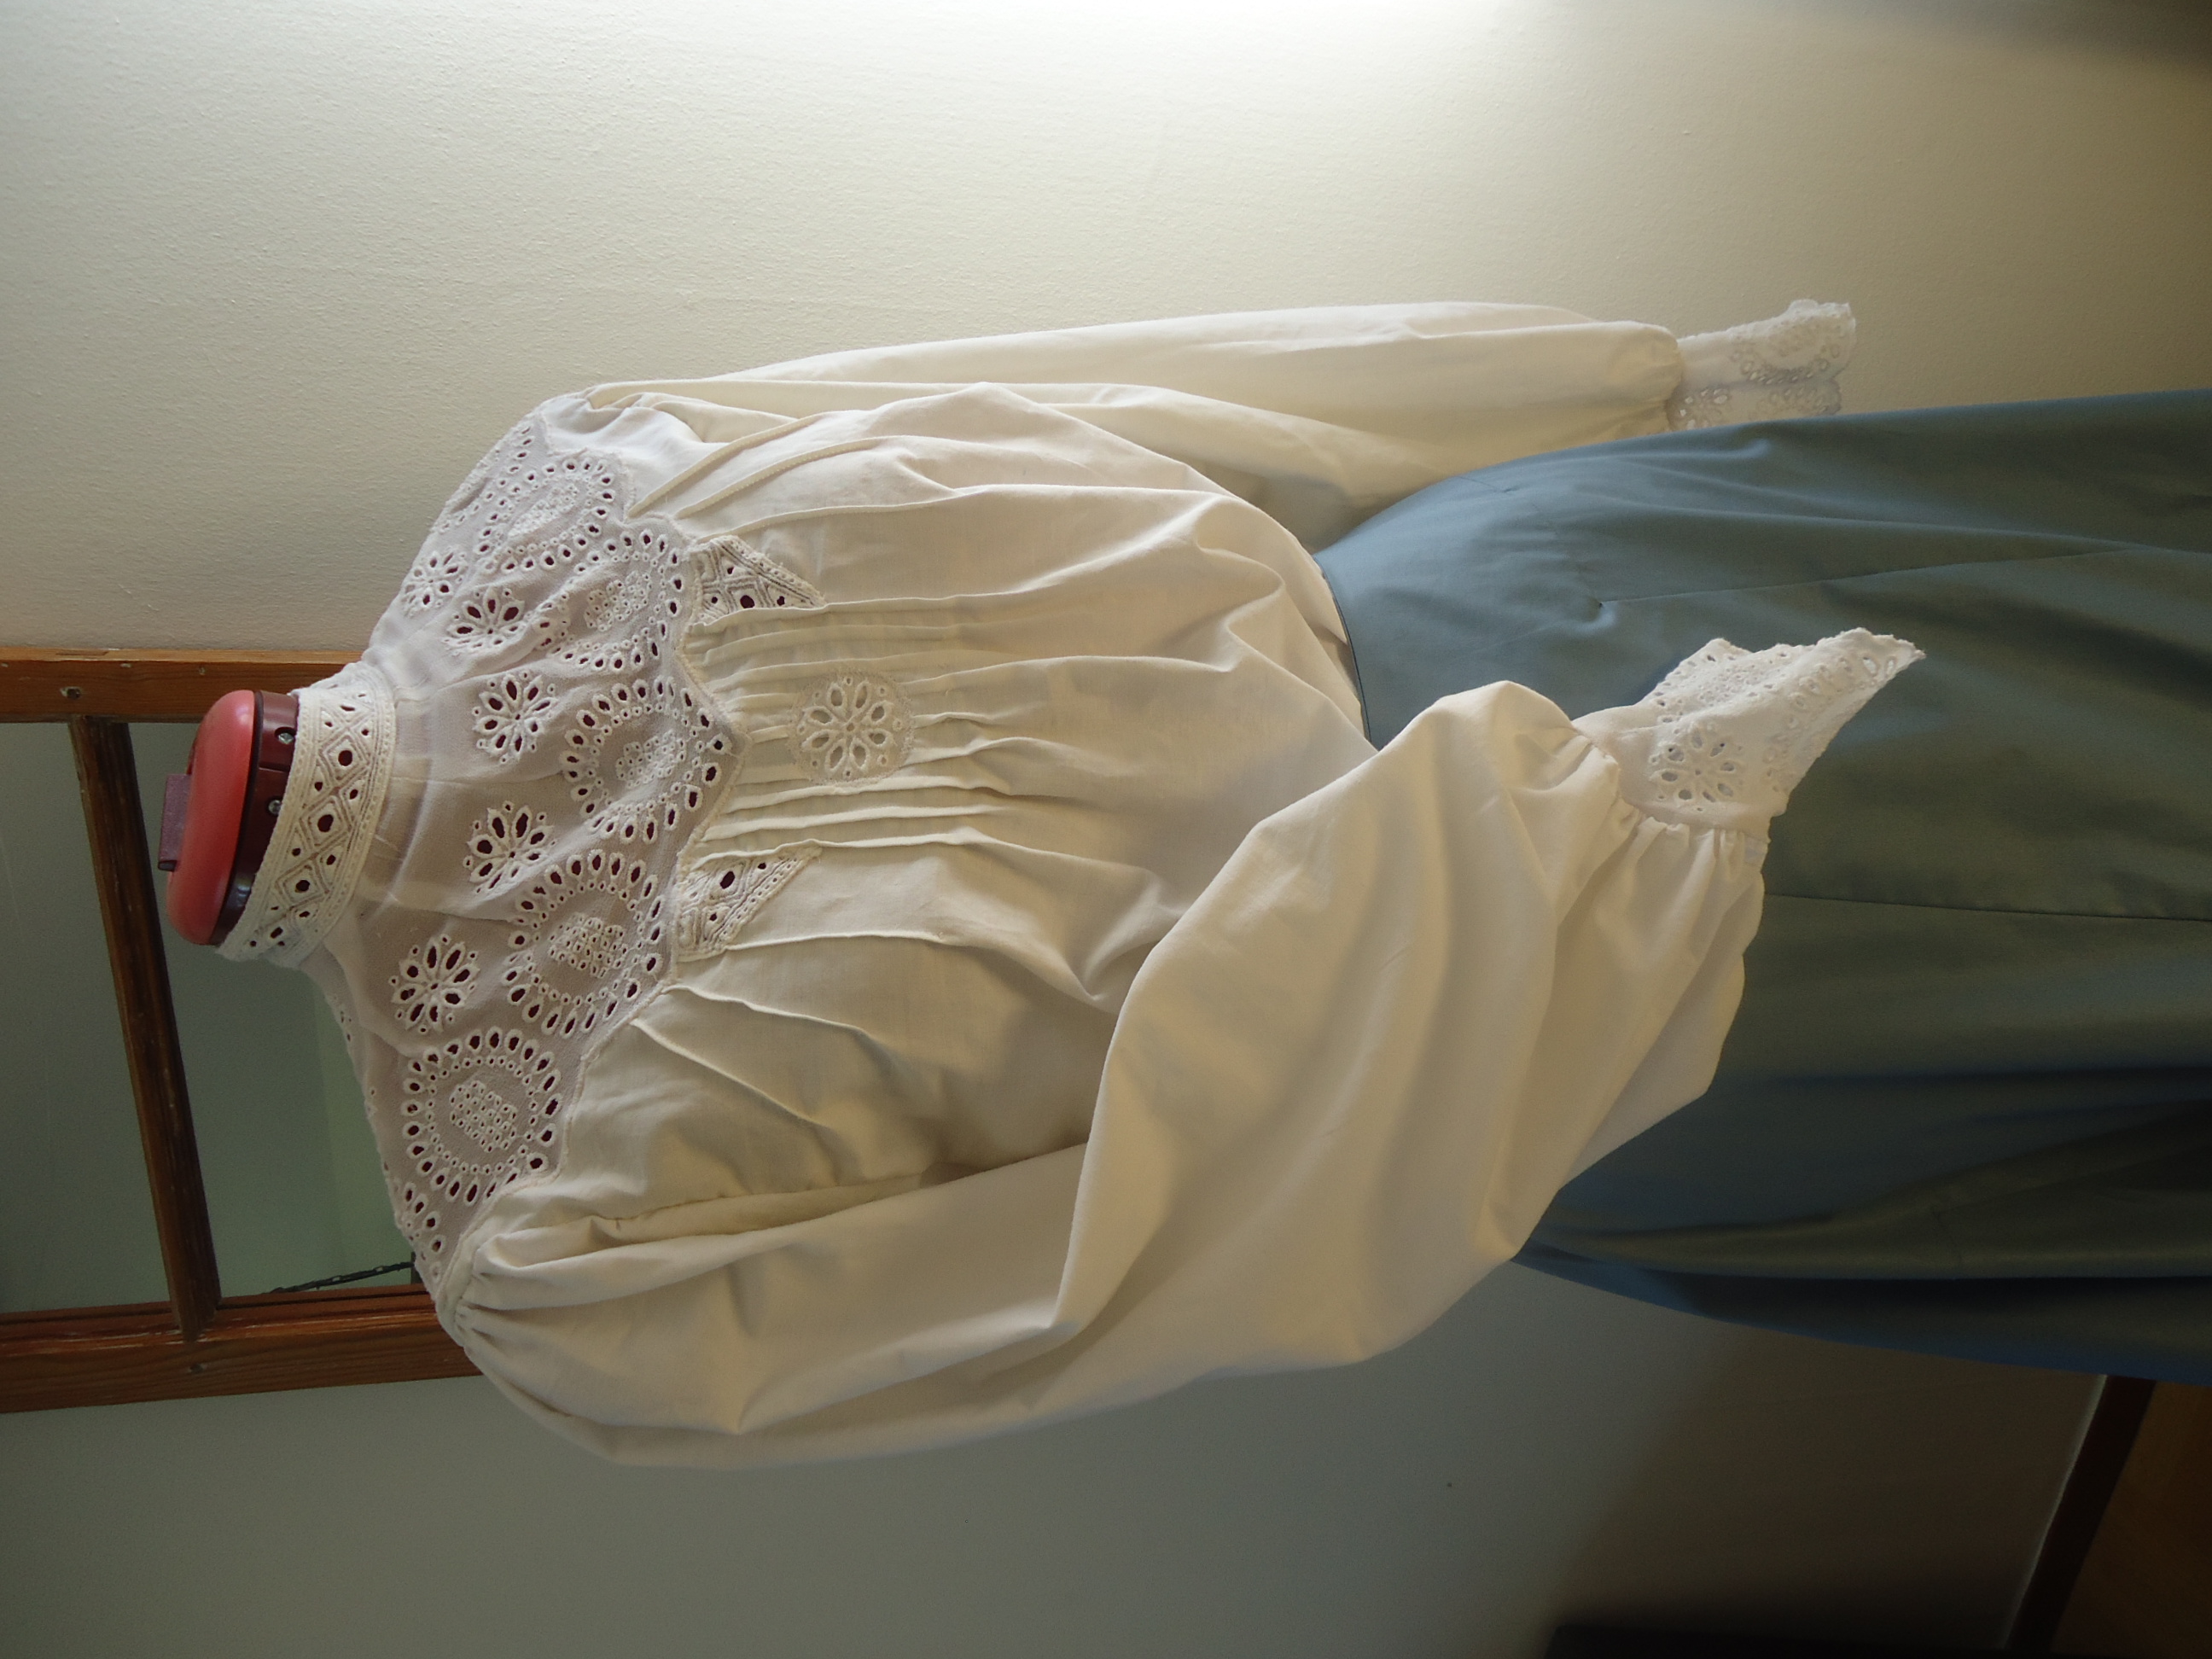
Här är ärmar fastnålade och jag experimenterar med kragen, som jag konstaterade faktiskt inte behövde rundas, men kunde vara helt rektangulär, eftersom den skulle sluta tätt runt halsen. Bredden är lika med halsens omkrets plus någon centimeters överlapp, så att man kan knäppa.
Here, the arms are pinned to the bodice and I experiment with the collar – I had expected a need for making the collar rounded, but found out that it actually would fit nicely round the neck when just left rectangular. The collar width is the same as the neck width plus some cm overlap for buttoning.
Jag sydde först längs kanterna på den nerfällda delen av kragen, vrängde, strök och la in mellan de båda styckena närmast halsen. Sedan sydde jag längs vikningskanten. Därefter strök jag igen och sedan kunde jag fästa kragen på blusen.
First I sewed along the borders of the collar on the wrong side, then turned the right side ought, ironed it and put the collar in between the standing part of the collar, closest to the neck. Then I stitched these parts together. I ironed again and then I attached the collar to the shirtwaist.
Jag märkte ut knapphålens placering med 4,5 cm avstånd, från kragens topp ned till botten.
I marked the placement of the button holes, 4,5 cm apart, from the top of the collar to the hemline.
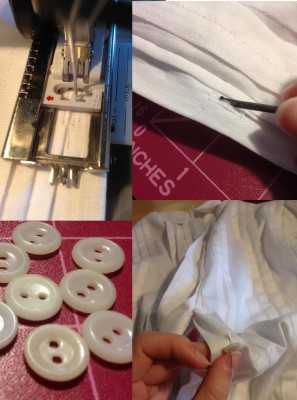
Sedan sydde jag knapphålen på maskin och fäste gamla ärvda plastknappar med motsvarande placering.
Then I sewed the button holes on machine and fastened some inherited plastic buttons accordingly.
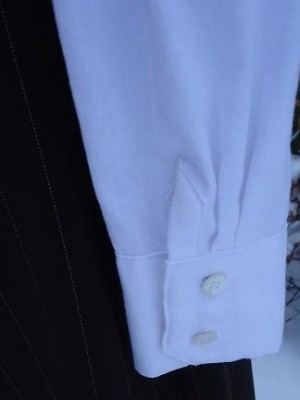
Sist av allt fållade jag nederkanten och fäste manschetterna. Jag använde ärvda knappar även till dessa, men här är de av pärlemor.
Last of all, I hemmed the bottom of the bodice and attached the cuffs. I used inherited buttons here too, but these were mother of pearl.
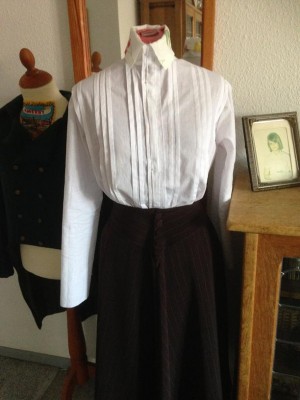
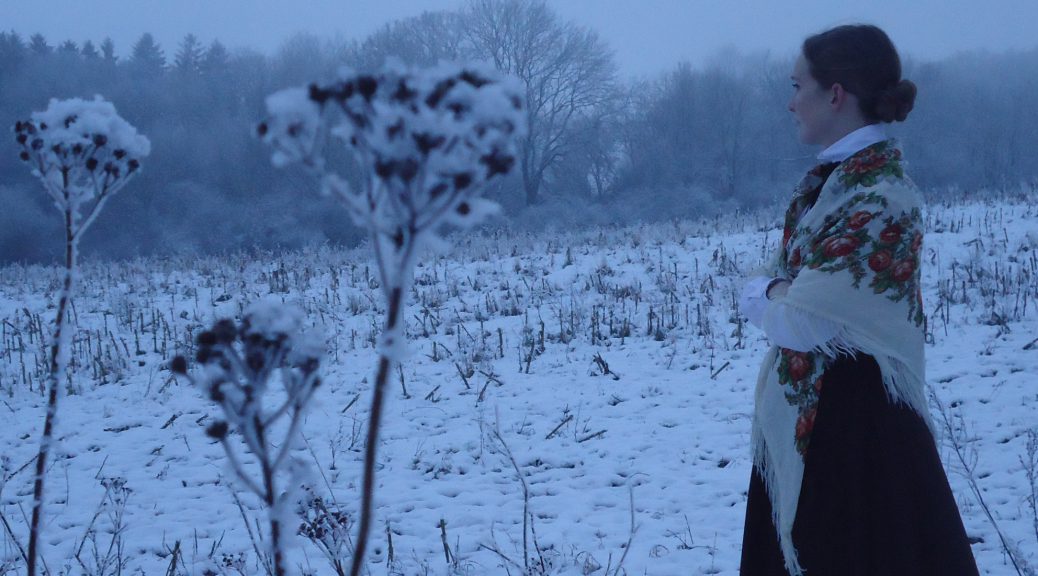
Dräkten
Självaste lärarinnan
– where you can see what I do – designing, sewing, singing, creating etc.


 Det händer då och då att jag får fantastiska gåvor, från de mest oväntade håll. Förra hösten kunde jag fullborda min kappa, tack vare en snäll medresenär som skänkte mig en vacker pälskrage. Förra sommaren fick jag flera kassar med tyger av en bekant och för någon månad sedan fick jag, förutom en ny favoritfilm, tillskickat vackra spännen för att dekorera min edwardianska dräkt. De passar inte till lärarinnekjolen, men väldigt bra till min tidigare dräkt! Tack, Ulrika!
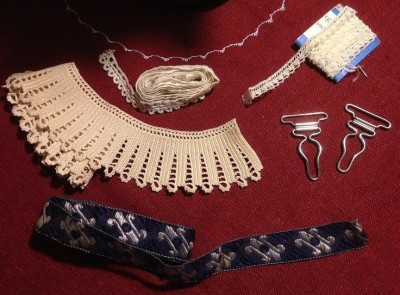


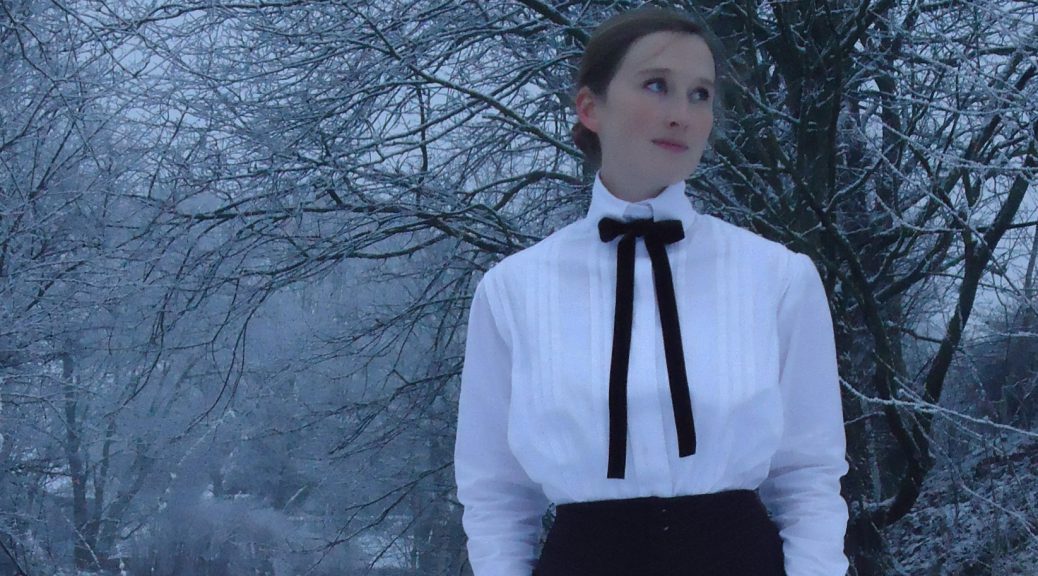
 Bilden intill ska föreställa en lärarinna, fotograferad 1914. Detta bekräftade vad jag hade hoppats på, att en proper lärarinna under första världskriget kunde fortsätta ha sina höghalsade blusar från starten av 1910-talet, trots att det verkar ha varit modernt med lägre kragar under 1914-1915.